


Audio editing can transform raw recordings into professional, polished productions that captivate listeners. From podcasts to music tracks, mastering the right techniques makes all the difference between amateur content and professional-grade audio that commands attention.
Basic audio editing techniques, such as trimming, fading, volume leveling, and noise reduction, can significantly enhance the quality of audio recordings. These foundational skills form the backbone of audio production workflows across various media. Audio editing encompasses three main types: cutting (removing unwanted segments), fading (creating smooth transitions), and mixing (balancing multiple audio elements).
The process typically begins with recording or importing audio files, then applying various modifications to improve clarity, balance frequencies, and ensure consistent volume levels throughout the production.
By learning to properly clean recordings, control dynamic range, and apply appropriate effects, you'll develop the ability to create professional-sounding audio for any purpose. The following sections will guide you through essential audio editing techniques that will transform how your content sounds and engages your audience.
Key Takeaways / TL;DR
- Mastering fundamental techniques like trimming, fading, and noise reduction lays a professional-sounding foundation.
- Proper frequency balance and equalization significantly improve clarity and listening experience.
- Effective audio editing requires both technical knowledge and creative application of appropriate effects.
1
Basic Audio Editing Techniques Overview
Audio editing involves manipulating recorded sound to achieve professional results. Establishing a consistent audio editing workflow allows you to move efficiently from raw captures to finished products. Mastering these fundamental techniques will dramatically improve your production quality.
Understanding Your Digital Audio Workstation (DAW)
Every successful audio editing journey begins with understanding your DAW. Popular options include Pro Tools for professional studios and Audacity for beginners. Many modern workstations excel at multi-track editing, allowing you to layer numerous elements simultaneously.
The interface typically consists of a timeline, tracks panel, and editing tools arranged in a toolbar. These tools are essential for both music production and podcasting. Familiarize yourself with the transport controls and the edit menu, where functions are stored.
Most DAWs follow similar principles but with different layouts and terminology. Take time to explore the waveform display, which visually represents your audio. The waveform height indicates volume, while the width shows duration.
Each track in your DAW represents a separate audio channel that can be edited independently. This allows for precise control over individual elements in your audio recording.
Setting Up Your Project For Optimal Editing
Proper project setup prevents countless headaches later. Start by setting the correct sample rate (typically 44.1kHz for music) and bit depth (24-bit is standard for editing).
Create a logical folder structure for your project files. Consider separating raw recordings, edited clips, and final masters.
Essential project organization tips:
- Use descriptive file naming conventions
- Color-code similar tracks (vocals, instruments, effects)
- Create template sessions for recurring project types
- Enable auto-save features to prevent data loss
Implement a "snap" function to align edits to grid points for precise timing. This feature is invaluable when working with music tracks that require rhythmic integrity.
Essential Keyboard Shortcuts To Speed Up Your Workflow
Keyboard shortcuts dramatically accelerate editing speed. Learning these combinations will reduce your reliance on mouse movements and menu navigation.
Common shortcuts across most DAWs:
|
Action |
Windows |
Mac |
|
Cut |
Ctrl+X |
Cmd+X |
|
Copy |
Ctrl+C |
Cmd+C |
|
Paste |
Ctrl+V |
Cmd+V |
|
Undo |
Ctrl+Z |
Cmd+Z |
|
Zoom In/Out |
Ctrl+/- |
Cmd+/- |
Customize shortcuts for your most frequently used actions. Many editors create personalized shortcut sets for different types of projects.
Recording and editing keyboard macros can further automate repetitive tasks. This allows complex editing sequences to be triggered with a single command.
Creating A Systematic Editing Process
Develop a methodical approach to audio editing rather than making random adjustments. Start by assembling rough cuts to establish the project timing and structure. Begin with broad structural changes before focusing on fine details.
Start by removing unwanted sections, such as false starts and background noise. Precision cutting and trimming at this stage are the primary tools for cleaning your timeline. This ensures a tight and professional performance.
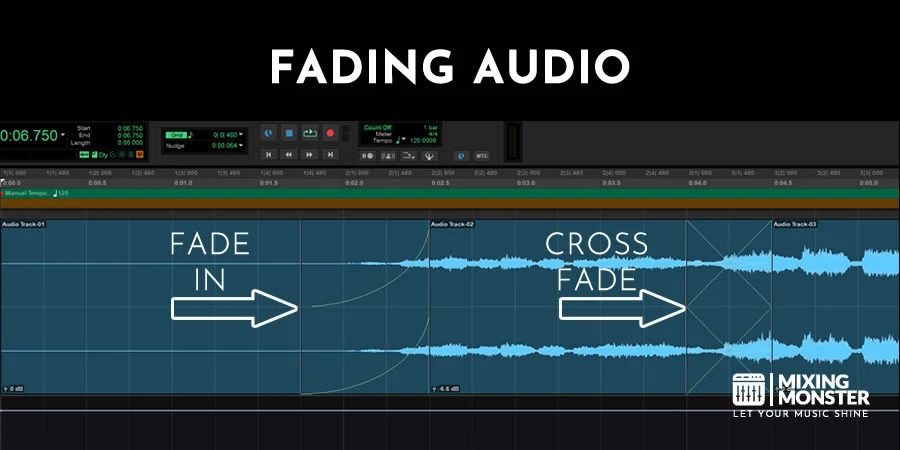
Add crossfades between edited sections to create smooth transitions. Apply a quick fade in at the start of a clip and a subtle fade out at the end. Even 10-20ms fades can eliminate potential clicks and pops at edit points.
You should adjust levels to maintain consistency throughout your project by applying normalization or compression. This ensures the listener doesn't need to adjust the volume while experiencing your content.
Follow a checklist for each editing session to ensure consistency. This might include noise reduction, timing adjustments, and final quality checks before exporting your finished audio.

2
Cleaning And Repairing Audio Recordings
Audio cleanup is essential for professional-sounding recordings. The following techniques will help you transform problematic audio into clear, professional content that enhances the listener's experience.
Noise Reduction And Background Hum Elimination
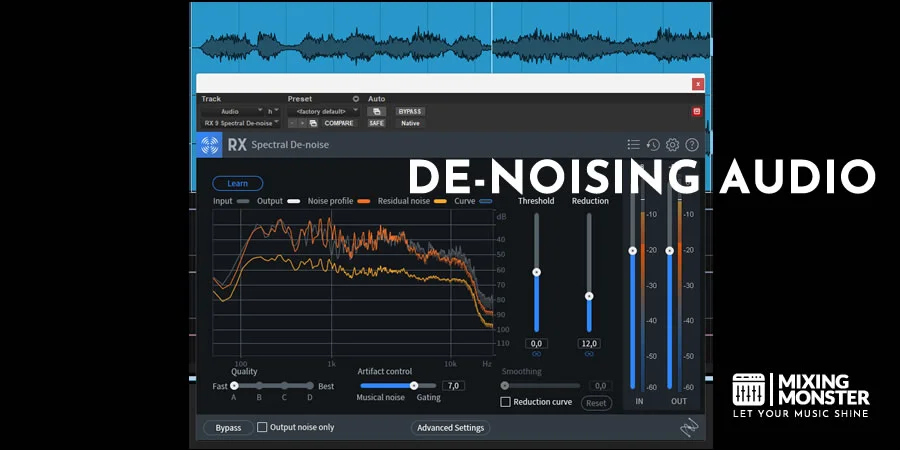
Background noise is one of the most common problems in audio recordings. Most digital audio workstations (DAWs) offer noise-reduction plugins that analyze and remove consistent background noise.
The process typically involves:
- Selecting a portion of audio that contains only the noise
- Creating a noise profile or fingerprint
- Applying the noise reduction algorithm to the entire recording
For persistent low-frequency hums (often caused by electrical interference), use a high-pass filter set to 80-100 Hz. This can eliminate rumble without affecting voice frequencies.
More advanced tools, such as spectral noise reduction, allow you to target specific frequency ranges where the noise occurs. Start with subtle reduction (6-10 dB) to avoid over-editing, which can introduce digital artifacts that make the audio sound unnatural.
Removing Pops, Clicks, And Mouth Sounds
Mouth noises and technical glitches can distract listeners. Mouth De-click tools specifically target these issues.
For plosives (p, b, t sounds that cause bursts of air), use a De-plosive tool or manually reduce the problem areas. You can identify these visually as large spikes in the waveform.
Click removal works by detecting and smoothing sudden transients in the audio. For manual removal:
- Zoom in on the problematic area
- Select just the click (usually 5-20 milliseconds)
- Apply a crossfade or automatic click repair function
In severe cases, spectral repair lets you visualize and "paint out" unwanted sounds on a frequency graph. This is particularly effective for removing coughs, page turns, or other discrete noises.
Discover Best Audio Gear & Equipment


De-Essing Techniques For Smoother Vocal Recordings
De-essing reduces excessive sibilance—the harsh "s," "sh," and "z" sounds that can be unpleasant at high volumes. These typically appear in the 4-10 kHz frequency range.
A dedicated de-esser plugin works as a frequency-specific compressor that only activates when sibilant sounds exceed a threshold. Key settings include:
Threshold: Determines how sensitive the de-esser is to sibilant sounds
Frequency range: Targets the specific frequencies where sibilance occurs
Reduction amount: Controls how much the sibilance is attenuated
Start with gentle settings (2-4 dB reduction) and adjust as needed. Too much de-essing can make speech sound lispy or unnatural. Split-band de-essing, which processes only the selected frequencies, generally produces more natural results than full-band techniques.
Room Tone And Ambience Management
Room tone refers to the natural ambient sound of the recording environment. Managing it properly creates cohesive audio without jarring transitions.
Always record 30-60 seconds of empty room tone during sessions. This "silence" can be used to:
- Fill gaps in editing
- Create natural-sounding transitions
- Provide a consistent ambient bed
For recordings with inconsistent ambiance, noise gates can help. Set the threshold just above the ambient noise level so the gate closes during pauses in speech.
When recording in reverberant spaces, use acoustic treatment or record in a more controlled environment. For fixing existing recordings, de-reverb plugins can reduce room reflections—these work by analyzing the reverb pattern and applying inverse processing to minimize its effects.
3
Mastering Dynamic Range Control
Dynamic range control shapes the difference between the loudest and quietest parts of your audio. Effective management of this range is crucial for creating mixes that sound professional on all playback systems while maintaining the intended emotional impact of your music.
Compression Basics: Thresholds, Ratios, And Release Times
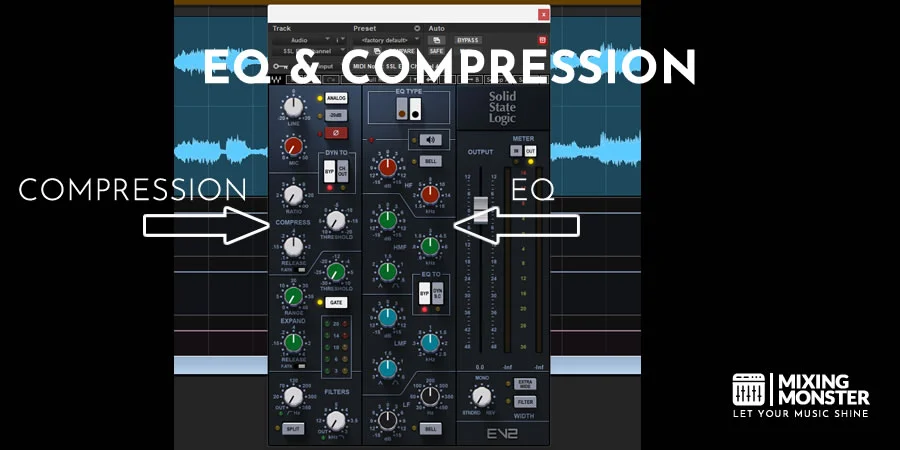
A compressor reduces dynamic range by attenuating signals that exceed a set threshold. The threshold determines at what level compression begins, while the ratio controls the amount of reduction. For example, a 4:1 ratio means for every 4dB over the threshold, only 1dB passes through.
Attack time controls how quickly compression engages after the threshold is crossed. Faster attack times (1-10ms) catch transients but may dull percussive elements. Slower attacks (10-50ms) preserve initial transients while still controlling overall dynamics.
Release time determines how quickly the compressor stops working after the signal falls below the threshold. Too fast can cause pumping effects, while too slow might suppress subsequent audio events. Generally, release times between 50-300ms work well for most materials.
To avoid over-compression, use your ears and meters together. Watch for signs of over-compression, such as a lack of punch or unnatural volume fluctuations, which can diminish the impact of your mix.
Using Limiters To Prevent Audio Clipping
Limiters are specialized compressors with high ratios (typically 10:1 or higher) that prevent signals from exceeding a ceiling value. They're essential for maximizing perceived loudness while preventing digital clipping.
When setting a limiter, start with a ceiling of -0.3 dB to prevent intersample peaks. Limiting is a vital part of the mastering chain to keep audio from peaking. Gradually lower the threshold until you achieve the desired loudness without sacrificing quality. Modern digital limiters often include lookahead functionality to manage peaks.
Various loudness standards, such as LUFS, help ensure your masters translate well across platforms. Precise volume adjustment throughout the mix ensures that no single element overpowers the master. Streaming services typically normalize to around -14 LUFS integrated.
Metering tools are invaluable for monitoring both peak levels and loudness. A good limiter workflow involves checking peak reduction meters and ensuring you're not consistently reducing by more than 3-6 dB to maintain dynamic integrity.
Your Song Mixed & Mastered By Mixing Monster


Expansion And Gates For Noise Management
Expanders increase dynamic range by attenuating signals below a threshold. Gates are extreme expanders that completely silence audio below the threshold, making them ideal for removing background noise between vocal phrases or drum hits.
Key parameters include the threshold (where expansion begins), the ratio (the extent of expansion), and the range (the maximum reduction). For subtle noise reduction, try gentle expansion ratios of 1:1.2 to 1:1.5.
The attack and release settings are crucial for natural-sounding results. Too fast can cause choppy artifacts, while too slow might let unwanted sounds through. Start with medium settings (attack: 5-10ms, release: 50-100ms) and adjust to taste.
For drums, gates with fast attack times preserve transients while cleaning up bleed between microphones. On vocals, a gentler expansion with a moderate range setting (10-15 dB) can reduce room noise without creating unnatural silences.
Parallel Compression For Fuller Sound
Parallel compression (also called New York compression) blends an unprocessed signal with a heavily compressed version of the same material. This technique preserves transients while adding density and sustain to your mix.
To implement parallel compression, create an aux send from your track to a bus, then add a compressor with aggressive settings: a low threshold, a high ratio (4:1 to 10:1), a fast attack, and a moderate release. Then blend this compressed signal back with the original.
This approach is particularly effective for improving dynamic range perception while maintaining impact. Drums, vocals, and bass are often the most likely to benefit from this technique. The ratio between dry and compressed signals determines how punchy or dense the result will sound.
Dynamic masters often employ parallel processing to achieve louder mixes while preserving transients. Try different compressor types—FET compressors add aggression while optical compressors provide smoother characteristics.

4
Frequency Balance And Equalization
Equalization is a fundamental technique for creating professional-sounding mixes. By adjusting specific frequencies within your audio, you can create clarity, fix problems, and ensure different elements work together harmoniously.
Identifying Problem Frequencies In Your Recordings
Effective equalization starts with recognizing frequency issues in audio. Engineers should train their ears to identify common problems, such as muddiness (excessive low-mids around 200-500 Hz) or harshness (too much high-frequency content around 2-5 kHz).
A spectrum analyzer provides visual feedback of frequency distribution, making it easier to spot imbalances that might be difficult to hear. Most DAWs include built-in analyzers that display real-time frequency content.
The most effective approach combines analytical listening with visual tools. Try the "sweep and destroy" technique: boost a narrow band with a high Q value and sweep through frequencies until problem areas become obvious.
Reference tracks are invaluable for comparison. Professional mixes in similar genres demonstrate appropriate frequency balance and can guide your decisions when identifying problem areas in your own recordings.
High-Pass And Low-Pass Filtering Techniques
High-pass filters (HPFs) remove unnecessary low-frequency content by attenuating signals below a chosen cutoff frequency. This technique is essential for cleaning up recordings and creating space in a mix.
Common HPF Applications:
- Vocals: 80-120 Hz to remove rumble
- Electric guitars: 80-100 Hz to reduce mud
- Overhead drums: 150-200 Hz to focus on cymbals
- Background vocals: 120-150 Hz for clarity
Low-pass filters (LPFs) operate in the opposite direction, removing frequencies above a cutoff frequency. They're valuable for taming harshness and controlling high-frequency energy.
The slope setting (measured in dB/octave) determines how aggressively the filter cuts frequencies. Gentler slopes (6-12 dB/octave) sound more natural, while steeper slopes (18-24 dB/octave) create more dramatic effects or solve serious problems.
When working in mono or stereo, remember that filtering affects the spatial character of your mix. Extreme filtering can diminish stereo width.
Related Articles
Parametric EQ For Precise Sound Sculpting
Parametric EQs offer maximum control with three primary parameters: frequency (which frequency to adjust), gain (how much to boost or cut), and Q/bandwidth (how wide or narrow the affected range).
For correcting frequency imbalances, use narrow Q values (0.5-1.5) when cutting problem frequencies. This surgical approach removes specific issues without affecting the overall tone.
When boosting frequencies to enhance characteristics, wider Q values (1.5-3.0) typically sound more musical and natural. This prevents the creation of artificial-sounding spikes in the frequency spectrum.
Key Frequency Ranges For Common Instruments:
- Kick drum punch: 80-100 Hz
- Vocal presence: 2-5 kHz
- Snare snap: 5-8 kHz
- Bass guitar clarity: 800-1000 Hz
Modern parametric EQs often include visual feedback that displays the frequency content, making it easier to identify where adjustments are needed. These tools combine the art of listening with technical precision.
Frequency Balance Between Multiple Audio Sources
Achieving proper frequency balance across multiple tracks requires a strategic approach to mixing. Each element needs its own frequency space to maintain clarity and definition.
Frequency masking occurs when two sounds compete in the same frequency range. For example, bass guitars and kick drums both occupy low frequencies, which can create mud if not properly managed.
Techniques for managing frequency conflicts:
- Complementary EQ - Cut frequencies in one sound that you boost in another
- Sidechain EQ - Dynamically reduce frequencies in one track when another plays
- Frequency splitting - Assign different frequency ranges to different elements
Consider the stereo field when balancing frequencies. Panning can separate elements competing for similar frequency ranges, creating width while maintaining clarity.
Remember that frequency balance isn't static throughout a song. Good mixers automate EQ changes to accommodate different arrangement sections, ensuring the mix remains clear whether sparse or dense.

5
Time-Based Audio Editing Techniques
Time-based editing is fundamental to creating professional audio productions. These techniques enable precise control over the timing, duration, and synchronization of audio elements, helping producers create seamless, engaging content.
Cutting, Trimming, And Arranging Audio Segments
Audio editing begins with the basic but essential skills of cutting, trimming, and arranging segments. Modern Digital Audio Workstations (DAWs) provide precise tools for these operations.
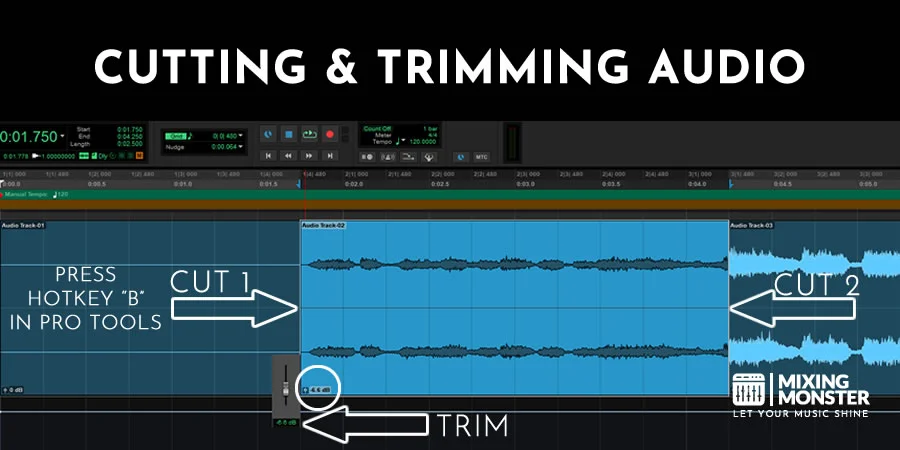
To cut audio effectively, use the razor or split tool at zero-crossing points to avoid unwanted clicks or pops. This technique is particularly important when editing dialogue or vocal recordings.
Trimming involves removing unnecessary sections from the beginning or end of a clip. The trim tool allows you to adjust clip boundaries without affecting the original file. This non-destructive approach preserves your source material.
When arranging audio segments, work with a timeline grid aligned to your project's tempo. For dialogue editing and ADR (Automated Dialogue Replacement), proper arrangement ensures natural speech patterns and seamless integration with video elements.
For precise control, utilize nudge commands to shift audio in small increments, often measured in milliseconds or frames. This helps align audio events with visual cues or other audio parts.
Crossfading Between Clips For Seamless Transitions
Crossfades are essential for creating smooth transitions between audio segments. They gradually decrease the volume of one clip while increasing the volume of another, eliminating abrupt changes.
There are three primary types of crossfades:
- Equal Power: Maintains consistent perceived volume throughout the transition
- Equal Gain: Linear fade that may result in a slight dip in perceived volume
- S-Curve: Provides faster transitions at the beginning and end with a smoother middle section
The ideal crossfade duration depends on your material. For speech, shorter crossfades (5-20ms) often work best. Musical transitions might require longer fades (50-500ms) to sound natural.
Automated batch crossfading can save time when working with multiple edit points. Most DAWs allow you to select multiple regions and apply uniform crossfades simultaneously.
For enhanced control, adjust the fade shapes individually to match the acoustic characteristics of your audio. This creates more natural audio transitions between segments.
Time Stretching And Pitch Correction Methods
Time-stretching allows you to modify the duration of audio without affecting its pitch. This technique is invaluable for fitting audio to specific time constraints or synchronizing with video.
Modern algorithms offer several time-stretching methods:
- Elastic Audio: Preserves transients while stretching sustained portions
- Warp: Maps audio to a tempo grid through multiple warp markers
- Flex Time: Analyzes and manipulates audio based on its characteristics
Pitch correction works in conjunction with time-stretching. Algorithms like Auto-Tune and Melodyne can adjust pitch while maintaining timing, or correct timing while maintaining pitch.
When editing commercials or promotional content, time-stretching helps fit audio precisely into 15-, 30-, or 60-second slots. Start by identifying logical edit points, then apply gentle stretching to avoid artifacts.
For optimal results, limit time-stretching to ±10% of the original duration. More extreme changes typically introduce noticeable artifacts that can diminish audio quality.
Working With Markers And Regions
Markers serve as critical reference points in audio editing, allowing for quick navigation and synchronization. They can indicate important moments, edit points, or sections requiring attention.
Different types of markers serve various functions:
- Timecode markers: Sync audio to specific video frames
- Tempo markers: Indicate tempo changes in musical compositions
- Comment markers: Provide notes about specific locations
- Cycle markers: Define regions for looping or repeated playback
Regions are defined sections within your audio project, typically marked by start and end points. They allow for easier organization of complex projects and facilitate editing of specific sections.
When working with dialogue, use transcript-based markers to locate specific phrases quickly. Modern software can automatically generate timecode-accurate markers based on speech recognition.
For efficient workflow, assign keyboard shortcuts to marker functions. This speeds up the process of setting, navigating, and editing markers, especially in lengthy sessions with numerous reference points.

6
Adding Audio Effects And Enhancement
Audio effects and enhancement techniques transform raw audio into polished, professional-sounding productions. These tools allow producers to create spatial dimension, control the stereo field, add dynamic movement, and build complex sonic textures.
Reverb And Delay For Spatial Dimension
Reverb and delay effects create a sense of space and depth in audio productions. Reverb simulates how sound behaves in different environments by adding reflections and decay.
Common reverb types include:
- Room - subtle, tight reflections
- Hall - longer decay times, simulating concert venues
- Plate - bright, dense reverb character
- Spring - distinctive "boingy" character common in guitar amps
When applying reverb, use a send/return configuration to maintain control over wet/dry balance. This technique preserves the original signal while adding the desired amount of effect.
Delay effects create echoes that can add rhythmic interest or spatial dimension. Digital delays offer precise timing options including ping-pong, tape, and multi-tap variations.
For natural-sounding results, time delays to match the tempo of your project. A delay set to 1/8th or 1/4 note can create musical, synchronized echoes.
Stereo Widening And Panning Techniques
Stereo imaging tools help create immersive soundscapes by controlling where elements appear in the stereo field. Panning positions between the left and right channels create a sense of width and separation.
Basic panning strategies include:
- Center placement for lead vocals, bass, and kick drum
- Hard left/right for doubled guitars or background vocals
- Subtle panning for supporting instruments
Stereo widening plugins expand the perceived width of mono signals by manipulating phase relationships between channels. Use these tools sparingly on individual elements rather than across full mixes to maintain mono compatibility.
Mid-side processing offers precise control over the center and sides of a stereo signal independently. This technique enhances stereo content while preserving the center elements, such as vocals and bass.
For film and video work, consider how panning relates to on-screen action to maintain believable spatial relationships.
Using Automation For Dynamic Changes
Automation brings movement and evolution to static sounds by changing parameters over time. Most DAWs offer automation for volume, panning, and effect parameters that can be recorded in real-time or drawn manually.
Volume automation creates natural dynamics by controlling levels throughout a production. Use it to emphasize important moments, create buildups, or smooth transitions between sections.
Common automation techniques include:
- Volume rides for consistent vocal levels
- Filter sweeps that gradually open or close
- Effect sends levels that increase during choruses
- Panning movement for dramatic spatial effects
Write automation after arranging to focus on enhancing the existing structure. Start with volume automation before moving to more complex parameter changes.
When automating time-based effects like delay, subtle changes often yield the most musical results. Small adjustments to feedback or mix levels can dramatically change the character without overwhelming the mix.
Layering Sounds For Richer Productions
Layering multiple sounds creates rich, complex textures that stand out in professional productions. This technique combines complementary elements to create something greater than the sum of its parts.
For impact sounds, layer elements with different frequency characteristics:
- Low-frequency rumble for power
- Mid-range punch for presence
- High-frequency crack for definition
Sound effects can be enhanced by combining multiple recordings of the same event from different perspectives or microphone types. This creates fuller, more detailed sounds.
When layering, avoid frequency masking by ensuring each element occupies its own spectral space. Use EQ to carve out room for each layer to shine through.
Time alignment is crucial when layering similar sounds. Slight timing offsets can cause phase issues that weaken rather than strengthen the combined sound. Use sample-accurate editing to align transients for maximum impact.

7
Key Takeaways For Basic Audio Editing
Audio editing involves manipulating recordings to enhance sound quality, fix timing issues, and remove unwanted elements. Mastering these fundamentals will significantly improve your production workflow and final results.
Essential Tools and Software:
- Digital Audio Workstation (DAW) like Ableton, Logic Pro, or Pro Tools
- Quality headphones or monitors
- Basic plugins for EQ, compression, and noise reduction
Fundamental Techniques:
- Trimming and cutting - Remove unwanted sections and silence
- Crossfading - Create smooth transitions between audio clips
- Normalization - Optimize volume levels across your project
- Noise reduction - Clean up background noise and interference
When editing vocals or dialogue, focus on removing breaths and plosives that distract from the content. Audio editing techniques should prioritize clarity and natural sound.
For beginners, starting with simple editing tips helps build confidence. Practice making precise cuts and transitions to develop your editing ear. When exporting, you must decide between high-quality WAV files for archiving and MP3 formats for easy distribution.
Time-Saving Approaches:
- Use keyboard shortcuts for a faster workflow
- Create templates for recurring project types
- Learn batch processing for repetitive tasks
The transition from traditional tape splicing to digital editing has made precision much more accessible, but principles remain similar. Non-destructive editing allows experimentation without permanently altering original files.
Mastering Considerations:
- Leave headroom (-6dB) for the mastering stage
- Focus on clean edits before applying mastering effects
- Consider loudness standards appropriate for your distribution platform
Happy audio editing!

Frequently Asked Questions
1
What are the foundational skills needed for audio editing?
Understanding digital audio fundamentals forms the base of all editing work. This includes knowledge of sample rates, bit depth, and how sound is captured and represented digitally.
Developing a trained ear is essential for identifying issues such as distortion, clipping, and frequency imbalances. Regular critical listening exercises help editors distinguish subtle audio problems that might go unnoticed by casual listeners.
Proficiency with at least one audio editing software, such as Adobe Audition, Pro Tools, or Audacity, enables editors to apply their technical knowledge. Familiarity with the interface and workflow dramatically impacts efficiency.
Time management skills help editors prioritize tasks when facing tight deadlines. Knowing which imperfections require fixing and which don't materially affect the final product saves valuable production time.
2
What strategies do professionals use to improve audio quality?
Recording in controlled environments prevents problems from arising in the first place. Professionals prioritize proper microphone selection and placement to capture clean audio that requires minimal editing.
Applying equalization (EQ) strategically enhances clarity by adjusting specific frequency ranges. For instance, cutting around 200-300Hz can reduce muddiness in vocal recordings, while boosting around 5-8kHz can increase intelligibility.
Multi-band compression helps tame dynamic range issues without creating an unnatural sound. This technique applies different compression settings to separate frequency bands, offering more precise control than standard compression.
3
How does one remove background noise from an audio track?
Noise reduction tools work by analyzing a sample of the isolated noise and then applying a filter to remove similar sounds throughout the recording. Most audio editing software includes this functionality.
Spectral editing enables editors to identify and remove specific unwanted sounds visually. This method works well for isolated noises, such as chair squeaks or dog barks, which appear as distinct patterns in the spectrogram.
Gate processors automatically silence parts of the recording that fall below a specified volume threshold. This technique effectively eliminates constant low-level noise during pauses in speech or performance.
4
What are the best practices for mixing and mastering audio?
Establishing a reference level before mixing ensures consistent volume throughout the project. Setting dialogue or main vocals to average around -18dB provides headroom for processing and prevents clipping.
Creating a distinct sonic space for each element through panning and EQ prevents frequency masking. This technique ensures that important elements don't compete for the same frequency range or stereo position.
Applying parallel processing preserves the original character of sounds while enhancing certain qualities. For example, blending a heavily compressed vocal track with the untreated original adds punch without sacrificing dynamics.
5
How can a beginner effectively balance sound levels in a mix?
Starting with the most important element establishes a foundation for the mix. In podcasts or voice-overs, this means setting vocals first; in music, it might be drums or vocals depending on the genre.
Using visual meters alongside critical listening helps identify imbalances. VU meters, spectrum analyzers, and correlation meters provide objective feedback that supplements what the ear perceives.
Practicing the "mute test" verifies that each element serves its purpose. If removing a track doesn't create a noticeable difference in the mix, it may need to be enhanced or eliminated to improve clarity.
6
What advanced audio editing techniques do experts recommend?
Automated dialogue replacement (ADR) synchronizes newly recorded vocals with original footage. This technique is crucial in film and television production when location audio is compromised or script changes occur after filming.
Convolution reverb applies the acoustic characteristics of real spaces to dry recordings. By using impulse responses, editors can place sounds in realistic settings. Understanding common audio editing mistakes, such as overusing reverb, is key to maintaining a professional, clear sound.
Dynamic EQ combines equalization with dynamics processing to address frequency problems only when they occur. Unlike static EQ, it responds to the changing content of the audio, applying corrections only when needed.
Related Articles
You Might Also Be Interested In
Share This Article!