


Most audio engineers spend hours perfecting individual tracks, only to find their mix lacks cohesion and punch. Top-down mixing offers a revolutionary approach that can transform your workflow and results. Using top-down mixing lets you see the big picture before getting bogged down in the details.
Top-down mixing is a technique where audio engineers begin by processing the entire mix bus before touching individual tracks, focusing on the overall sonic character and balance of the mix from the start. This method reverses traditional mixing approaches by establishing compression, EQ, and saturation on the master chain first, then working backward to individual elements.
Top-down mixing emphasizes the big picture rather than getting lost in microscopic adjustments. The technique requires well-recorded source material and benefits genres like rock, metal, and acoustic folk that maintain consistent dynamics throughout. Engineers who master this approach often complete mixes faster while achieving better cohesion and professional polish.
This comprehensive guide explores the fundamental principles of top-down mixing. It covers everything from mix-bus processing strategies to advanced frequency-balancing techniques. Mastering top-down mixing can significantly reduce the time spent on corrective individual track work.
Discover how to implement professional-grade compression and EQ chains, avoid common pitfalls that derail mixes, and develop the critical listening skills necessary for success. The methods covered transform chaotic mixing sessions into streamlined, musical experiences that consistently deliver radio-ready results.
Key Takeaways / TL;DR
- Top-down mixing begins with mix bus processing to establish overall sonic character before addressing individual tracks
- This technique works best with well-recorded material and consistent musical arrangements, such as rock and metal genres
- Proper implementation requires careful gain staging and understanding of how bus processing affects downstream elements

1
Top-Down Mixing Fundamentals And Core Principles
Top-down mixing reverses traditional workflow by starting with the mix bus and working toward individual tracks, requiring specific philosophical shifts and technical setup considerations. This mixing technique demands understanding of signal flow hierarchy, proper equipment configuration, and strategic mix decisions that affect the entire production from the outset.
Understanding The Top-Down Philosophy In Audio Engineering
The top-down mixing philosophy fundamentally changes how engineers approach mixing. Instead of building individual elements first, this mixing technique starts with the complete musical picture.
Engineers using this approach make broad sonic decisions before addressing specific issues. The philosophy emphasizes global coherence over individual track perfection. Mix decisions begin at the stereo bus level, establishing the overall character and energy.
This mindset requires engineers to think like listeners rather than technicians. The focus shifts from fixing problems to enhancing musical expression. Engineers must trust their instincts about the complete mix rather than obsessing over isolated elements.
The philosophy also promotes efficiency in creative flow. By establishing the mix's direction early, engineers avoid getting lost in technical details. This approach particularly benefits projects with tight deadlines or large track counts.
Traditional Bottom-Up Vs. Top-Down Mixing Approaches
Bottom-up mixing follows the conventional path of perfecting individual tracks before combining them. Engineers typically start with drums, add bass, then layer additional instruments. Each element receives detailed processing before group bus consideration.
This traditional mixing process often leads to decision paralysis and endless tweaking. Engineers may spend hours perfecting a snare drum sound that disappears in the full mix. The approach can create technically excellent individual sounds that lack cohesion.
Top-down mixing inverts this workflow entirely. The mixing technique begins at the mix bus, applying compression, EQ, and saturation to all elements simultaneously. Individual tracks receive attention only after the global sound is established.
| Aspect | Bottom-Up | Top-Down |
| Starting Point | Individual tracks | Mix bus |
| Processing Order | Track → Group → Mix | Mix → Group → Track |
| Time Investment | High per element | High initially, then efficient |
| Cohesion Focus | Built gradually | Established immediately |
The top-down approach requires different decision-making patterns. Engineers must evaluate how mix bus processing affects every element rather than optimizing isolated sounds. This creates more cohesive results but demands broader perspective skills.
Essential Equipment And Software For Top-Down Workflow
Mix bus compressors form the foundation of top-down mixing equipment. Hardware units like SSL G-Series or software emulations provide the glue compression essential for cohesive mixes. These compressors shape the entire mix's dynamics from the start.
Console-style channel strips or plugin suites streamline the workflow. Products offering consistent sonic character across all channels help maintain mix coherence. Many engineers prefer suites from a single manufacturer for tonal consistency.
High-quality monitoring becomes crucial, as engineers make global decisions that affect all elements. Studio monitors must reveal how mix-bus processing affects individual instruments. Headphones should complement the main monitors for detailed evaluation.
DAW-specific considerations include sufficient CPU power for real-time mix bus processing. The system must handle multiple instances of demanding processors without latency. Audio interfaces should provide low-latency monitoring for comfortable working conditions.
Metering plugins help engineers monitor levels and dynamics across the entire signal chain. Visual feedback becomes essential when processing affects multiple elements simultaneously. Peak and RMS meters prevent over-processing at the mix bus level.
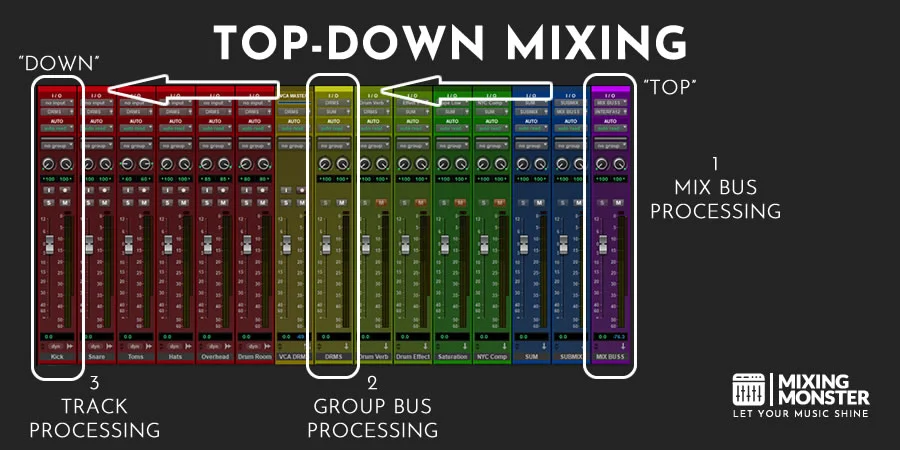
Setting Up Your DAW For Optimal Top-Down Processing
The mix bus configuration requires inserting key processors before any mixing begins. Place an EQ, compressor, and saturator on the stereo bus as starting points. These processors should remain active throughout the entire mixing process.
Group bus creation follows the mixed bus setup. Establish buses for drums, bass, vocals, and other major elements. Route all relevant tracks through appropriate group buses before they reach the mix bus. This creates a clear signal hierarchy.
Template preparation saves time on future projects. Create a mix-and-group bus processing chains that work across different genres. Save frequently used processor combinations as channel strip presets for quick loading.
CPU optimization becomes critical with multiple bus processors running simultaneously. Freeze or bounce individual tracks when editing is complete. Use lower-quality settings during initial mixing, then switch to high-quality settings for final processing.
The monitoring setup should include multiple reference points throughout the signal chain. Create sends to monitor individual groups with and without mix bus processing. This allows engineers to understand how top-level decisions affect each element.
The DAW's mixer layout should clearly display the signal flow hierarchy. Group related channels together and color-code different sections. This visual organization helps engineers maintain the top-down perspective throughout the mixing process.

2
Mix Bus Processing And Master Chain Optimization
Mix bus processing creates professional cohesion by applying broad dynamics and tonal control across the entire mix. The master chain requires strategic placement of gain staging, compression, EQ, and parallel processing to achieve balanced frequency response and controlled dynamics.
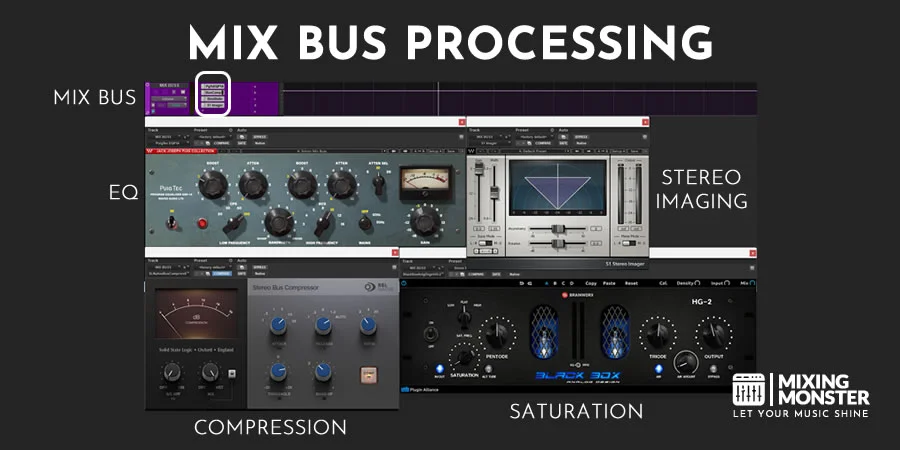
Configuring Your Master Bus For Professional Results
The master bus chain begins with proper gain staging to manage signal flow through subsequent processors. Gain should be the first plugin in the master bus chain to manage levels effectively rather than compensate for poor mixing decisions.
Signal Flow Order:
- Gain/Trim - Initial level management
- EQ - Broad frequency correction
- Bus Compressor - Glue compression
- Saturation/Color - Harmonic enhancement
- Limiter - Peak control
Input levels should be set to the mix bus compressor between -18 dB and -12 dB RMS for optimal headroom. This prevents digital clipping while maintaining sufficient signal strength for processing.
Hardware emulations of SSL, Neve, or API consoles provide characteristic color and glue compression. Software alternatives like FabFilter Pro-C 2 or Waves SSL G-Master Buss Compressor deliver similar results with precise control parameters.
Essential Mix Bus Compression Techniques And Settings
Bus compressor settings focus on gentle gain reduction to create cohesion without destroying dynamics. Slow attack times (10-30ms) preserve transients while medium release times (100-300ms) maintain natural breathing.
|
Parameter |
Setting Range |
Purpose |
|
Ratio |
2:1 to 4:1 |
Gentle compression |
|
Attack |
10-30ms |
Preserve transients |
|
Release |
100-300ms |
Natural decay |
|
Threshold |
2-4dB reduction |
Subtle control |
Mix bus compression should achieve 2-4dB of gain reduction during loud passages. Faster release times work for uptempo tracks, while slower releases suit ballads and ambient material.
VCA-style compressors provide punch and clarity for rock and pop genres. Optical compressors offer smooth, musical compression for jazz and acoustic material. FET compressors deliver aggressive character suitable for electronic and hip-hop productions.
Discover Best Audio Gear & Equipment


EQ Strategies For Full Mix Frequency Shaping
Mix bus EQ addresses frequency imbalances across the entire mix rather than individual instrument issues. Broad Q settings (0.7-1.2) prevent harsh corrections that affect multiple frequency ranges.
High-pass filtering at 20-30Hz removes subsonic rumble that wastes headroom and can damage speakers. Low-frequency control around 60-120Hz tightens muddy low-end without removing fundamental frequencies.
Mid-range adjustments between 200 and 800Hz reduce boxiness and improve clarity. Presence enhancement around 2-5kHz adds definition to vocals and lead instruments when applied subtly.
High-frequency shaping above 10kHz controls harshness or adds air depending on source material. Gentle high-shelf boosts (+1 to +2dB) at 12kHz brighten dull mixes while cuts reduce digital harshness.
Surgical cuts address specific problem frequencies identified during mix analysis. Musical boosts enhance existing strengths rather than forcing unnatural frequency emphasis.
Parallel Processing And Bus Sends Integration
Parallel compression blends heavily compressed signals with the original mix bus to maintain dynamics while adding density. The compressed parallel channel uses aggressive settings (8:1-12:1 ratio, fast attack) mixed 10-20% with the main signal.
Parallel EQ chains process frequency-specific content through dedicated channels. High-frequency parallel processing adds brightness without affecting the fundamental mix character.
The bus sends route instruction groups to parallel processors before reaching the master bus. Drum buses benefit from parallel compression while maintaining original transient information.
Frequency-specific parallel chains target bass content below 100Hz or treble above 8kHz independently. This approach prevents processing conflicts between frequency ranges.
Integration requires careful gain staging to prevent phase issues between parallel and original signals. High-pass and low-pass filtering on parallel channels prevents frequency overlap that can cause comb filtering.
3
Frequency Spectrum Analysis And Balance Techniques
Modern mixing engineers use spectrum analyzers for real-time frequency analysis to make informed bus processing decisions and identify problematic frequency interactions. These visual tools reveal how compression and EQ affect the entire frequency spectrum during top-down mixing workflows.
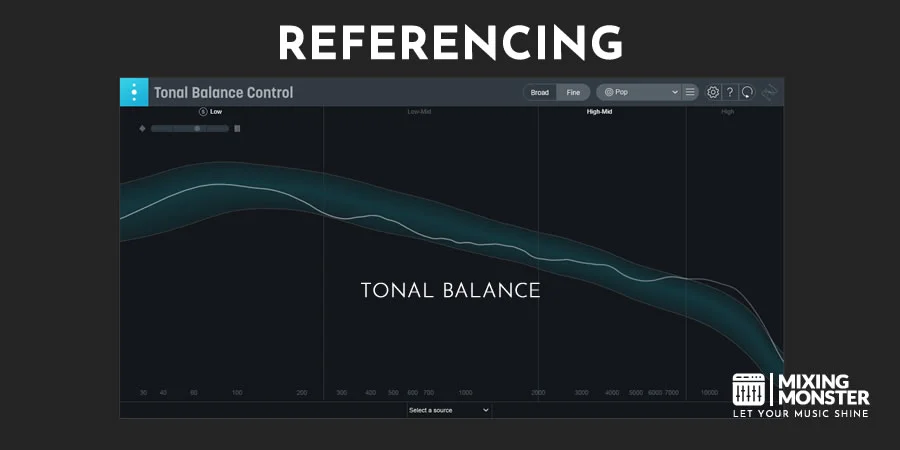
Using Spectrum Analyzers For Mix Bus Decisions
Spectrum analyzer plugins like Sonible True and Blue Cat Audio FreqAnalyst Multi provide real-time visual feedback when applying bus EQ and compression. Engineers monitor how stereo bus processing affects frequency distribution across the entire mix.
Critical frequency ranges to monitor:
- 20-200 Hz: Low-end clarity and mud detection
- 200-800 Hz: Low-mid frequency buildup identification
- 2-8 kHz: Presence and harshness evaluation
- 8-20 kHz: Air and brightness assessment
The spectrum analyzer reveals how bus compression alters frequency balance through gain reduction. VCA-style compressors on the stereo bus often emphasize midrange frequencies while reducing peak transients.
Engineers adjust bus EQ based on spectrum analyzer feedback rather than relying solely on auditory perception. Visual confirmation helps identify subtle frequency imbalances that become apparent only when comparing against reference tracks.
Frequency Masking Identification Across Full Arrangements
Complex frequency interactions create muddy or harsh mixes when multiple instruments occupy similar frequency ranges. Top-down mixing reveals these masking issues through full-spectrum analysis before individual track processing.
Bass guitar and kick drum masking typically occurs between 60 and 120 Hz. Vocal and guitar conflicts commonly appear in the 1-4 kHz range, where both instruments compete for presence.
Common masking scenarios:
- Electric guitars masking vocal clarity (2-4 kHz)
- Bass instruments creating low-mid buildup (100-300 Hz)
- Cymbals competing with vocal sibilance (6-10 kHz)
Bus processing with gentle high-pass filtering removes unnecessary sub-sonic content that contributes to masking. Engineers apply subtle bus EQ cuts to problematic frequency ranges before addressing individual tracks.
Real-time spectrum analysis during playback shows frequency masking as dense overlapping regions. The visual representation guides stereo bus EQ decisions to create separation before detailed mix work begins.
Your Song Mixed & Mastered By Mixing Monster


Subtractive EQ Methods For Cleaner Mix Translation
Engineers like Craig Bauer consistently apply bus EQ with a slight 180Hz dip to address low-mid frequency buildup across entire arrangements. This subtractive approach removes problematic frequencies rather than boosting desired ones.
Effective bus eq subtractive techniques:
- 150-300 Hz cuts: Removes muddiness and improves definition
- 400-600 Hz reduction: Addresses boxy tonal characteristics
- 2-3 kHz gentle cuts: Reduces harshness in dense arrangements
Subtractive bus EQ prevents frequency accumulation that occurs when multiple tracks contain similar harmonic content. Wide Q settings affect broad frequency ranges without creating phase issues.
Engineers monitor spectrum analyzers as they make subtractive EQ moves to verify frequency reduction across the entire mix. Bus processing removes problematic frequencies before they require individual track correction.
This approach maintains headroom and prevents the need for excessive individual track EQ. Clean bus EQ translation improves mix clarity on various playback systems without frequency-specific emphasis.
Dynamic Range Optimization Through Bus Processing
Bus compression controls dynamic range while maintaining frequency balance across the entire mix spectrum. VCA-style compressors with 2:1-4:1 ratios and 30ms attack times provide transparent gain reduction without frequency coloration.
Optimal bus compression parameters:
|
Setting |
Conservative |
Aggressive |
|
Ratio |
2:1-3:1 |
4:1-6:1 |
|
Attack |
30-50ms |
10-30ms |
|
Release |
100-300ms |
Auto/Fast |
|
Gain Reduction |
1-3dB |
3-6dB |
Spectrum analyzers reveal how bus compression affects frequency distribution during gain reduction. Slower attack times preserve transient frequencies while faster settings emphasize midrange content.
Engineers balance the compression amount with the maintenance of the frequency spectrum. Excessive bus compression causes frequency pumping, with certain ranges becoming prominent during gain reduction cycles.
Release time settings align with the song tempo to maintain a natural frequency response. Auto-release functions adapt to program material while preserving consistent spectral balance throughout dynamic passages.

4
Group Processing And Stem Management Strategies
Top-down mixing relies heavily on stem processing to create cohesive mixes through strategic bus architecture and targeted group treatments. Effective stem management combines parallel compression, harmonic saturation, and specialized routing to achieve professional-sounding results.
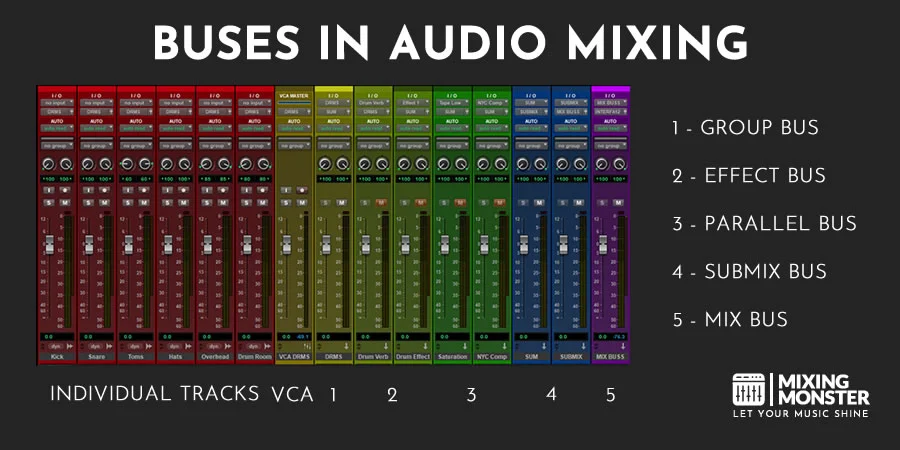
Creating Effective Drum Bus Processing Chains
The drum bus serves as the foundation for rhythmic cohesion in any mix. Engineers typically apply EQ first to shape the overall frequency balance, followed by compression to control dynamics and glue the drum elements together.
Essential drum bus processing order:
- High-pass filter at 20-40 Hz to remove subsonic content
- Low-mid cut around 200-400 Hz to reduce muddiness
- Presence boost at 2-5 kHz for snap and attack
- Gentle high-frequency shelving for air and brightness
Compression ratios between 2:1 and 4:1 work best for drum bus processing. Attack times should be slow enough to preserve transients while release times match the song's groove.
Tape saturation adds harmonic content and vintage character to drum buses. Parallel compression creates punch without sacrificing dynamics by blending compressed and uncompressed signals.
Vocal Bus Treatment And Harmonic Enhancement
Vocal bus processing shapes the entire vocal presentation rather than individual vocal tracks. Engineers focus on frequency balance, dynamic control, and harmonic enhancement to create polished vocal sounds.
Primary vocal bus treatments:
- A dedicated de-esser to control harsh sibilants across all vocals
- Gentle compression with slow attack and medium release
- EQ for presence enhancement and frequency cleanup
- Harmonic saturation for warmth and character
Parallel compression works particularly well on vocal buses. The compressed signal adds density and sustain, while the dry signal maintains natural dynamics and clarity. Placing a de-esser before or after the compressor can help manage vocal harshness that might be accentuated during this process.
Reverb and delay sends from the vocal bus create spatial cohesion. Bus-level processing ensures all vocals sit in the same acoustic space rather than having individual reverb characteristics.
Related Articles

Instrument Group Routing And Bus Architecture
Strategic bus routing organizes a mix of elements into logical groups for efficient processing. Standard bus configurations include separate stems for drums, bass, guitars, keyboards, and vocals with additional sub-buses as needed.
Common bus architecture:
- Rhythm section: Drums, bass, rhythm guitars
- Harmonic content: Lead guitars, keyboards, pads
- Melodic elements: Lead vocals, background vocals, solos
- Texture layers: Percussion, effects, ambient sounds
Guitar buses benefit from shared EQ and compression settings. High-gain guitars often need low-mid cuts around 250-500 Hz to prevent frequency buildup across multiple guitar tracks.
Keyboards and synthesizers route to separate buses based on their musical function. Pad sounds require different processing than lead synths or bass synthesizers.
Parallel Compression Applications For Mix Cohesion
Parallel compression blends heavily compressed and uncompressed signals to achieve punch without losing dynamics. This technique works across drum, vocal, and full mix buses to enhance cohesion.
Engineers set parallel compressors with aggressive settings - high ratios, fast attack times, and moderate release times. The compressed signal provides density and sustain, while the original maintains transient information.
Parallel compression settings:
- Ratio: 6:1 to 10:1 for aggressive compression
- Attack: 1-5ms for quick response
- Release: 100-300ms depending on musical content
- Blend: 15-30% compressed signal mixed with the original
Parallel compression on the mix bus creates overall cohesion. Light tape saturation on parallel channels adds harmonic content that naturally glues mix elements together.

5
Advanced Top-Down Mixing Techniques For Professional Results
Professional engineers leverage sophisticated mix bus processing and strategic automation to achieve polished, cohesive results. These techniques focus on multiband control, stereo enhancement, dynamic changes, and systematic comparison methods that elevate mixes beyond basic top-down approaches.
Multiband Processing On Mix Groups And Master Bus
Multiband compression and EQ on the master bus provide frequency-specific control while maintaining overall cohesion. Engineers typically split the spectrum into three to four bands: low (20-120Hz), low-mid (120-800Hz), high-mid (800-5kHz), and high (5-20kHz).
The low band requires gentle compression ratios around 2:1 to 3:1 with slower attack times to preserve kick drum punch. Low- to mid-frequency ranges benefit from more aggressive control at 4:1 ratios, as this range often contains muddiness.
High- and mid-range bands need careful handling to avoid vocal harshness. Light compression at 2:1 with moderate attack times works effectively. The high band is typically treated gently to maintain air and sparkle.
Key multiband settings:
- Attack times: 10-30ms for transient control
- Release times: 100-300ms depending on song tempo
- Knee: Soft knee for musical compression
- Crossover frequencies: Adjust based on song content
Multiband EQ allows surgical corrections across frequency ranges. Engineers often apply broad high-shelf boosts around 10kHz while simultaneously cutting problematic frequencies in the 200-400Hz range.
Stereo Imaging And Width Control Across Full Mixes
Stereo width processing on the master bus creates immersive soundscapes while maintaining mono compatibility. Mid-side processing offers the most control by independently adjusting center and side information.
The mid channel contains vocals, kick, bass, and snare - elements that need center placement. The side channel holds stereo guitars, keyboards, and ambient elements that benefit from width enhancement.
Effective width control techniques:
- Subtle side channel enhancement: 1-2dB boost around 8-12kHz
- Mid channel focus: Light compression to solidify the center image
- Bass management: High-pass filter on sides around 100-150Hz
- Width limitation: Prevent excessive stereo spread above 90-100%
Engineers avoid aggressive width processing that compromises mono playback. Professional top-down mixing workflows emphasize maintaining translation across different playback systems.
Correlation meters help monitor stereo compatibility. Values below +0.5 indicate potential mono compatibility issues requiring adjustment.
Automation Strategies For Dynamic Mix Bus Changes
Master bus automation creates dynamic interest without disrupting individual track balances. Engineers automate compression ratios, EQ curves, and stereo width to match song sections and emotional intensity.
Verse sections often benefit from lighter compression ratios around 2:1, while choruses can handle more aggressive 4:1 to 6:1 settings. This automation creates natural energy shifts without manual fader rides.
EQ automation addresses changes in frequency content between sections. Choruses with additional instruments may require low-mid cuts around 300Hz, while sparse verses might need gentle low-end boosts.
Common automation targets:
- Compressor ratio: 2:1 (verses) to 4:1 (choruses)
- Release times: Faster for dense sections, slower for sparse parts
- High-frequency enhancement: +1dB boost during energetic sections
- Stereo width: Narrower for verses, wider for choruses
Limiter automation prevents sudden level increases during peak sections. Engineers set conservative thresholds during quiet parts and allow more aggressive limiting during climactic moments.
Smooth automation curves prevent audible artifacts. Engineers use 100-500ms ramp times for most parameter changes to maintain musicality.
Reference Mixing And A/B Comparison Workflows
Professional reference workflows integrate commercial tracks directly into the mixing session for real-time comparison. Engineers load reference tracks onto dedicated channels and level-match playback via the same master bus processing.
Level matching ensures accurate frequency and dynamic comparisons. References should peak at the same level as the mix-in-progress, typically around -6dB to -3dB before master bus processing.
Systematic A/B comparison process:
- Match levels between reference and mix
- Compare frequency balance using spectrum analyzers
- Assess dynamic range and compression character
- Evaluate stereo width and imaging placement
Advanced mixing techniques emphasize frequent referencing throughout the process rather than relying solely on final-stage comparison. Engineers switch between reference and mix every few minutes to maintain perspective.
Multiple references provide a broader context. Engineers typically use 2-3 commercial tracks that represent different aspects of their target sound - one for frequency balance, another for dynamics, and a third for stereo imaging.
Dedicated reference plugins streamline the workflow by handling level matching and instant switching. These tools eliminate the manual setup required for traditional reference track methods.

6
Common Top-Down Mixing Mistakes And Solutions
Mix engineers frequently encounter specific technical challenges when implementing top-down approaches, which can compromise final results. These issues typically involve excessive processing at the mix bus level, phase alignment problems in group channels, difficulty balancing individual elements within heavily processed groups, and translation problems across different monitoring systems.
Over-Processing Mix Bus Elements And Recovery Methods
Mix bus over-processing represents one of the most destructive mistakes in top-down mixing workflows. Engineers often apply excessive compression ratios above 4:1 or aggressive EQ boosts exceeding 6dB on the master bus.
Common Over-Processing Signs:
- Pumping artifacts during dynamic sections
- Loss of stereo width and imaging
- Harsh frequency buildup in midrange areas
- Reduced punch in drum transients
The recovery process begins with bypassing all mix bus processing and starting fresh. Engineers should limit compression ratios to 2:1 or 3:1 maximum. EQ adjustments should remain subtle, typically within ±3dB ranges.
Recovery Steps:
- Remove all mix bus processing
- Apply gentle 2:1 compression with slow attack (30ms)
- Use broad EQ curves instead of narrow cuts
- Monitor gain reduction meters staying below 2-3dB
Saturation plugins should add warmth without obvious distortion. If harmonic content becomes audible during quiet passages, the processing level is too aggressive.
Phase Issues In Group Processing And Correction Techniques
Group bus processing can create phase relationships that cause frequency cancellation and stereo image problems. Multiple EQ stages and different plugin latencies contribute to these alignment issues.
Linear phase EQs prevent phase rotation but introduce pre-ringing artifacts. Minimum-phase EQs maintain transient response but introduce phase shifts that accumulate across processing chains.
Phase Problem Indicators:
- Hollow or thin sound character
- Instruments losing position in the stereo field
- Frequency response inconsistencies
- Comb filtering artifacts
Engineers should check phase correlation meters on group buses and mix outputs. Values consistently below +0.7 indicate potential problems requiring correction.
Correction Methods:
| Technique | Application | Effectiveness |
| Plugin delay compensation | Automatic latency adjustment | High |
| Manual phase alignment | Time-shifting group buses | Medium |
| Linear phase EQ selection | Critical frequency adjustments | High |
All-pass filters can correct specific phase issues without affecting frequency response. These tools work particularly well on drum group buses where kick and bass interactions cause problems.
Balancing Individual Tracks Within Processed Groups
Individual track adjustments become challenging when group processing alters the entire frequency spectrum and dynamic response. Engineers must account for how group compression affects individual elements differently based on their frequency content and timing.
Balancing Strategies:
- Use parallel processing to maintain original dynamics
- Apply complementary EQ curves on individual tracks
- Implement sidechain filtering on group compressors
- Adjust individual track levels after group processing
Drum groups present particular challenges because kick drums trigger group compression that affects snare and cymbal presence. Engineers should use sidechain high-pass filtering at 100-200Hz to prevent low-frequency triggering.
Vocal groups require careful gain staging: lead vocals need prominence, while background vocals blend into the mix. Individual track compression should use faster attack times than group compression to maintain clarity.
Level Management Approach:
- Set rough individual track levels
- Apply group processing with moderate settings
- Fine-tune individual track levels
- Make final group processing adjustments
This iterative process prevents constant readjustment cycles that compromise the mixing workflow.
Maintaining Translation Across Different Playback Systems
Mix bus processing can introduce translation issues that don't appear until checking mixes across different monitoring systems. Heavy mix bus compression often sounds impressive on studio monitors, but loses impact on consumer playback devices.
Translation Testing Protocol:
- Studio monitors (near-field and far-field)
- Consumer headphones and earbuds
- Car audio systems
- Phone and laptop speakers
- Streaming platform loudness standards
Frequency response differences between systems become more pronounced with aggressive mix-bus EQ. High-frequency boosts above 10kHz may sound bright on accurate monitors but harsh on consumer systems.
Engineers should reference their mixes at multiple volume levels since mix bus processing affects perceived loudness differently across the dynamic range. Quiet listening reveals whether the mix maintains clarity and balance.
System-Specific Considerations:
- Mobile devices: Reduce sub-bass content below 60Hz
- Car systems: Control midrange buildup (200-800Hz)
- Headphones: Monitor stereo width and center image
- Streaming: Target -14 LUFS integrated loudness
Mix bus limiting should preserve transient information while achieving competitive loudness levels. Peak limiters with fast release times (under 100ms) maintain punch while preventing overs.

7
Key Takeaways For Top-Down Mixing Mastery
Start with well-recorded material. Top-down mixing relies heavily on quality source tracks since engineers shape the overall sound before individual track surgery.
Begin with the mix bus, not individual tracks. This backward mixing approach places processing on the stereo output first, then works toward individual elements.
| Essential Mix Bus Tools | Purpose |
| VCA Compressors | Glue tracks together |
| EQ | Shape overall frequency balance |
| Console/Tape Emulation | Add cohesive character |
Avoid overdriving the mix bus compressor. Additional compression on individual tracks creates a domino effect when the mix bus is already compressed.
Use subtle processing moves. Gentle EQ curves and moderate compression ratios work better than aggressive processing on the master bus.
Monitor gain reduction carefully. Target 2-4dB of compression depending on the material's dynamics and genre requirements.
Choose appropriate material. Top-down mixing works best for consistent genres like rock, metal, and acoustic folk, but not for songs with wide dynamic ranges.
Bypass limiters before bouncing. Engineers should remove mix bus limiters when sending tracks to mastering to preserve headroom.
Think big picture first. This approach prevents analysis paralysis by focusing on the song's overall vibe before detailed adjustments.
Happy top-down mixing!

Frequently Asked Questions
1
What is the difference between top-down and bottom-up mixing approaches in audio production?
Top-down mixing begins by placing signal processing on the mix bus before working on individual tracks. Engineers shape the overall sound and feel of the entire song first.
Bottom-up mixing takes the opposite approach. Engineers place EQs, compressors, and other processors on individual tracks first. They perfect each element separately before blending them on the mix bus.
The top-down method focuses on the big picture from the start. This approach aligns with the song's overall sound and feel rather than obsessing over individual track details.
Bottom-up mixing requires surgical precision on each track. Engineers must ensure every instrument sounds great in isolation before combining them.
2
What are the primary benefits of using a top-down approach when mixing tracks?
Speed represents the most significant advantage of top-down mixing. Grammy-winning mix engineer Craig Bauer saves time and CPU by placing an EQ on his mix bus with a slight dip at 180Hz instead of making these moves on individual tracks.
The big picture approach helps engineers avoid analysis paralysis. Working with the overall feel prevents getting stuck on minor details of individual tracks.
Top-down mixing helps engineers understand how their gear works. Placing processors on the mix bus with full-frequency-spectrum content reveals how different settings affect each frequency range.
The method creates better cohesion across the entire mix. Processing all elements together through the same chain naturally glues the song together.
3
How does top-down mixing influence the workflow during the post-production stage?
Top-down mixing streamlines the entire post-production workflow by establishing the sonic character early. Engineers set up their mix bus processing chain before touching individual tracks.
The approach reduces the number of processing decisions needed throughout the session. Many EQ and compression moves happen automatically through the mix bus processors.
Engineers can detect interference earlier and encounter fewer phase problems by using fewer individual filters per track.
The workflow becomes more intuitive and musical. Engineers focus on how elements work together rather than perfecting isolated sounds.
4
Which processing techniques are generally applied first in a top-down mixing strategy?
Mix bus compression appears most commonly as the first processor in top-down mixing. VCA-style compressors glue everything together and tame transients without over-squashing.
EQ processing typically follows compression in the signal chain. Engineers often start with broad strokes, such as gentle low- to mid-range cuts around 180Hz or subtle high-frequency shelving.
Console and tape emulation plugins provide additional glue and character. These processors add harmonic content and subtle saturation, binding all elements together.
Limiters may be placed at the very end of the mix bus chain for reference purposes, though they should be bypassed when bouncing the final mix.
5
How can top-down mixing be implemented effectively when dealing with multiple elements within a mix?
Engineers create instrument buses or groups before applying mix bus processing. Drums, guitars, vocals, and other elements get organized into logical subgroups.
Each instrument bus receives its own processing chain. This creates a hierarchy where individual tracks feed buses, which then feed the main mix bus.
Balance adjustments happen primarily through bus levels rather than individual track faders. This maintains the established relationships between elements.
The approach works best with well-recorded material, since poorly recorded tracks cannot benefit from broad mix-bus processing.
6
Can top-down mixing be used in both analog and digital domains, and if so, how do the techniques differ?
Top-down mixing works effectively in both analog and digital environments. The core principles remain the same regardless of the platform.
Analog implementations use hardware compressors, EQs, and console channels for mix bus processing. Engineers route all tracks through the same analog chain before individual processing.
Digital implementations rely on plugin versions of classic hardware processors. Popular options include SSL G Comp, API 2500, and Fairchild limiters in plugin format.
The main difference lies in recall ability and automation. Digital setups allow perfect recall of all settings, while analog setups require careful documentation and manual recreation.
Hybrid approaches combine both domains effectively. Engineers might use analog mix-bus processing with digital individual-track work, or vice versa.