


Resonant peaks can make or break the clarity of any audio project. They shape how frequencies stand out, sometimes adding character but often creating harsh, unwanted tones.
A resonant peak is the frequency point where a system produces its highest output, often leading to noticeable boosts that can distort balance if left unchecked. Resonant peaks occur when a system or component, such as a speaker, pickup, or digital mix, emphasizes a narrow band of frequencies more than others. This happens because the system naturally vibrates more strongly at certain frequencies, producing a peak in its frequency response.
In audio engineering, resonant peaks can cause issues like distortion, masking of other sounds, or listener fatigue if not managed properly. Understanding how to identify and control these peaks is a fundamental skill for achieving a balanced and accurate mix.
Anyone working with sound benefits from learning how to detect and manage resonant peaks. This knowledge not only improves mixing and mastering but also prevents common problems like muddiness or harshness in playback. By exploring practical techniques and proven best practices, one gains the tools to achieve cleaner, more professional results in any audio environment.
Key Takeaways / TL;DR
- Resonant peaks are frequency points where the output is maximized
- Identifying and managing them ensures balanced, clear audio
- Practical techniques help prevent distortion and improve mixes

1
What Are Resonant Peaks In Audio Engineering?
Resonant peaks occur when certain frequencies in an audio signal become disproportionately amplified compared to surrounding frequencies. They often create tonal imbalances, distortion, or unwanted emphasis that can interfere with the intended mix or playback environment.
Definition Of Resonant Peaks
A resonant peak is a sharp rise in amplitude at a specific resonant frequency. This frequency corresponds to the natural vibration point of a system, whether it is a speaker enclosure, microphone diaphragm, or even a room.
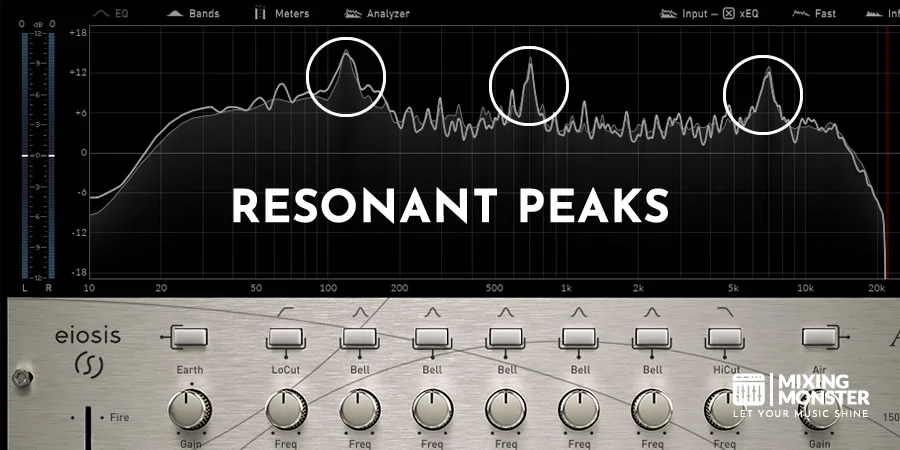
In audio engineering, these peaks can be visualized on a spectrum analyzer as narrow spikes that stand out from the rest of the frequency response. They are not broad tonal shifts but localized increases.
Unlike general boosts applied with equalization, resonant peaks are usually unintentional. They often result from the interaction of sound waves with physical components or acoustic spaces. This makes them more problematic because they are not part of the original mix design.
Engineers often detect them through careful listening and by using tools such as a real-time analyzer (RTA), which highlights frequencies that rise above the surrounding spectrum. Identifying them is the first step before applying corrective measures such as EQ attenuation or room treatment.
How Resonant Peaks Differ From General EQ Issues
General EQ problems usually involve broad tonal imbalances, such as too much bass or not enough midrange. These are wide-band issues spanning multiple frequencies and can often be corrected with a few EQ adjustments.
Resonant peaks, by contrast, are narrow and highly localized. They appear as sharp spikes in the response curve and can create harshness or ringing that is more noticeable than a gradual tonal imbalance.
For example, a vocal recording might sound muddy due to excess low mids, which is a general EQ issue. But if a single frequency around 250 Hz suddenly "booms" louder than others, that is a resonant peak.
Because they are so specific, resonant peaks require precise tools to manage. A parametric equalizer with a narrow Q setting is often used to cut the exact frequency without affecting nearby bands. This precision distinguishes their treatment from broader EQ shaping.
Common Causes Of Resonant Peaks In Audio Signals
Resonant peaks can arise from multiple factors, including equipment, environment, or signal processing.
Typical causes include:
- Speaker enclosures: A poorly sized box can create unwanted resonance at low frequencies, leading to peaks in output response as noted in speaker design studies.
- Room acoustics: Standing waves and reflections can exaggerate certain frequencies, especially in untreated spaces.
- Microphones: The diaphragm can resonate at specific frequencies, introducing coloration.
- Electronic circuits: Components themselves may emphasize resonant frequencies, causing distortion or interference.
Unlike intentional EQ boosts, these arise naturally from the system's physical properties. Even small enclosures or reflective surfaces can introduce narrow peaks that alter playback balance. Recognizing the root cause is important because the solution may involve acoustic treatment, equipment adjustment, or electronic filtering.
Why Resonant Peaks Affect Audio Clarity And Balance
Resonant peaks disrupt clarity by making certain frequencies disproportionately loud relative to the rest of the signal. This imbalance can mask other details, making mixes sound muddy, harsh, or uneven.
In live sound, resonant peaks often cause feedback loops when microphones pick up amplified frequencies that match the room's resonant frequency. This results in the familiar high-pitched squeal that engineers must quickly address.
In studio mixing, resonant peaks can cause distortion, especially when the system is operating near its limits. As explained in resonant frequency analysis, peaks can exaggerate energy at specific points, leading to muddiness or harshness.
They also reduce balance by drawing listener attention to one narrow frequency band. Instead of hearing a smooth, even mix, the ear focuses on the exaggerated tone. Correcting these peaks ensures instruments and voices sit properly together without one frequency dominating.
By controlling resonant peaks, engineers maintain both tonal accuracy and listener comfort, which are essential for professional-quality audio.

2
How To Identify Resonant Peaks In Your Mix
Resonant peaks can create harsh, uneven mixes by making certain frequencies stand out too strongly. Detecting them requires both technical tools and listening skills to reduce problem areas without weakening the overall sound.
Using Parametric EQ Sweeps To Detect Problem Frequencies
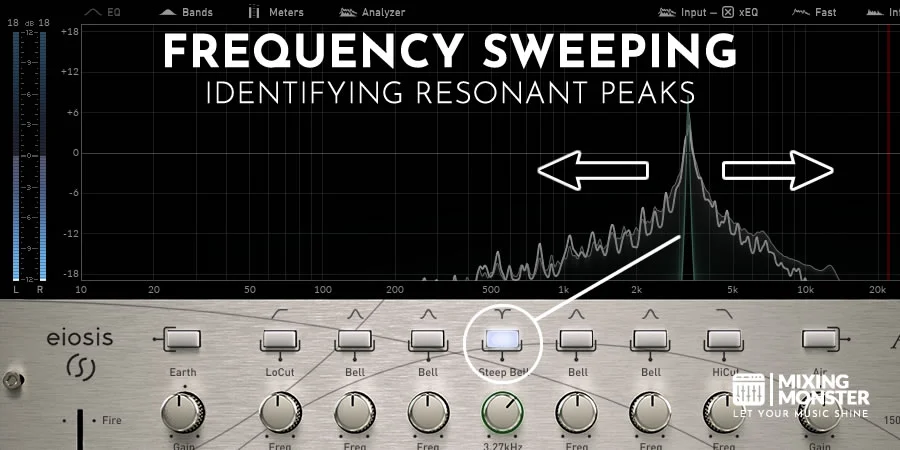
A common way to locate resonant peaks is by using a parametric EQ with a narrow Q setting. The engineer boosts the gain significantly and sweeps across the frequency range to identify spots where the amplitude jumps out unnaturally. These frequencies often sound piercing, nasal, or boxy, depending on the range.
Once identified, the gain is reduced at those points. The cut should be narrow enough to target the resonance without removing useful tonal content. This method, sometimes called the "sweep and cut" technique, is especially effective on vocals and acoustic instruments where unwanted resonance is most noticeable.
For a step-by-step approach, guides such as detecting resonances when mixing music explain how to set up EQ sweeps and recognize the harshness of problematic frequencies.
Visual Tools — Spectrum Analyzers And Frequency Plots
Spectrum analyzers and frequency plots provide a real-time view of a track's frequency response. They display amplitude across the spectrum, making it easier to spot narrow spikes that indicate resonance.
These tools are especially helpful when the ear struggles to isolate problem frequencies in dense mixes. A spike at 2–5 kHz, for example, often corresponds to harshness in vocals, while low-mid buildups around 200–400 Hz may cause muddiness.
Modern plugins combine analyzers with dynamic EQ functions. This allows the engineer not only to see resonant peaks but also to automatically attenuate them. Tools like RESO provide visual feedback and suggest cuts that balance transparency with control.
Discover Best Audio Gear & Equipment


Training Your Ear To Recognize Resonance
While visual tools are useful, ear training remains essential. Resonant peaks often have a harsh, whistling, or ringing quality that stands out from the rest of the mix. By repeatedly practicing EQ sweeps, engineers develop a memory for the tonal character of common problem frequencies.
For example:
- 200–400 Hz: boxy, muddy sound
- 2–4 kHz: nasal or harsh tone
- 6–8 kHz: piercing sibilance
Listening in different environments also helps. Resonances can be exaggerated in untreated rooms, so checking mixes on headphones and multiple monitors ensures more accurate detection. Over time, the ear becomes more reliable than visuals for catching subtle resonances.
Examples Of Resonant Peaks In Vocals, Guitars, And Drums
Resonant peaks appear differently across instruments. Vocals often show harshness around 2–5 kHz, where the human ear is most sensitive. Cutting narrow peaks in this range can make a vocal sound smoother without losing clarity.
Guitars can develop resonances in the low mids, often around 150–300 Hz, leading to a muddy or boomy tone. Acoustic guitars may also produce ringing resonances when the body amplifies certain frequencies.
Drums frequently exhibit resonance in the snare around 800 Hz–1.2 kHz or in toms at their fundamental pitch. Using dynamic EQ or multiband compression can control these peaks only when they become excessive, preserving natural sustain while avoiding buildup.
By understanding these instrument-specific patterns, engineers can quickly identify and treat resonant peaks before they dominate the mix.

3
Techniques To Remove Resonant Frequencies
Engineers often deal with unwanted resonance peaks that mask clarity and reduce mix balance. Addressing these issues usually involves precise EQ adjustments, dynamic processing, or specialized tools that suppress problematic peak frequencies without affecting the rest of the spectrum.
Surgical EQ Cuts For Resonance Control
Surgical EQ cutting involves isolating narrow resonance peaks and attenuating them with precision. Engineers typically use a parametric EQ with a high Q factor to create a tight bandwidth that reduces only the offending frequency.
The process usually starts by boosting a narrow band and sweeping across the spectrum until the harsh or boomy resonance becomes obvious. Once identified, the boost is inverted into a cut, often between -2 dB and -6 dB.
Care must be taken not to overdo these cuts. Too many narrow notches can create a hollow or unnatural sound. For this reason, surgical EQ is best applied selectively, often on vocals, cymbals, or instruments with strong harmonic content that exaggerate resonance peaks.
Dynamic EQ Vs. Static EQ: Which Works Best?
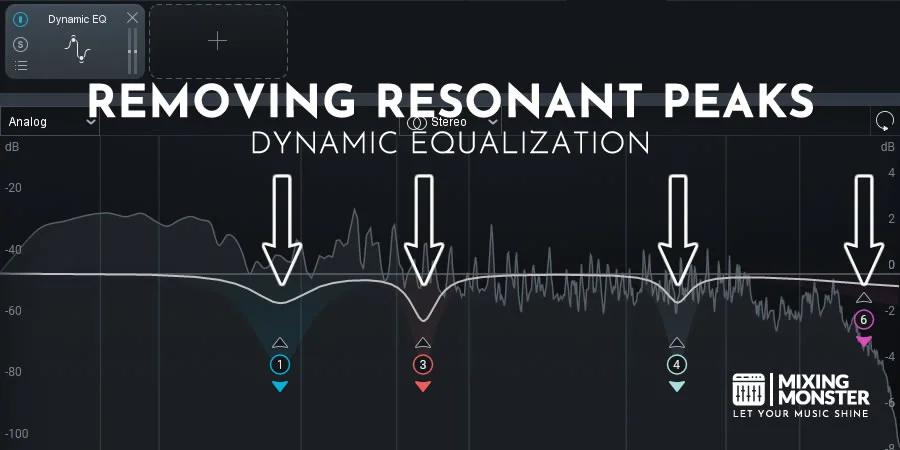
Static EQ applies a fixed cut, which works well for consistent resonances but may remove too much energy if the frequency is not always problematic. In contrast, dynamic EQ reacts in real time, reducing peak frequencies only when they cross a set threshold.
Dynamic EQ is often preferred for material such as vocals or acoustic instruments, where resonance varies with performance. It allows the natural tone to remain intact most of the time while controlling peaks when they become intrusive.
For example, a dynamic EQ band with a medium Q factor can tame harshness in the 2–5 kHz range only when the singer emphasizes certain vowels. This makes it more transparent than applying static cuts across the entire track.
Your Song Mixed & Mastered By Mixing Monster


Multiband Compression For Resonant Peaks
Multiband compression divides the audio into frequency bands and applies compression only where needed. Unlike EQ, which permanently alters gain at a specific frequency, multiband compression dynamically reduces resonance peaks within a defined range.
This method is useful when resonances occur in broader areas rather than narrow spikes. For instance, low-end rumble between 80–150 Hz can be controlled by compressing that band without affecting the mids or highs.
Settings usually involve a moderate ratio and attack/release times tuned to the material. The bandwidth of each compressor band should be carefully set to target problem areas without dulling the overall mix.
Using De-Resonator Plugins And AI Tools
Specialized de-resonator plugins and AI-driven tools automate the identification and reduction of resonances. Tools like RESO or similar processors scan the frequency spectrum, locate resonance peaks, and suggest optimal cuts.
These plugins often create "target nodes" that adapt dynamically, saving time compared to manual EQ sweeps. Many also automatically optimize the Q factor, ensuring that cuts remain transparent.
AI-based solutions are especially effective for complex materials such as full mixes or bus groups. Instead of manually tweaking dozens of narrow bands, the software continuously analyzes the signal and applies corrective adjustments with minimal phase distortion. This makes them efficient for both mixing and mastering workflows.

4
Best Practices For Preventing Resonant Peaks
Resonant peaks often occur when sound energy builds up at a system's natural frequency, creating unwanted emphasis in the mix or recording. Preventing them requires a combination of controlled recording methods, careful acoustic treatment, proper microphone positioning, and consistent gain structure.
Recording Techniques To Minimize Resonance At The Source
Capturing clean audio at the source reduces the need for heavy corrections later. Musicians and engineers should avoid overlapping instruments in the same frequency range, as this can cause resonance frequency buildup. For example, layering multiple instruments in the 200–400 Hz range often creates muddiness.
Dynamic control during recording also matters. Using instruments with proper damping, such as muting guitar strings or applying drum dampers, prevents excessive vibration. This reduces the likelihood of resonant peaks forming in the low- to mid-range.
Engineers should also monitor recordings with a real-time analyzer to detect early signs of problematic resonances. Identifying and addressing these during tracking is more effective than relying solely on post-processing.
Room Acoustics And Resonant Frequencies
The acoustic properties of a room strongly influence resonance. Small, untreated rooms often exaggerate low-frequency energy due to standing waves. These occur when sound reflects between parallel surfaces at the room's natural frequency.
To reduce this, absorptive materials such as bass traps and acoustic panels can be placed at reflection points. This increases damping and lowers the amplitude of resonant peaks. Diffusion panels also help by scattering sound energy, preventing buildup at specific resonance frequencies.
Monitoring speaker placement is equally important. Positioning speakers too close to walls can reinforce low-end resonance. Adjusting both speaker and listener positions helps minimize room-induced peaks, creating a more balanced frequency response.
Related Articles

Microphone Placement And Resonance Reduction
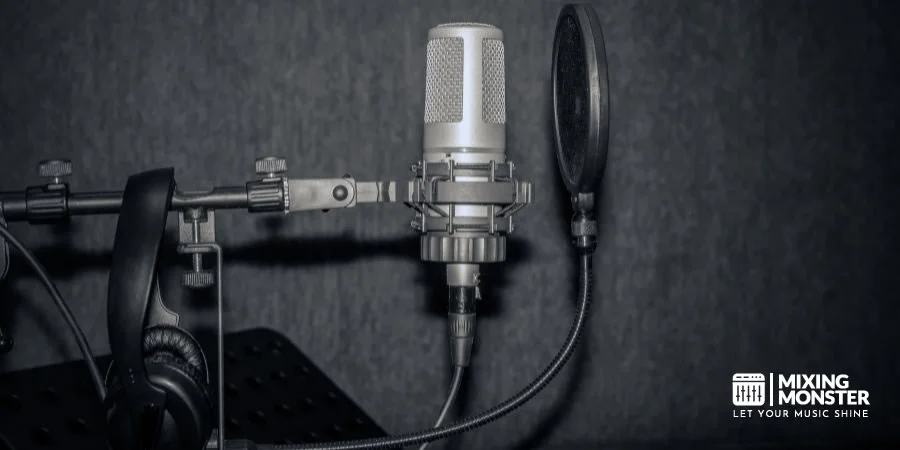
Microphone distance and angle directly affect how resonant peaks are captured. Placing a microphone too close to reflective surfaces can emphasize certain resonance frequencies. Moving the mic slightly off-axis often reduces harshness in the upper midrange.
Different microphones also respond uniquely to resonance. For example, a condenser mic may capture more detail but also highlight vibrations at higher frequencies. A dynamic mic, with its natural damping, can sometimes reduce problematic peaks.
Experimenting with mic placement relative to the sound source is key. Engineers often use incremental adjustments—moving a few inches at a time—to find a position that minimizes resonant buildup without losing tonal balance.
Gain Staging And Headroom Management
Improper gain staging can exaggerate resonant peaks, especially when signals approach clipping. Maintaining adequate headroom ensures that peaks at resonance frequencies do not distort or dominate the mix.
A structured approach helps:
- Set input gain conservatively to avoid overloading preamps.
- Balance track levels so no single element overwhelms the frequency spectrum.
- Use dynamic processors, such as compressors, only after establishing a proper gain structure.
By carefully managing levels, engineers prevent resonance from becoming more pronounced. This approach preserves clarity while maintaining a stable damping ratio across the mix.
For additional strategies on handling resonance in mixing, see techniques for fixing resonant frequencies in audio.

5
Advanced Tips For Managing Resonant Peaks
Engineers can control resonant peaks more effectively by combining corrective EQ, dynamic tools, and careful referencing. Subtle adjustments often achieve better results than aggressive cuts, preserving the sound's natural character while reducing harshness or buildup.
Layering EQ And Compression Strategically
A single EQ cut may not fully manage a stubborn resonance frequency. Layering EQ with compression creates a more controlled response. For example, a narrow bell cut can target a sharp resonance, while a multiband compressor can tame the same range when it spikes dynamically.
This approach reduces the chance of overcutting. Instead of applying a deep static notch, small EQ adjustments combined with compression produce a balanced tone.
When working with instruments like acoustic guitar or vocals, engineers often find that resonances shift slightly with performance dynamics. Using both EQ and compression ensures that peaks remain under control without stripping away harmonics that give the sound depth.
Automating EQ For Dynamic Resonant Control
Static EQ cuts can sometimes make a mix sound thin in sections where the resonance is absent. Automating EQ allows precise control, applying attenuation only when the resonance appears.
Dynamic EQ plugins make this process efficient. For instance, a cut at 4 kHz can be set to trigger only when the amplitude crosses a threshold, reducing harshness during loud passages but leaving quieter sections untouched.
This method is particularly effective for instruments with shifting resonance frequencies, such as strings or brass. In these cases, automation maintains tonal balance without compromising expressiveness. Tools like dynamic equalization in mastering highlight how adaptive processing improves clarity.
Mixing With Reference Tracks To Spot Resonance
Resonant peaks often stand out more clearly when compared to a well‑balanced reference track. By switching between the mix and a reference, engineers can identify whether a buildup around ωr or other problem areas is masking important details.
Using spectrum analyzers alongside listening tests provides additional confirmation. A Fourier transform display can reveal narrow spikes that the ear may overlook, especially in complex mixes with multiple harmonics.
Practical workflow:
- Select a reference track in the same style.
- Match playback levels for fair comparison.
- Use both listening and visual analysis to detect unwanted resonances.
This combination helps prevent overcorrection and maintains tonal consistency across playback systems.
Balancing Resonance Removal With Natural Tone
Removing resonances should not come at the cost of making instruments sound lifeless. A violin, for example, naturally contains resonant frequencies that define its timbre. Cutting too aggressively can flatten these characteristics.
The key is moderation. Small cuts of 2–3 dB at specific frequencies often yield better results than deep notches. Engineers should evaluate changes in the context of the full mix rather than in isolation.
In control system terms, resonance management is about damping excessive peaks without eliminating the system's natural response. This balance ensures that the sound retains its identity while avoiding listener fatigue.
Careful listening across multiple monitors or headphones helps confirm whether the adjustments preserve both clarity and authenticity.

6
Key Takeaways For Managing Resonant Peaks
Managing resonant peaks is an essential skill for any audio engineer, whether working in a professional studio or a home recording setup. The concepts and techniques covered throughout this guide provide a clear framework for identifying, removing, and preventing unwanted resonances that can compromise audio quality.
Understanding resonance is the foundation. A resonant peak is a narrow, localized spike in a frequency response where a system naturally vibrates more strongly. Unlike broad EQ imbalances, these peaks are often unintentional and require precise tools to correct. Resonant frequencies can be deeply irritating to listeners on a subconscious level, making their removal critical to a professional-sounding mix.
Detection comes before correction. Using a combination of spectrum analyzers, parametric EQ sweeps, and trained listening, engineers can pinpoint problem frequencies before applying any fixes. The sweep-and-cut method remains one of the most reliable and practical approaches for isolating harsh or unwanted resonances across vocals, guitars, drums, and other instruments.
Choose the right tool for the job. Surgical EQ cuts, dynamic EQ, multiband compression, and AI-driven de-resonator plugins each serve different purposes. Static EQ works well for consistent resonances, while dynamic EQ is better suited for material where peaks vary with performance. Understanding the strengths of each tool allows for more transparent and effective corrections.
Prevention is more efficient than correction. Good recording practices, proper room treatment, thoughtful microphone placement, and careful gain staging all reduce the likelihood of resonant peaks forming in the first place. Addressing resonance at the source saves significant time during mixing and mastering.
Subtlety produces better results. Whether applying EQ cuts or using compression, small adjustments of 2–3 dB are often more effective than aggressive notching. Over-processing can strip away the natural harmonic character of instruments, leaving mixes sounding flat or lifeless. The goal is to reduce problematic peaks while preserving the sound's original identity.
Always reference and re-evaluate. Comparing a mix against a well-balanced reference track helps confirm whether resonance corrections are working as intended. Using both listening tests and visual analysis tools ensures that adjustments improve the mix without introducing new problems or causing overcorrection.
By applying these takeaways consistently, engineers at any level can achieve cleaner, more balanced, and more professional-sounding audio across any genre or production environment.

Frequently Asked Questions
1
What are resonant peaks in audio engineering?
In audio engineering, resonant peaks are narrow frequency bands that stand out with higher amplitude than the surrounding spectrum. They often occur when a wavelength aligns with the physical characteristics of a sound source or playback environment. Excessive peaks can make a mix sound harsh or unbalanced.
2
How do I identify resonant frequencies in vocals?
Engineers usually identify vocal resonant frequencies by sweeping a narrow EQ band across the spectrum. A high Q value helps isolate the exact area where the resonance occurs. This makes it easier to detect nasal or piercing tones that distract from the natural vocal timbre.
3
What tools are best for removing resonant peaks?
Common tools include parametric EQs, dynamic EQs, and multiband compressors. A static EQ cut reduces the gain of a specific frequency, while a dynamic EQ adapts in real time when the resonance exceeds a threshold. Plugins designed for resonance control allow more transparent adjustments.
4
Can room acoustics cause resonant peaks in recordings?
Yes, reflective surfaces and standing waves in untreated rooms can create resonant buildup. When the wavelength of a sound matches the dimensions of a room, certain frequencies amplify unnaturally. This often results in boomy low-end or sharp midrange peaks that color the recording.
5
What's the difference between EQ cuts and dynamic EQ for resonance?
EQ cuts reduce a frequency band at all times, regardless of signal level. Dynamic EQ reduces gain only when the resonance becomes prominent, acting similarly to a compressor focused on a narrow band. This allows more natural control, especially when resonances vary with vocal dynamics.
6
How do resonant peaks affect perceived loudness in a mix?
Resonant peaks can make a track seem louder than it actually measures on meters because the ear is sensitive to narrow-band exaggerations. They can mask other elements in the mix, reducing clarity. Controlling them ensures more balanced loudness without over-compression or distortion.