You've probably heard someone say a mix needs "more compression" without knowing exactly what that means or how to compress audio in a way that actually helps the song. That confusion is normal, and this guide sorts it out.
How to compress audio refers to a specific audio engineering process: using a compressor to reduce a signal's dynamic range so the loudest and quietest moments sit closer together. It's a distinct process from file-size reduction methods like MP3 encoding, which discard data to shrink storage size. Dynamic compression shapes how a performance feels and behaves by controlling peaks, adding sustain, and helping tracks sit together without losing their character.
Every mix engineer relies on it, but the tool only works when you apply it with a reason in mind, not by chasing someone else's preset. Getting comfortable with threshold, ratio, attack, and release means you can start making decisions with your ears instead of guessing.
The sections ahead walk through compressor fundamentals, per-track shaping, bus and parallel techniques, common mistakes, and how to hand off a compressed mix for mastering. The goal is to build judgment, not just memorize numbers, so your mixes translate across systems and hold up under scrutiny.
Key Takeaways / TL;DR
- Dynamic compression controls volume differences within a performance; it has nothing to do with shrinking file size.
- Good compressor settings come from listening to the source material and the song, not from copying a generic preset.
- Combining track-level, bus, and parallel compression thoughtfully creates a mix that feels controlled without sounding squashed.

1
What Dynamic Compression Does in a Mix
An audio compressor listens to a signal and automatically turns down the parts that cross a level you set, then restores overall volume afterward. The result is a track that holds its place in a mix instead of jumping around or disappearing, which is the foundation of consistent audio quality across a song.
Dynamic Range Versus File Compression
Dynamic range compression and file compression share a name and nothing else. Lossy compression formats like MP3 remove audio data to reduce file size, while lossless audio formats like WAV or FLAC keep everything intact.
Dynamic compression, the subject of this guide, doesn't affect file size; it changes the relationship between loud and quiet moments in a performance, as Tracklib explains in its breakdown of audio compression.
Threshold, Ratio, and Gain Reduction
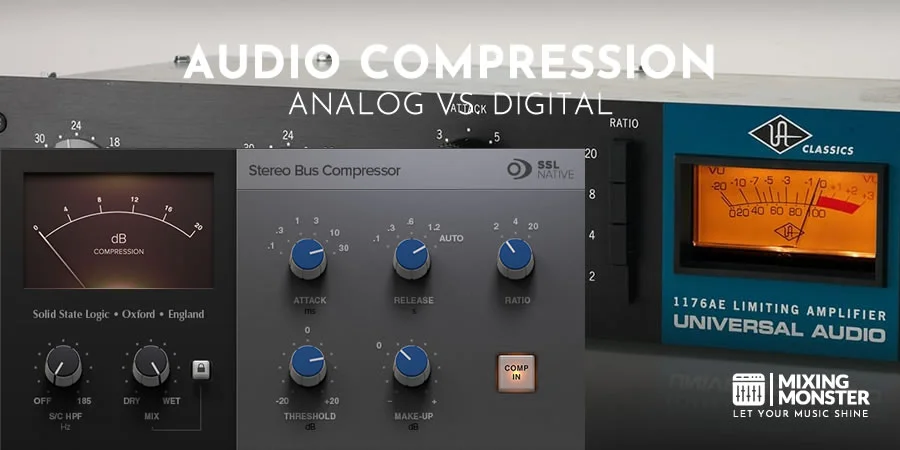
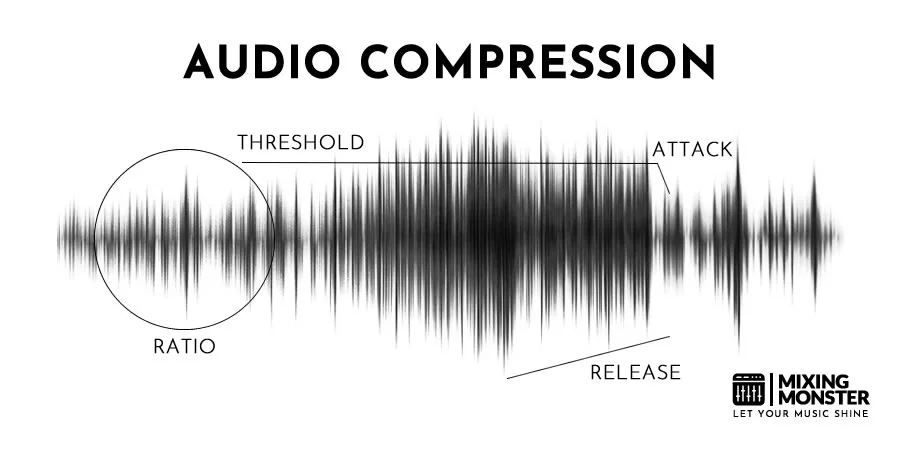
Threshold sets the level where compression kicks in. Ratio decides how much attenuation gets applied above that point, so a 4:1 ratio turns 4 dB of excess into 1 dB of output. Watching your gain reduction meter tells you how hard the compressor is actually working, not just what the knobs claim.
Makeup Gain and Loudness Bias
Compression pulls level down, so makeup gain brings the average volume back up afterward. Be careful here: louder almost always sounds "better" to the ear in a quick A/B, even when it isn't—Level-match before judging any compression decision.
Compression as Tone, Control, and Groove
Beyond taming peaks, compression shapes tone and rhythm. A slower attack lets transients punch through before the compressor grabs them. At the same time, faster settings can pull a performance tighter and add a felt sense of groove, a creative angle explored in Native Instruments' look at harmonic compression techniques.

2
Set Up a Compressor Before Chasing Settings
Before touching threshold or ratio, get the fundamentals right: clean gain staging, a stable sample rate across your session, and files in a format like WAV or AIFF that preserve full resolution for mixing. FLAC works too if you need smaller storage without quality loss. Skipping this step is the most common reason compressor settings that "worked on a tutorial" don't work in your session.
Start With Level, Arrangement, and Automation
Ride faders or draw volume automation on obvious outliers before compression ever enters the picture. A compressor reacting to a single wildly loud note will make decisions across the whole track that don't serve the quieter passages. Clean up the big problems by hand first.
Choose the Right Signal Path and Monitoring Level
Insert the compressor on the track or bus where it belongs in the signal chain, typically after EQ that removes problem frequencies, though some engineers compress first for tonal reasons. Monitor at a consistent, moderate volume; cranking the speakers hides distortion and pumping that will be obvious later.
Discover Best Audio Gear & Equipment


Use Gain Reduction Meters Without Mixing by Numbers
Gain reduction meters are a guide, not a scoreboard. A vocal might need 2 dB of reduction to sit right, while an aggressive rock guitar might want 8 dB for character. Trust what you hear over an arbitrary target number.
A Practical Starting Point for Attack and Release
A reasonable starting point on most material is a 3:1 or 4:1 ratio, medium attack (10 to 30 ms), and medium release (80 to 150 ms), similar to the baseline described in Audio Spectra's step-by-step compressor setup. Adjust from there by ear, tightening the release if the track feels sluggish or slowing the attack if transients feel clipped off.
3
Shape Individual Tracks With Purpose
Every instrument asks for a different compression strategy based on its transient shape and role in the arrangement. Vocals need peak control without losing emotional nuance, drums need punch or sustain depending on genre, and bass needs steadiness without sacrificing low-end weight.
Control Vocal Peaks While Keeping Expression
Start gentle, around 2 to 4 dB of gain reduction, with a medium attack that lets consonants through before clamping down. A soft knee, where the compressor eases into full ratio rather than snapping on instantly, tends to sound more natural on vocals, a distinction detailed in Adobe's breakdown of compressor controls. Stack two compressors doing light work rather than one doing heavy lifting; it stays more transparent.
Add Punch or Sustain to Drums
A fast attack on a kick or snare will tame the initial hit and can reduce punch, since it grabs the transient itself. A slightly slower attack lets that transient through, then compresses the tail for more perceived punch and sustain. Hard knee settings suit percussive sources well.
Your Song Mixed & Mastered By Mixing Monster


Stabilize Bass Without Losing Weight
Bass often needs the most consistent compression in a mix since even small volume dips read as pitch or tuning issues. A moderate ratio with a fast-ish attack and medium release keeps the low end anchored under the rest of the arrangement without squashing the fundamental tone.
Manage Acoustic Instruments, Guitars, and Piano
Acoustic sources have naturally wide dynamics that read as expressive live but inconsistent in a mix. Light to moderate compression, often 2 to 3 dB of reduction, smooths pick or hammer transients without flattening the performance's dynamics.
Treat Voice Recordings and Spoken-Word Audio Naturally
For voice recordings and meeting recordings intended for podcasts or dialogue, prioritize intelligibility over musical character. A gentle ratio around 2:1 or 3:1 with quick release keeps volume consistent without giving speech that obvious "pumping" quality, preserving natural audio quality for listeners on phone speakers or earbuds.

4
Use Bus and Parallel Techniques for Cohesion
Bus compression applies one compressor across a group of tracks to glue them together. In contrast, parallel compression blends a heavily compressed copy back with the original for density without losing transients. Both techniques work at a different scale than single-track compression, shaping how elements relate to each other rather than shaping one sound in isolation.

Glue a Drum Bus Without Flattening Transients
A drum bus compressor set with a low ratio (2:1), slower attack, and auto or fast release can unify a kit's dynamics while letting transient hits through. Aim for only 1 to 3 dB of gain reduction, as detailed in Music Guy Mixing's guidance on bus compression settings. Push harder and the kit starts to feel squashed rather than tight.
Use Parallel Compression for Energy and Density
Blend a heavily compressed duplicate of a track or bus underneath the untouched original, a technique sometimes called New York compression. This adds density and audible energy to quiet details while keeping the original transients intact, as explained in SoundGym's guide to compression for a professional mix. It's especially effective on drum buses and vocals that need to feel bigger without feeling squeezed.
Related Articles

Apply Sidechain Compression to Create Space
Sidechain compression triggers gain reduction on one track based on another's level, most commonly ducking bass slightly whenever the kick hits. This carves out space in a crowded low end without manual automation on every hit.
Decide Whether the Mix Bus Needs Compression
Light mix bus compression, often just 1 to 2 dB of reduction with a gentle ratio, can add cohesion before mastering. It's optional, not mandatory, and heavy-handed use here limits what a mastering engineer can do later.

5
Avoid Pumping, Distortion, and Lifeless Mixes
Over-compression is easy to fall into because louder often sounds more exciting in the moment, even when it's actively hurting the mix. The goal is balanced compression that controls dynamics without introducing artifacts or draining the life out of a performance, which means learning to catch the warning signs early.
Recognize Over-Compression by Ear
Pumping (an audible breathing effect as gain recovers), flattened transients, and a general sense of fatigue are classic signs of maximum compression pushed too far. If a mix sounds loud but tiring after thirty seconds, dynamics are likely the culprit, a pattern outlined in common compression errors documented by MixAcademia.
Match Attack and Release to the Song
A release time that's too fast on a ballad can make it feel jittery; a release too slow on a fast, aggressive track can smother its energy. Tempo and genre should always inform these settings, not a fixed number from a cheat sheet.
Use High-Pass Sidechain Filtering to Prevent Low-End Pumping
Filtering the low frequencies out of a compressor's sidechain input stops big bass or kick energy from triggering unwanted gain reduction across the whole mix. This keeps compression reacting to the frequencies that actually need control.
Know When Automation Works Better Than Compression
Sometimes a single loud word or note is better handled with a manual volume dip than with a compressor setting tuned around that one moment. Automation offers surgical control that a compressor, reacting to an entire performance, can't always match.
Compare Bypassed and Level-Matched Processing
Always A/B the compressed signal against the bypassed one at matched volume. This is the only fair way to judge whether compression genuinely improves good-quality sound or makes it louder, an idea reinforced in Soundcy's discussion of compression and audio artifacts.

6
Prepare a Compressed Mix for Mastering and Delivery
A mix compressed with care still needs the right export habits to protect that work through mastering and final delivery—leaving room for a mastering engineer, avoiding lossy detours, and labeling files clearly matter as much as the compression itself.
Leave Headroom and Preserve Musical Dynamics
Export your mix with peaks around -6 dB and avoid limiting the master bus into oblivion before sending it off. Mastering engineers need headroom to work with, and a mix compressed to the point of losing all dynamics gives them nothing to shape, as Sage Audio notes in its guide to bus compression before mastering.
Avoid Re-encoding Loss During Review Exports
Send reference mixes as WAV, AIFF, or FLAC whenever possible. If MP3 files are necessary for quick review, use a high bitrate like 320 kbps rather than 192 kbps, and never re-encode an already-compressed MP3 into another lossy format like AAC or M4A; each re-encoding pass degrades quality further.
Use Reference Files and Clear Version Naming
Label exports with version numbers and dates, and include a reference track or two that shows the tonal and dynamic target you're aiming for. This saves confusion during revisions and gives a mastering engineer useful context.
When to Ask a Professional Mix or Mastering Engineer
Some mixes benefit from a second, more objective set of ears, especially after hours of staring at the same session. Services like Mixing Monster, an online mixing and mastering studio based in Hamburg, exist for exactly that kind of experienced, unbiased listening on stubborn projects.

7
Key Takeaways For Audio Compression
- Dynamic compression shapes how loud and quiet parts relate to each other; it's unrelated to shrinking file size.
- Start with clean gain staging and modest settings, then adjust attack, release, and ratio by ear based on the source material.
- Different instruments need different approaches: vocals favor a soft knee, drums often benefit from a slower attack for punch, and bass needs steady, consistent control.
- Bus and parallel compression add cohesion and density without necessarily flattening transients, when used with restraint.
- Watch for pumping, distortion, and listener fatigue as signs of over-compression, and always compare bypassed versus processed at matched volume.
- Leave headroom, avoid unnecessary lossy re-encoding, and label files clearly before sending a mix off for mastering.
Happy compressing!

Frequently Asked Questions
1
What does a compressor actually do to an audio signal in mixing?
A compressor reduces a signal's volume once it crosses a set threshold, using a ratio to determine how much reduction is applied. It then restores overall loudness with makeup gain, resulting in a more consistent, controlled signal that sits steadier in a mix.
2
What are the best starting compressor settings for vocals, drums, and bass?
Vocals typically respond well to a 3:1 ratio, medium attack, and 2 to 4 dB of gain reduction with a soft knee. Drums often benefit from a slower attack to preserve punch and a hard knee for character. Bass usually needs a moderate ratio with a faster attack to stay steady under the mix.
3
How do I know if I'm over-compressing a track?
Listen for pumping, an audible breathing sound as the compressor releases, flattened transients, and general listener fatigue. If a track sounds loud in isolation but tiring after a minute, or if dynamics feel completely gone, back off the ratio or gain reduction.
4
Should I compress individual tracks, buses, or the master, or all three?
Most professional mixes use compression at all three stages, but with different goals: track-level for shaping individual sounds, bus-level for cohesion across groups like drums, and light master bus compression, if any, for gentle glue before mastering. Each stage should apply only as much compression as it needs.
5
What's the difference between parallel compression and serial compression?
Serial compression processes a signal directly, in line, changing the dynamics of that one signal path. Parallel compression blends a heavily compressed copy underneath the untouched original, adding density and energy while preserving the source's natural transients.
6
Do I need an expensive compressor plugin, or are stock DAW compressors good enough?
Stock compressors in modern DAWs are genuinely capable and cover threshold, ratio, attack, release, and knee controls just like premium plugins. The sound character differs slightly between models, but the skill of setting attack and release musically matters far more than the plugin's price tag.