


Mix bus processing transforms individual tracks into a cohesive, professional-sounding mix that competes with commercial releases. Learning how to set up a mix bus is essential for any engineer aiming to create a balanced mix that translates across various playback systems. This critical stage in audio production can make the difference between amateur and professional results.
Mix bus processing in audio mixing involves applying selected effects, such as compression, EQ, and saturation, to the entire stereo mix before mastering. It allows engineers to make global adjustments that affect the overall tone, dynamics, and spatial characteristics of the music within a digital audio workstation.
Mix bus processing creates cohesion by running individual tracks through a single master effects chain, causing elements to gel into a unified mixdown rather than separate, stacked components.
The technique serves as the final mixing stage before the master bus. It enables producers to enhance overall balance, clarity, and punch while defining what a mix bus is in their specific workflow. When executed properly, it provides the warmth and competitive edge that distinguishes professional tracks from unprocessed mixes.
Understanding the right plugins, techniques, and workflow integration separates successful mix bus processing from common mistakes that can ruin a mix. This comprehensive guide covers essential processing techniques, professional tips, and strategic approaches used by audio mixing engineers to achieve a radio-ready sound.
Discover how to select appropriate tools, avoid common pitfalls, and seamlessly integrate bus processing into their audio production workflow for consistently polished results.
Key Takeaways / TL;DR
- Mix bus processing applies effects to the entire stereo mix to create cohesion and professional sound quality.
- Essential techniques include subtle compression, gentle EQ adjustments, and harmonic saturation for gluing tracks together.
- Proper workflow integration and avoiding over-processing are crucial for achieving competitive, radio-ready mixes.

1
What Is Mix Bus Processing In Audio Mixing?
Mix bus processing applies audio effects to the entire mix rather than individual tracks, creating cohesion and professional polish. This technique transforms separate elements into a unified sound that competes with commercial releases.
Understanding The Role Of The Mix Bus In Audio Mixing
The mix bus serves as the final destination where all individual tracks combine before reaching the master output. This stereo bus serves as a summing point for all elements in your project. The mix bus channel provides a central point for processing the entire song as a single entity. Mix bus processing routes multiple signals to one channel for simultaneous treatment.
This central hub differs from individual track processing. While track-level effects target specific instruments, mix bus processing affects the entire stereo mix. The mix bus sits between individual channels and the master bus in the signal chain.
Engineers use the mix bus to apply gentle compression, EQ, and saturation. These effects shape the overall tonal balance and dynamic response. The mix bus also provides a convenient location for A/B testing different processing chains. Understanding what a mix bus is helps you organize your routing effectively.
Key mix bus functions:
- Combines all individual tracks
- Provides unified processing control
- Creates cohesive sound character
- Enables quick mix adjustments
How Mix Bus Processing Shapes The Final Sound
Mix bus processing shapes and enhances the overall sound by bringing cohesion to individual elements. Compression on the mix bus glues tracks together by controlling peak levels and adding subtle pumping.
EQ at the mix bus level corrects broad frequency imbalances. A gentle high-frequency boost adds air and sparkle. Low-frequency cuts remove muddiness across the frequency spectrum without significantly affecting individual instruments.
Saturation and harmonic excitement add warmth and presence. These effects create the dense, full sound characteristic of professional recordings. Tape emulation and tube modeling plugins provide vintage character.
Common mix bus effects:
- Compression: Controls dynamics and adds glue
- EQ: Shapes overall frequency response
- Saturation: Adds harmonic richness
- Limiting: Prevents clipping and increases loudness
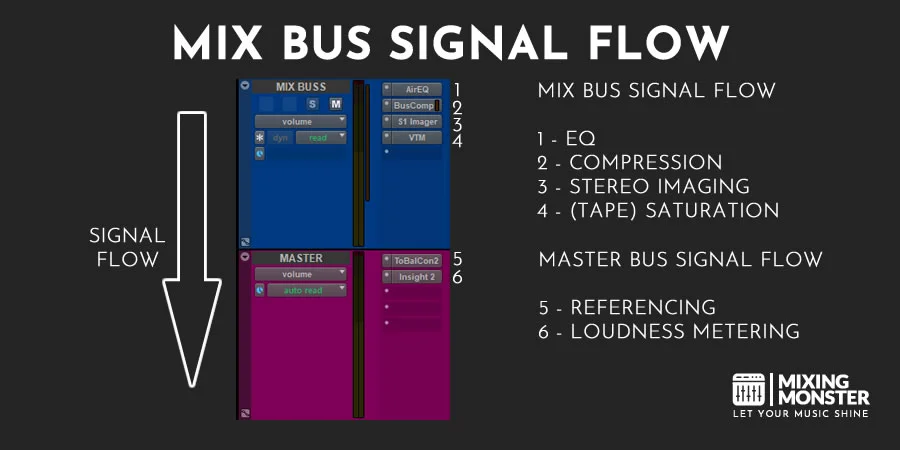
The processing order matters significantly. Most engineers follow the EQ → Compression → Saturation → Limiting signal chain.
Common Misconceptions About Mix Bus Compression
Many producers believe mix bus compression requires aggressive settings to be effective. Heavy compression ratios above 4:1 often cause pumping and destroy natural dynamics. Subtle ratios between 1.5:1 and 3:1 provide better results.
Another misconception involves compression timing. Fast attack times can remove transient punch from drums and percussion. Slower attacks between 10-30ms preserve impact while controlling sustained levels.
Mix bus compression myths:
- More compression equals better glue
- Fast attacks always improve control
- Digital compressors sound identical
- Compression should be obvious
Some engineers avoid mix bus compression entirely, fearing it will damage their careful individual track work. Light compression with 1-3dB gain reduction enhances rather than masks good mixing decisions.
When To Start Applying Mix Bus Effects In Your Workflow
Mix bus processing works best when applied after achieving solid individual track balances. Starting too early can mask problems that need to be addressed at the source.
The rough mix stage provides the ideal entry point. With basic levels, panning, and EQ established, mix bus processing reveals its full potential. This timing allows proper evaluation of how effects interact with the complete arrangement.
Optimal workflow sequence:
- Set individual track levels and panning
- Apply basic EQ and compression per track
- Establish send effects and reverbs
- Add gentle mix bus compression
- Fine-tune with mix bus EQ
Some engineers prefer inserting mix bus processing from the start of the project. This approach helps inform individual mixing decisions but requires careful gain staging. Template sessions with pre-configured mix bus chains streamline this workflow, providing a clear starting point for setting up a mix bus effectively.

2
Essential Mix Bus Processing Techniques
These four core techniques form the foundation of professional mix bus processing. Proper compression creates cohesion between elements, strategic EQ addresses tonal balance issues, saturation adds musical character, and stereo imaging ensures optimal spatial presentation.
Using Compression To Glue Your Mix Together
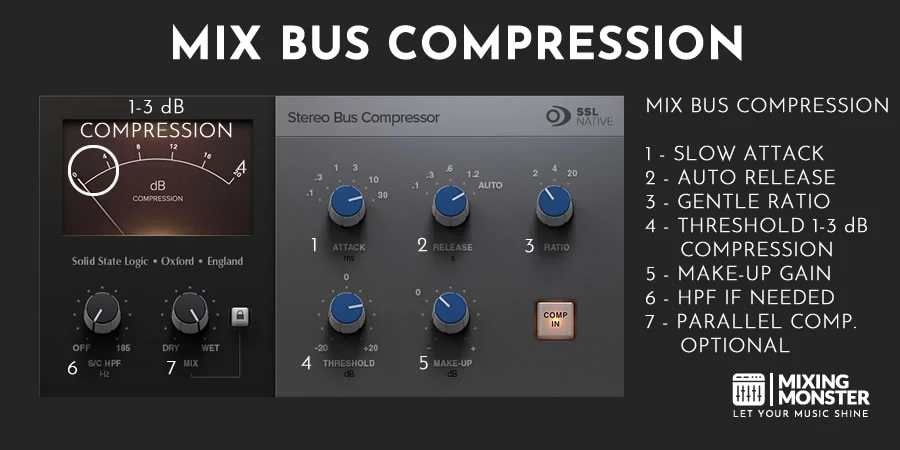
Bus compression serves as the primary tool for creating a cohesive mix by controlling dynamics across all elements simultaneously. The technique makes individual tracks feel unified rather than separate.
Optimal Settings for Glue Compression:
- Ratio: 2:1 to 3:1
- Attack: 10-30ms (slow)
- Release: 100-300ms (medium)
- Gain Reduction: 1-3dB maximum
Engineers typically target gentle gain reduction that responds to the mix's natural dynamics. The compressor should breathe with the music rather than constantly working. Proper settings let you preserve transients while controlling the overall dynamic range of the program material.
Glue compression techniques work best when applied subtly. Excessive compression destroys the natural punch and excitement that make music engaging.
The SSL bus compressor remains the industry standard for this application. Using a dedicated glue compressor ensures the different tracks feel like a single performance. Its distinctive sound characteristics complement most musical genres without imposing unwanted coloration.
Applying EQ For Clarity And Balance
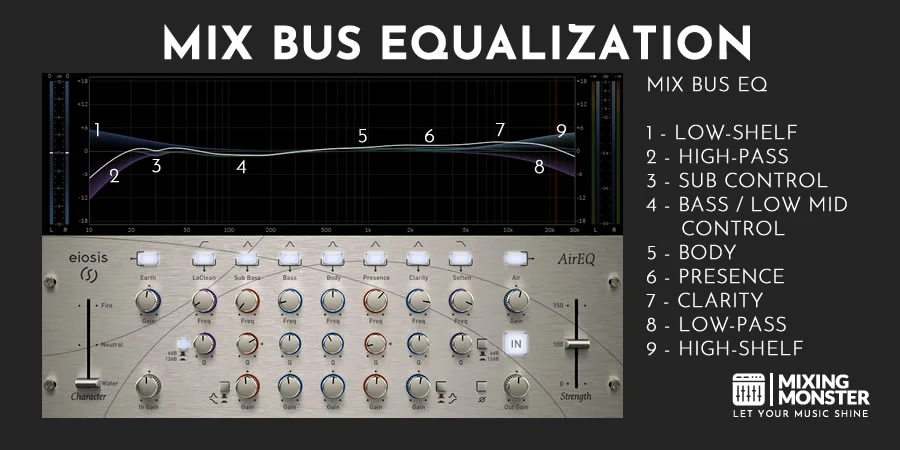
Mix bus EQ addresses broad frequency issues that affect the entire mix's tonal balance. These adjustments enhance clarity without disrupting individual instrument relationships established during mixing. This process is vital to ensuring a balanced mix in which no single frequency range dominates the others.
Common Mix Bus EQ Moves:
|
Frequency Range |
Purpose |
Typical Adjustment |
|
20-40Hz |
Remove rumble |
High-pass filter |
|
200-400Hz |
Reduce muddiness |
-1 to -2dB |
|
2-5kHz |
Control harshness |
-0.5 to -1.5dB |
|
10-15kHz |
Add air and sparkle |
+0.5 to +2dB |
Strategic equalization approaches focus on gentle, broad adjustments rather than surgical cuts. Wide Q settings prevent phase issues while maintaining natural sound. Some engineers also use a dynamic EQ to address frequency buildup that occurs only during loud sections of a song.
Engineers often apply high-shelf boosts around 10kHz to enhance perceived clarity. This technique adds brightness without making the mix sound harsh or fatiguing.
Low-frequency cleanup remains critical for translation across different playback systems. A steep high-pass filter can remove unnecessary sub-bass content. This improves headroom and prevents mastering complications later on.
Discover Best Audio Gear & Equipment


Adding Saturation And Harmonic Warmth
Saturation introduces pleasing harmonic distortion, enhancing the mix's musicality and analog character. This process adds depth and richness without significantly altering the frequency balance.
Types of Saturation for Mix Bus:
- Tape saturation: Adds compression and warmth
- Tube saturation: Creates even-order harmonics
- Console saturation: Provides subtle glue and character
Harmonic enhancement works by generating overtones that fill gaps in the frequency spectrum. These additional harmonics make instruments sound fuller and more present.
Drive settings should remain conservative to avoid unwanted distortion. Most engineers apply just enough saturation to add warmth without obvious coloration.
Tape emulation plugins excel at providing natural-sounding saturation. They combine gentle compression with harmonic enhancement for a vintage analog feel that complements modern productions.
Managing Stereo Width And Imaging
Stereo imaging controls the perceived width and spatial characteristics of the entire mix. Proper management ensures the mix translates well across mono and stereo playback systems. This involves balancing the width and depth of the stereo field to create an immersive listening experience.
Key Stereo Processing Considerations:
- Mono compatibility: Essential for broadcast and club systems
- Center stability: Maintains focus for lead vocals and kick drums
- Side enhancement: Adds width without compromising center content
Stereo widening techniques can enhance the immersive quality of a mix when applied judiciously. Excessive widening creates phase issues and reduces impact on single-speaker systems.
Mid-side processing offers precise control over center and side content independently. This approach allows engineers to enhance the width while maintaining mono compatibility.
Bass frequencies below 120Hz should remain centered to avoid phase cancellation. Low-frequency stereo content can cause problems in mastering and reduce the mix's power and definition.
3
Choosing The Right Mix Bus Plugins And Tools
Selecting the right mix of bus processing tools determines whether a mix achieves professional cohesion or falls apart under scrutiny. The most critical decisions involve compressor character, EQ transparency, and the desired sonic character of the production. You must decide whether analog modeling or digital precision serves the music better.

Top Mix Bus Compressors For Modern Mixing
SSL G-Series compressors remain the industry standard for their distinctive VCA sound and musical response to transients. The SSL Native Bus Compressor and Waves SSL G-Master Buss Compressor deliver this classic glue effect at ratios of 2:1 to 4:1.
API 2500-style compressors offer three distinct knee settings and feedback/feedforward modes. The UAD API 2500 and Plugin Alliance bx_townhouse provide aggressive character perfect for rock and hip-hop productions.
Transparent compressor options like the Fabfilter Pro-C 2 and UAD Empirical Labs Distressor excel when subtle dynamic control is needed. These processors maintain the original tone while providing consistent levels across different sections.
The best bus compressor plugins for 2025 include Slate Digital VBC, which models multiple vintage units in one plugin. Softube's Console 1 Bus Compressor brings hands-on hardware control to the digital domain.
Modern producers often layer multiple compressors at low ratios rather than using a single compressor heavily. A 1176-style unit at 2:1 followed by an SSL-type compressor at 3:1 creates complex harmonic interactions.
EQ Plugins That Enhance Tonal Balance
Pultec-style EQs shape mix bus tone through their distinctive boost-and-cut curves. The UAD Pultec EQP-1A and Waves PuigTec provide gentle high-frequency air and low-end warmth without harsh artifacts.
Surgical EQ tools like FabFilter Pro-Q 3 and DMG Audio Equilibrium offer linear-phase modes for mix bus work. These prevent phase shifts that can blur stereo imaging when making broad tonal adjustments.
Console-modeled EQs from Slate Digital VCC and Plugin Alliance deliver the subtle coloration of analog mixing desks. Each channel adds minimal harmonic content that accumulates into pleasing saturation.
High-pass filter settings between 20 and 40 Hz remove subsonic rumble without affecting musical bass content. Steep 24 dB/octave slopes work better than gentle 6 dB/octave curves for this application.
Vintage-modeled EQs like the Neve 1073 or API 550A impart character through transformer saturation and component modeling. These work best on program material that benefits from added harmonics and compression.
Your Song Mixed & Mastered By Mixing Monster


Analog Emulation vs Digital Precision
Analog emulations introduce harmonic distortion, component drift, and transformer coloration that can enhance musical content. Tape saturation plugins like UAD Studer A800 and Slate VTM add perceived loudness through harmonic excitement.
Digital precision tools provide surgical accuracy without unwanted artifacts. Transparent compressor algorithms and linear-phase EQs maintain the original mix balance while applying processing.
Console emulations from UAD, Waves, and Plugin Alliance model entire mixing desk signal paths. These add cumulative harmonic content and subtle compression, gluing individual tracks together.
Modern hybrid approaches combine both philosophies within a single plugin. FabFilter Pro-C 2 offers both clean digital modes and vintage-style analog modeling for maximum flexibility.
The choice depends on source material and artistic intent. Electronic music often benefits from digital precision, while acoustic recordings gain warmth from analog modeling.
Recommended Mix Bus Plugin Chains For Different Genres
Hip-hop and R&B chains typically start with gentle high-pass filtering at 30 Hz, followed by SSL-style compression at a 2:1 ratio. Add Pultec-style EQ for air and warmth, then finish with a transparent limiter to control peak levels.
Rock and metal processing requires aggressive compression to control dynamic peaks. Use API 2500-style compression at 4:1, tape saturation for harmonic excitement, and console EQ for presence boosts around 2-5 kHz.
Electronic music chains emphasize digital precision and surgical control. Start with multiband compression, add transparent EQ for spectral balancing, then use clean limiting for competitive loudness levels.
Acoustic and jazz mixing benefits from subtle analog modeling throughout the chain. Gentle tube compression, vintage EQ curves, and minimal processing preserve natural dynamics and spatial information.
Pop music processing combines elements from multiple approaches. Use moderate SSL compression, transparent surgical EQ for problem frequencies, analog saturation for character, and controlled limiting for radio compatibility.

4
Advanced Mix Bus Processing Tips From Professionals
Professional engineers employ sophisticated techniques that go beyond basic compression and EQ. These methods include parallel compression for transparent control, spatial enhancement through reverb, strategic automation for dynamic movement, and careful restraint to prevent over-processing.
Parallel Compression Techniques For Dynamic Control
Parallel compression provides transparent dynamic control by blending compressed and uncompressed signals. Engineers typically set up a parallel bus with aggressive compression settings - fast attack times around 1-3ms and moderate to fast release times.
The compressed signal uses a significant gain reduction of 6-10dB or more. This heavily compressed version gets blended at low levels with the original mix bus signal.
Professional engineers often use vintage-style compressors, such as 1176 or LA-2A emulations, on the parallel bus. The key lies in finding the right balance between the compressed and dry signals.
Parallel Compression Settings:
- Attack: 1-3ms
- Release: 100-300ms
- Ratio: 4:1 to 10:1
- Gain Reduction: 6-10dB
- Blend Level: 10-30%
This technique maintains the mix's natural dynamics while adding punch and cohesion. The parallel signal fills in the gaps during quieter passages without squashing the peaks.
Subtle Reverb And Spatial Enhancement
Professional mixes benefit from subtle reverb processing that creates depth without muddying the sound. Engineers apply short-plate or hall reverbs with decay times of 0.8 to 1.5 seconds to the mix bus.
The reverb return typically receives high-pass filtering around 200-400Hz to prevent low-end buildup. Low-pass filtering around 8-12kHz removes harsh frequencies that compete with vocals.
M/S EQ processing on reverb returns allows precise control over stereo imaging. Engineers boost the sides slightly in the 2-4kHz range while keeping the center focused.
Mix the reverb return extremely low - usually 5-15% of the dry signal. This subtle enhancement creates cohesion without obvious reverb artifacts.
Pre-delay settings of 20-40ms help separate the reverb from the direct sound. This prevents the mix from becoming washy while maintaining spatial enhancement.
Related Articles

Automation Tricks For Dynamic Mix Bus Movement
Dynamic automation on the mix bus creates musical movement throughout the song. Professional engineers automate EQ boosts during choruses and compress more heavily during dense sections.
Parallel processing automation involves riding the blend level of parallel buses. Increase parallel compression during verses for intimacy, then reduce it during powerful choruses.
Stereo width automation using M/S processing creates dramatic effects. Widen the stereo field during choruses by boosting the sides 1-2dB, then narrow during verses for focus.
High-frequency excitement automation adds energy during climactic moments. Gentle 1-2dB boosts around 8-12kHz during choruses enhance presence without harshness.
Saturation automation provides warmth and density when needed. Increase tape or tube saturation during emotional peaks while keeping verses cleaner.
How To Avoid Over-Processing Your Mix Bus
Over-processing destroys the natural feel of a mix and creates fatigue. Professional engineers limit gain reduction to 2-3dB on the mix bus compressor to maintain dynamics.
EQ moves should remain subtle - no more than 2-3dB cuts or boosts. Dramatic EQ changes indicate problems in the individual track-mixing stage that need to be addressed first.
Use bypass switching frequently to compare processed and unprocessed versions. If the processing isn't obviously beneficial, remove it entirely rather than keeping subtle but unnecessary changes.
Processing Chain Order:
- EQ (corrective)
- Compression (gentle)
- Saturation (subtle)
- EQ (musical enhancement)
Avoid stacking multiple compressors unless using parallel processing. High-quality metering plugins help you visualize the impact of your decisions on the overall waveform. Each processor should serve a specific purpose rather than adding processing for its own sake.
Trust the individual mix decisions and use mix bus processing only to enhance what already works well. Monitoring your LUFS levels at this stage ensures you aren't sacrificing too much dynamic range for volume.

5
Common Mistakes In Mix Bus Processing
Mix bus processing errors can undo hours of careful mixing and create problems that carry over into the mastering stage. If you over-process, your pre-master will lack the necessary clarity for final optimization. The most critical mistakes involve compression settings that crush dynamics, EQ decisions that conflict with mastering processes, stereo enhancement that introduces phase problems, and poor gain staging that reduces headroom.
Over-Compression And Loss Of Dynamics
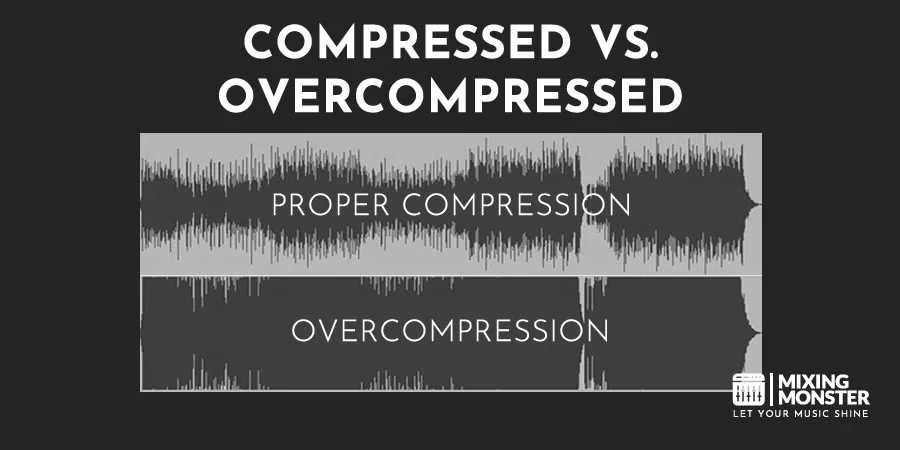
Over-compression represents the most damaging mistake in mix bus processing. Engineers often apply excessive compression ratios above 4:1 with fast attack times, which destroys the natural punch and breathing of the mix.
Attack Time Problems:
- Attack times under 10ms kill transients from drums and percussion
- Fast attacks create a flat, lifeless sound that lacks energy
- Slow attacks (30-100ms) preserve the initial impact of instruments
The fast-attack compression mistake destroys transients and makes mixes sound unexciting. Professional mixers typically use ratios between 2:1 and 3:1 with medium to slow attack times.
Compression Ratio Guidelines:
|
Mix Type |
Recommended Ratio |
Attack Time |
|
Rock/Pop |
2:1 - 3:1 |
30-50ms |
|
Electronic |
3:1 - 4:1 |
10-30ms |
|
Jazz/Acoustic |
1.5:1 - 2:1 |
50-100ms |
Over-compressed mixes permanently lose their dynamic range. Mastering engineers cannot restore dynamics that compression has already removed from the mix bus stage.
EQ Conflicts Between Mix Bus And Mastering Stage
Mix bus EQ decisions often create conflicts during mastering when engineers apply broad frequency corrections. These conflicts result in frequency buildups or cancellations that damage the final master.
Common EQ mistakes include high-frequency boosts above 10kHz that become harsh after mastering compression. Low-end boosts below 60Hz often conflict with mastering high-pass filtering and loudness optimization.
Problematic EQ Moves:
- High-shelf boosts above 8kHz that become brittle under mastering limiting
- Low-mid cuts around 200-400Hz that create thin masters
- Presence boosts at 2-5kHz that clash with mastering de-essing
Common EQ mistakes on the mix bus include applying corrections that should be applied to individual tracks. Mix bus EQ should enhance rather than fix fundamental problems.
Mastering engineers prefer receiving mixes with minimal corrective EQ on the mix bus. This approach provides maximum flexibility for loudness processing and final tonal adjustments.
Phase Issues From Stereo Enhancers
Stereo enhancement plugins often introduce phase issues that cause mono compatibility problems and unstable stereo imaging. These phase issues are amplified during mastering when mid-side processing is applied.
Mid-side stereo wideners often push frequencies out of phase between left and right channels. When mastering engineers fold the mix to mono for streaming compatibility checks, important elements disappear completely.
Common Phase Problems:
- Bass frequencies pushed wide become muddy in mono
- Vocal elements processed with stereo width lose clarity
- Drum overheads enhanced with widening create hollow sounds
The phase issues from stereo enhancement create artifacts that mastering compression and limiting amplify. Professional mixers test mono compatibility before applying any stereo processing.
Stereo Enhancement Best Practices:
- Keep bass content (below 120Hz) centered in mono
- Test mono compatibility after applying widening
- Use stereo enhancement subtly on high frequencies only
Mastering processes like multiband compression can react poorly to phase-shifted material, causing pumping and instability across frequency bands.
Ignoring Gain Staging And Headroom
Poor gain staging creates problems that cascade through the mastering chain. Mixes hitting the mix bus too hot force mastering engineers to reduce levels before processing, which degrades signal-to-noise ratio.
The proper gain staging technique targets an average level of around -18 dBFS at the mix bus. This level provides optimal plugin performance and sufficient headroom for processing.
Gain Staging Problems:
- Hot levels above -12 dBFS cause plugin distortion and limiting artifacts
- Low levels below -24dBFS introduce noise and require excessive makeup gain
- Inconsistent levels between sections create mastering difficulties
Mix bus processing works best when individual tracks feed the bus at consistent, moderate levels. Engineers should leave 6-12dB of headroom before any mix bus processing begins.
Mastering requires headroom for loudness processing and peak limiting. Mixes delivered with peaks above -3 dBFS force mastering engineers to reduce levels, which affects the balance between processed and unprocessed signals.
Recommended Peak Levels:
- Mix bus output: -6dB to -3dB maximum peaks
- Individual tracks: -12dB to -6dB peak levels
- Bus sends: Match the mix bus gain structure
Dithering becomes necessary when reducing bit depth from 24-bit mixing to 16-bit delivery, but proper gain staging minimizes quantization noise throughout the process.

6
Integrating Mix Bus Processing Into Your Mixing Workflow
Successful mix bus integration requires establishing your processing chain before detailed track mixing and maintaining proper levels throughout your DAW—the workflow centers on early setup, precise gain staging, and consistent referencing. Mastering the mix begins with these critical choices on the stereo bus.
Setting Up Your Mix Bus Chain Early
Engineers should establish their mix bus processing chain before diving into individual track adjustments. This approach allows the mixer to hear how their decisions affect the final output from the beginning.
Mixing into your bus during processing helps provide an accurate representation of the finished mix. The master channel receives all audio signals, making it the ideal location for this processing chain. Knowing how to set up a mix bus and understanding its signal flow are fundamental skills in modern digital production. This structural foundation is necessary to produce a balanced mix that maintains its integrity even after heavy processing.
Essential early setup steps:
- Route all tracks to a dedicated mix bus or subgroups
- Insert a gentle compressor with a 2:1 ratio and a slow attack
- Add subtle EQ cuts around 400Hz and boosts at 10kHz
- Apply light saturation for harmonic enhancement
Most DAW systems allow multiple output routing options for mix bus configuration. Engineers can create auxiliary channels or use the master channel directly. This mirrors the signal flow found on a traditional mixing console.
Metering becomes crucial during this phase. Set up peak and RMS meters on the mix bus to monitor levels consistently throughout the mixing process.
Balancing Individual Tracks Before Bus Processing
Individual track levels must be properly balanced before applying bus processing effects. Poor gain staging at the track level creates problems that bus processing cannot solve effectively.
Start with static fader adjustments to establish basic relationships between instruments. Drums, bass, and lead vocals typically form the foundation of most mixes.
Track balancing priorities:
- Drums - Set kick and snare levels first
- Bass - Balance against the kick drum
- Lead vocals - Position above the instrumental bed
- Supporting instruments - Fill remaining frequency spaces
Each track should hit the mix bus at optimal levels. Peaks around -18 dBFS to -12 dBFS provide adequate headroom for bus processing without digital distortion.
Check individual track contributions by soloing and unsoloing elements. This technique reveals masking issues and level imbalances that affect the overall mix cohesion.
Subgroups help organize related instruments before they reach the main mix bus. Create separate buses for drums, guitars, vocals, and other instrument families.
Referencing Professional Mixes For Accuracy
Reference tracks provide objective standards for evaluating mix bus processing decisions. Choose professionally mixed songs in the same genre with similar instrumentation and energy levels.
Load reference tracks into your DAW at the same sample rate as your project. Match the playback levels between your mix and the reference using peak meters.
Reference comparison checklist:
- Frequency balance - Compare low, mid, and high frequency content
- Dynamic range - Assess compression and punch characteristics
- Stereo width - Evaluate spatial placement and imaging
- Overall loudness - Match perceived volume levels
Switch between your mix and reference tracks every 30-60 seconds to maintain ear calibration. Longer listening periods reduce the ability to accurately detect differences.
A balanced mix should compete favorably with reference tracks in terms of clarity, punch, and frequency distribution. Learning how to set up a mix bus with appropriate references ensures your project matches commercial standards.
Significant differences indicate areas requiring adjustment in the mix bus chain. Aim for a radio-ready sound by carefully balancing the tonal spectrum against your references.
Preparing Your Mix For Mastering
Mix bus processing should leave appropriate headroom and dynamic range for the mastering engineer. Peak levels between -6 dBFS and -3 dBFS provide sufficient room for mastering processing.
Avoid excessive limiting or maximizing on the mix bus. These processes belong in the mastering stage, where specialized monitoring and processing chains optimize the final product.
Pre-mastering mix bus considerations:
- Remove any look-ahead limiters from the master channel
- Check for intersample peaks using true peak metering
- Ensure consistent levels across different song sections
- Maintain at least 6dB of peak headroom
Export your final mix at the project sample rate and bit depth. Higher resolution formats like 24-bit/96kHz preserve more audio information for mastering processing.
Document your mix bus processing chain settings for potential revisions. Include plugin names, settings, and any automation applied to the master channel output routing.

7
Key Takeaways For Mix Bus Processing
Start with subtle settings when applying mix bus processing. A gentle approach preserves the natural dynamics of individual tracks while enhancing overall cohesion.
Use compression ratios of 2:1 or lower with medium to slow attack times. This prevents over-compression that can flatten the final mix and reduce its impact across different playback systems.
EQ adjustments should be minimal on the mix bus. Small cuts in the 200-400 Hz range can reduce muddiness, while gentle high-frequency boosts around 5-10 kHz add brightness.
| Processing Type | Recommended Setting | Purpose |
| Compression | 2:1 ratio, 10-100ms attack | Gentle gluing |
| EQ | ±3dB maximum cuts/boosts | Tonal balance |
| Saturation | Subtle application | Character enhancement |
Saturation adds warmth and character but requires restraint. Too much saturation can muddy the final mix and cause problems during playback across different systems.
A/B testing is essential throughout the process. Regular comparison between processed and unprocessed versions ensures each adjustment genuinely improves the mix.
Leave adequate headroom to prevent digital clipping. This maintains a clean signal flow and provides flexibility for mastering engineers.
The mix bus enhances overall balance, clarity, and cohesion when processed correctly. Poor processing can result in mixes that lack punch and fail to compete with professional tracks.
Genre considerations matter significantly. Rock and metal benefit from punchy compression, while acoustic genres require minimal processing. Mastering the mix requires a balanced approach tailored to each specific genre.
Happy mix bus processing!

Frequently Asked Questions
1
How can one effectively use compression on a mix bus?
Effective mix bus compression starts with conservative settings and gentle gain reduction. Engineers should set compression ratios between 1.5:1 and 3:1 to maintain musical dynamics.
Attack times between 10 and 100 milliseconds allow transients to pass through naturally. Fast attack times can reduce punch, while slower settings preserve the initial impact of drums and percussive elements.
Release times should match the music's tempo and rhythm. Faster releases around 100-300 milliseconds work well for uptempo tracks, while slower releases suit ballads and ambient music.
Gain reduction should be limited to 2-4 dB to avoid over-compression. Excessive gain reduction flattens dynamics and removes the mix's natural breathing.
Makeup gain compensates for the volume reduction caused by compression. Engineers should match the bypassed and processed levels to ensure accurate comparisons during mixing.
2
Which EQ techniques are optimal for mix bus processing?
Mix bus EQ should address broad frequency ranges rather than surgical cuts or boosts. Gentle adjustments of 1-3 dB typically provide sufficient correction without altering the mix character dramatically.
Low-frequency management prevents muddiness in the 200-400 Hz range. A subtle high-pass filter around 30-40 Hz removes subsonic rumble that wastes headroom and speaker energy.
High-frequency enhancement between 8 and 12 kHz adds presence and clarity to vocals and instruments. Shelving EQ works better than bell curves for broad tonal shaping across the mix bus.
Mid-range frequencies require careful attention, as most musical content lies between 500 Hz and 5 kHz. Small cuts in the 800 Hz to 1.2 kHz range can reduce harshness and listening fatigue.
3
What is the purpose of adding saturation to a mix bus, and how is it done?
Saturation adds harmonic content and perceived loudness to mixes without increasing peak levels. It creates cohesion by introducing complementary harmonics across all mix elements simultaneously.
Tube saturation provides warm, even-order harmonics that enhance musicality. Tape saturation offers gentle compression and harmonic enhancement, mimicking the sound of analog recording equipment.
Transistor saturation delivers more aggressive, odd-order harmonics suitable for rock and electronic genres. Each saturation type imparts distinct tonal characteristics that complement different musical styles.
The application requires subtle settings to avoid overwhelming the mix. Engineers should start with minimal saturation amounts and gradually increase until the desired character becomes apparent without muddying the sound.
Drive controls determine saturation intensity, while output level maintains consistent volume for accurate comparison. Input gain staging affects how hard the saturation algorithm works on the source material.
4
How do parallel processing techniques apply to mix bus treatment?
Parallel processing splits the mix bus signal into multiple paths for different treatments. One path remains clean while others receive heavy processing, then blend for controlled enhancement.
Parallel compression adds punch and density without sacrificing dynamics. The compressed parallel signal fills in gaps during quiet passages while leaving transients unaffected on the dry path.
Parallel EQ allows extreme frequency shaping on one path while maintaining tonal balance. Engineers can boost high frequencies aggressively on the parallel path while blending them subtly with the original signal.
Parallel saturation provides harmonic enhancement options without committing to heavy processing.
Different saturation types can run in parallel on separate paths to produce complex harmonic textures.
Send levels determine how much signal each parallel processor receives. Return levels determine the blend ratio between processed and unprocessed signals for optimal balance.
5
What are the best practices for setting levels and balance during mix bus processing?
Proper gain staging prevents digital clipping and maintains headroom throughout the processing chain. Each processor should receive optimal input levels for best performance and lowest noise.
Peak levels should remain below -6 dBFS before mix bus processing begins. This headroom accommodates gain increases from EQ boosts and makeup gain from compressors without causing distortion.
RMS levels provide a better indication of perceived loudness than peak meters. Engineers should monitor both peak and average levels to ensure consistent energy throughout the mix.
The order of plugins significantly affects the final sound. The typical chain flows: EQ → Compression → Saturation → Limiting, though creative variations can yield interesting results.
Output levels from the mix bus should be set to -3 to -6 dBFS for mastering. This provides the mastering engineer with adequate headroom while maintaining strong signal levels.
6
In what scenarios should automation be implemented on the mix bus?
Automation becomes necessary when static processing cannot address dynamic changes throughout a song. Different song sections often require varied processing amounts for optimal impact and clarity.
Vocal-heavy sections benefit from slight high-frequency enhancement to improve intelligibility. Instrumental sections might require different EQ curves to highlight guitar solos or keyboard parts effectively.
Compression ratios can change between verses and choruses to match energy levels. Lighter compression during the verses preserves dynamics while heavier compression during the choruses adds excitement.
Genre-specific processing requirements may vary within songs that change style or energy. Bridge sections might require different saturation settings than the main song sections.
Automation also addresses technical issues, such as frequency buildup during complex arrangements. Temporary EQ cuts can prevent masking when multiple instruments occupy overlapping frequency ranges.