


Stepping into sound recording can feel overwhelming, but mastering a few fundamental techniques can transform your projects from amateur to professional. Whether you're recording music, podcasts, or voice-overs, the right approach makes all the difference in capturing clean, dynamic sound.
Audio recording techniques involve strategically using equipment and software to capture, mix, and enhance sound quality while minimizing unwanted noise and distortion.
From microphone placement strategies to understanding acoustic environments, each decision affects your final product. The foundation of good recording starts with selecting appropriate microphones for your source material, creating suitable acoustic spaces, and mastering proper gain staging to ensure optimal signal levels without clipping.
The journey to professional-quality recordings doesn't end with capturing audio—it extends into post-production, where techniques like equalization, compression, and spatial enhancement can elevate your work.
By understanding these fundamental principles, you'll be equipped to make informed decisions throughout the recording process, ultimately achieving more polished results in your music production projects regardless of your budget or experience level.
Key Takeaways / TL;DR
- Proper microphone selection and placement form the cornerstone of capturing clear, professional-quality audio recordings.
- Creating an acoustically-treated recording environment dramatically reduces unwanted reflections and background noise.
- Post-recording techniques, including proper gain staging, equalization, and compression, are essential for polishing your final audio product.

1
Audio Recording Techniques Every Beginner Should Master
The foundation of quality audio production lies in mastering fundamental recording techniques. These skills help capture clean, professional-sounding audio while avoiding common technical issues that plague beginner recordings.
Understanding the Audio Signal Chain
The audio signal chain represents the path your sound takes from source to final recording. It typically begins with the sound source (voice, instrument), travels through a microphone, into an audio interface, and finally to your recording software.
Each component affects sound quality, with the weakest link determining your overall recording quality. Strategic equipment use is crucial for capturing clean audio.
Gain staging is perhaps the most critical concept to master. Proper levels throughout the chain prevent distortion while maintaining a strong signal-to-noise ratio. Set the input gain so your signal peaks around -12 dB to -6 dB on your meters.
Monitor your signal path for potential issues like ground loops, which cause humming, or digital clipping that creates harsh distortion. A clean signal chain produces recordings that require minimal processing later.
Digital vs. Analog Recording: Pros and Cons
Digital recording offers accessibility, flexibility, and cost-effectiveness. Modern digital systems capture high-quality audio in WAV or AIFF formats with minimal noise and unlimited takes. Selecting a high bit depth is essential to maintaining audio quality during sound recording.
This ensures your WAV files have enough resolution for post-production. This provides better fidelity than a compressed MP3. Editing is non-destructive, allowing experimentation without permanently altering source files.
Digital recording's main disadvantages include potential sound brittleness and dependence on computer processing power. Some musicians find that digital recordings lack the warmth and character of analog.
Analog recording, using tape machines or vinyl, provides natural compression and saturation that many find pleasing. The slight imperfections and harmonics introduced can add character to recordings.
However, analog equipment is typically expensive, requires maintenance, and has limited editing capabilities. Physical media degrades over time, and the recording process demands more technical expertise.
For beginners, digital recording offers the best starting point due to its affordability and forgiving nature. Many digital tools now emulate analog warmth while maintaining digital convenience.
Basic Equipment Needed for Quality Recordings
Essential Recording Gear:
- Microphone: A large-diaphragm condenser for vocals/acoustic instruments or a dynamic mic for loud sources
- Audio Interface: Converts analog signals to digital data that your computer can process
- Headphones: Closed-back design for monitoring while recording
- Digital Audio Workstation (DAW): Software for recording, editing, and mixing
- Computer: With sufficient processing power and storage
- Pop Filter: Reduces plosives when recording vocals
- Mic Stand: Provides stability and proper positioning
Beginners should invest in quality rather than quantity. A single excellent microphone will serve better than multiple mediocre ones. Home recording setup doesn't require expensive gear, but avoiding the cheapest options prevents frustration.
Acoustic treatment, while not equipment per se, significantly impacts recording quality. Simple foam panels or DIY solutions can dramatically improve your recordings by reducing room reflections.
Common Beginner Mistakes and How to Avoid Them
Recording levels too hot leads to distortion that cannot be fixed later. Always maintain headroom by keeping peaks below -6dB and aim for an average level around -18dB.
Poor microphone placement fundamentally compromises sound quality. Practice proper mic placement before recording sessions. For vocals, position the microphone slightly above mouth level, 6-8 inches away, with a pop filter between the microphone and the mouth.
Neglecting room acoustics results in recordings plagued by unwanted reverb or resonances. Record in spaces with minimal reflective surfaces or create a makeshift vocal booth with blankets and cushions.
Inadequate preparation wastes valuable recording time. Ensure instruments are properly tuned, and performers have a guide track to follow. All equipment should function correctly before you begin.
Skipping rehearsal recordings prevents the identification of potential issues. Always capture test recordings to check levels, microphone placement, and overall sound quality before committing to final takes.

2
Microphone Selection and Placement Fundamentals
Selecting the right microphone and positioning it correctly are crucial elements that can make or break your audio recording. The difference between amateur and professional sound often comes down to these fundamental choices.

Types of Microphones and Their Best Applications
Microphones come in several varieties, each designed for specific recording scenarios. Dynamic microphones excel in high-volume situations, such as drum recording or live performances, thanks to their durability and ability to handle loud sound sources without distortion. They're less sensitive than other types, making them forgiving in untreated acoustic environments.
Condenser microphones offer superior sensitivity and frequency response, making them ideal for capturing vocals and acoustic instruments in studio settings. They require phantom power and perform best in controlled environments.
Cardioid microphones pick up sound primarily from the front while rejecting noise from the sides and rear. This makes them perfect for isolating a specific sound source. In contrast, omnidirectional mics capture sound from all directions.
Ribbon microphones are another excellent choice for those seeking a warm, vintage character. They are often used in a professional home studio to smooth out harsh high frequencies.
Shotgun microphones feature highly directional polar patterns, excellent for film dialogue and field recording where focused sound capture is essential. Lavalier microphones are small clip-on mics ideal for interviews, presentations, and film work where discretion is needed.
The Art of Proper Microphone Positioning
Proper mic placement dramatically affects sound quality. For vocals, position the microphone 6-12 inches from the performer's mouth, slightly above nose level, angled down toward the mouth. Always use a pop filter to reduce plosives.
The proximity effect causes bass frequencies to increase as a directional microphone moves closer to the sound source. This can be used creatively to achieve a richer vocal sound, or avoided by maintaining proper distance.
For acoustic guitars, aim a condenser mic at the 12th fret, about 6-12 inches away, to capture a balanced sound. For a warmer, fuller tone, position it closer to the sound hole.
Experiment with distance and angles when recording any instrument. Even small adjustments of a few inches or degrees can significantly change the tonal quality of the recording.
Discover Best Audio Gear & Equipment


Using Multiple Microphones Effectively
Multiple microphone setups can create depth and dimension in recordings. When using multiple mics, be aware of phase issues that occur when sound waves arrive at different microphones at different times.
The 3:1 rule helps avoid phase problems: position additional microphones at least three times the distance from the first microphone to the sound source. For example, if a mic is 1 foot from a guitar, the second mic should be at least 3 feet from the first.
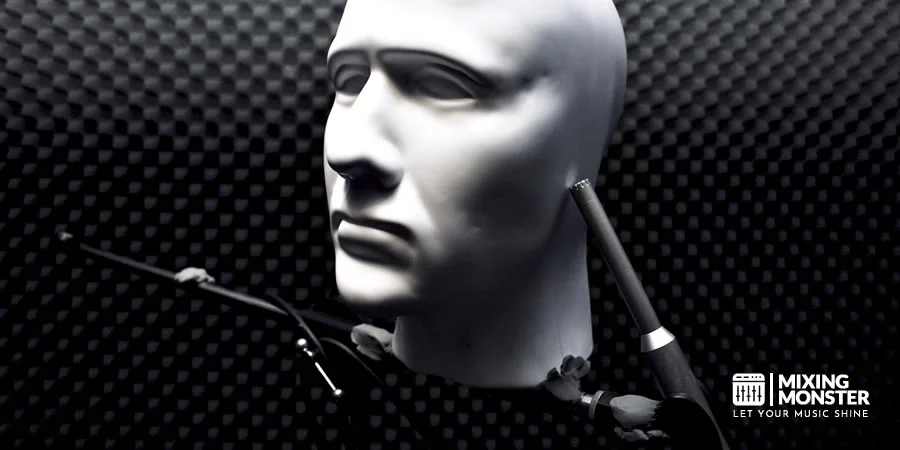
Binaural recording techniques use two microphones to simulate human hearing, creating immersive 3D audio experiences ideal for headphone listening. This technique places microphones at ear-width apart, often using a dummy head.
Room microphones can capture natural ambiance when placed strategically away from the primary sound source, adding depth to otherwise dry recordings.
Budget-Friendly Microphone Recommendations
Entry-level recordists can achieve excellent results without breaking the bank. The Shure SM57/SM58 dynamic microphones ($99) are industry standards that handle vocals and instruments and can withstand rough handling.
For affordable condenser options, the Audio-Technica AT2020 ($99) offers remarkable clarity for vocals and acoustic instruments. The Rode NT1-A ($229) provides professional-quality vocal recordings with extremely low self-noise.
Budget-friendly lavalier microphones like the Rode SmartLav+ ($79) connect directly to smartphones for interviews and field recording. For streaming and podcasting, the Blue Yeti USB microphone ($129) offers multiple polar patterns and plug-and-play convenience.
Remember that proper technique and placement with a modest microphone will consistently outperform poor technique with expensive equipment. Investing in acoustic treatment for your recording space often yields better results than upgrading microphones.
3
Creating the Ideal Audio Recording Environment
Your recording environment significantly impacts the quality of your audio. A well-designed space minimizes ambient noise and enhances the clarity of your sound recording. Using a sensitive condenser mic requires you to be especially vigilant about outside sounds. Reducing ambient noise ensures that your tracks remain clean and professional.
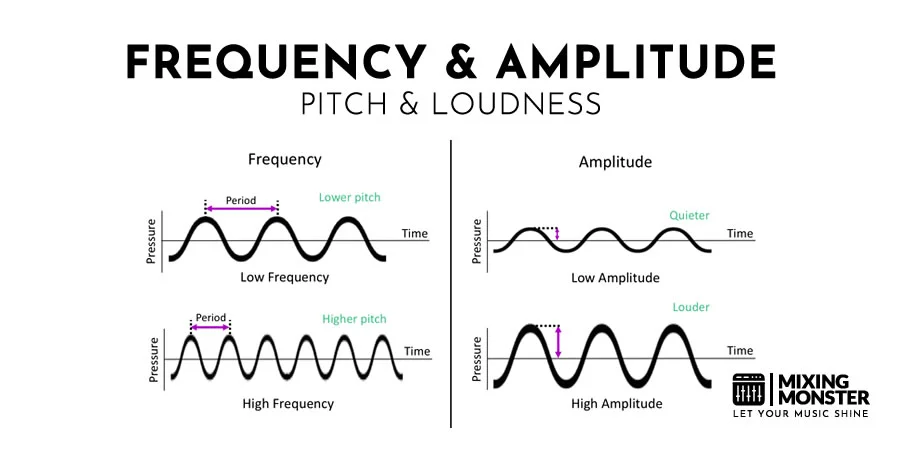
Room Acoustics and Their Impact on Sound Quality
Room acoustics play a crucial role in determining sound quality. Hard surfaces cause sound to bounce, creating echoes and reverberations that muddy recordings. Conversely, soft surfaces absorb sound, creating a "deader" space with cleaner audio.
Square rooms often produce standing waves, in which certain frequencies are unnaturally amplified. Irregular shapes tend to diffuse sound more evenly. The size of your space also matters—larger rooms have longer reverb times while smaller spaces can sound boxy.
The ceiling height affects how sound travels upward and how it reflects downward. An ideal recording environment balances sound absorption and diffusion to create neutral acoustics where your voice or instruments sound natural.
Consider the floor material as well. Carpeting absorbs high frequencies, while hardwood reflects them. Professional studios often employ a mix of materials to achieve a balanced sound.
DIY Acoustic Treatment Solutions
Creating effective acoustic treatments doesn't require expensive professional solutions. Start with these affordable options:
Basic DIY Acoustic Treatments:
- Heavy blankets hung on the walls
- Bookshelves filled with books (irregular surfaces diffuse sound)
- Foam mattress toppers cut to size
- Moving blankets hung from stands or walls
- Thick curtains over windows and hard surfaces
For more targeted treatment, place absorption panels at first reflection points. These are spots where sound bounces off walls before reaching your ears. Use a mirror along the walls while sitting in your recording position—anywhere you can see your microphone in the mirror needs treatment.
Bass traps in corners help control low-frequency buildup. DIY versions can be made from mineral wool insulation wrapped in fabric. Place these in room corners where bass frequencies accumulate.
Closets make excellent improvised vocal booths. The hanging clothes provide natural sound absorption. Record in a closet for instant improvement in sound quality.
Your Song Mixed & Mastered By Mixing Monster


Managing Background Noise and Interference
Background noise can ruin otherwise perfect recordings. Start by identifying noise sources in your environment:
- Turn off HVAC systems, fans, and appliances during recording
- Unplug refrigerators temporarily (set a reminder to plug back in)
- Close windows to block outside noises
- Place "recording in progress" signs to prevent interruptions
- Schedule sessions during quieter times of day
Electronic interference requires different strategies. Keep microphones and cables away from power sources, fluorescent lights, and wireless devices. Use balanced XLR cables when possible, as they reject interference better than unbalanced connections.
Digital noise can be reduced by setting appropriate gain levels. Always watch your levels and avoid recording "in the red." Leave adequate headroom—aim for peaks around -6 dB to prevent distortion.
Create a quiet environment by silencing mobile devices and disconnecting doorbells during critical recording sessions.
Portable Recording Solutions for On-the-Go Recording
Field recording presents unique challenges but can yield impressive results with the right approach. Portable recorders with built-in microphones offer convenience for capturing ambient sound and interviews on location.
Wind protection is essential outdoors. Foam windscreens work for light breezes, while furry "deadcat" windshields provide superior protection in windy conditions. Always carry both types to adapt to changing conditions.
When recording in public spaces, seek quieter areas away from traffic and crowds. Early mornings often provide the cleanest environmental audio. Position yourself with your back to noise sources when possible.
Battery management becomes critical in the field. Always carry spares and check levels before important recordings. Some recorders offer dual-recording functionality, capturing a second track at lower levels as insurance against unexpected loud sounds.
Consider using lavalier microphones for interviews in noisy environments—their proximity to the speaker dramatically improves the signal-to-noise ratio. Directional shotgun microphones help isolate specific sound sources from background noise.

4
Essential Audio Recording Software and Hardware
Building a functional recording setup requires a careful selection of both software and hardware components. Quality recording equipment forms the foundation of any recording chain, while the right software brings everything together.
Comparing Digital Audio Workstations (DAWs) for Beginners
A Digital Audio Workstation (DAW) is the central software that manages your entire recording process. For beginners, several options stand out:
- GarageBand (Mac): Free, intuitive interface, perfect for first-time users
- Audacity: Free, open-source, cross-platform with basic recording capabilities
- Reaper: Low-cost ($60 license), professional features with a gentle learning curve
Mid-tier Options:
- PreSonus Studio One: Streamlined workflow with drag-and-drop functionality
- Ableton Live Intro: Excellent for electronic music production, loop-based workflow
Look for DAWs offering free trials to test functionality before committing. Modern DAWs include essential plugins for EQ, compression, and reverb, eliminating the need to purchase additional plugins when starting.
Audio Interface Selection Guide
An audio interface converts analog signals from microphones or instruments into digital information that your computer can process. When selecting one, consider:
Key Specifications:
|
Feature |
Why It Matters |
|
I/O Count |
Determines how many inputs/outputs available |
|
Preamp Quality |
Affects signal clarity and noise levels |
|
Bit Depth/Sample Rate |
44.1 kHz or 48 kHz sample rates are standard. Higher values offer better audio resolution. |
|
Connection Type |
USB or Thunderbolt. Many mixers can also serve as interfaces for a DJ setup. |
For solo recordists, a 2-input interface like the Focusrite Scarlett 2i2 or PreSonus AudioBox USB provides excellent quality at reasonable prices. These units include built-in preamps that boost microphone signals to usable levels.
Ensure compatibility with your computer's operating system before purchasing. Many modern interfaces are class-compliant, meaning they work without special drivers.
Related Articles
Headphones vs. Monitors for Recording and Mixing
Both headphones and monitors serve essential but different purposes in the recording process.
Headphones are ideal for tracking (recording) as they prevent microphone bleed. Closed-back designs like the Audio-Technica ATH-M50x or Sony MDR-7506 provide excellent isolation during recording sessions. They allow performers to hear themselves clearly without sound leaking into microphones.
Studio monitors excel during mixing, offering a more natural sound representation. Entry-level options like the JBL 305P MkII or PreSonus Eris E5 provide reasonably flat frequency response for accurate mix decisions. Monitors reveal the spatial relationships between sounds that headphones cannot accurately replicate.
For beginners with limited budgets, invest in quality headphones first. As skills develop, add monitors when possible to create a balanced monitoring system.
Must-Have Accessories for Your Recording Setup
Beyond the core components, several accessories dramatically improve recording quality and workflow efficiency:
Essential Accessories:
- Pop filters ($15-30): Reduce plosives (p/b sounds) when recording vocals
- Shock mounts ($25-50): Isolate microphones from vibrations
- Balanced cables (XLR, TRS): Provide noise-free signal transfer
- Microphone stands: Sturdy positioning for consistent recording
Room Treatment Basics:
- Acoustic panels for early reflection points
- Bass traps for corner treatment
- Diffusers to manage sound reflections
According to audio recording techniques experts, proper cable management using Velcro ties or cable channels prevents signal interference and keeps workspaces organized. Consider a power conditioner to protect equipment from voltage fluctuations and reduce electrical noise.

5
Mastering Gain Staging and Levels
Gain staging is the process of managing signal levels throughout the audio chain to ensure optimal sound quality. Proper gain staging minimizes noise and distortion while maximizing clarity and headroom for processing.
Understanding Decibels and Audio Levels
Audio levels are measured in decibels (dB), which exist in several forms depending on the context. In digital audio, dBFS (decibels relative to full scale) is the standard measurement unit, where 0 dBFS corresponds to the maximum level before clipping occurs.
Analog equipment typically uses dBu or dBV measurements. These reference different voltage levels but serve the same purpose—helping you maintain proper gain staging throughout your signal path.
A good rule of thumb is to keep your average levels around -18 dBFS during recording and mixing. This provides adequate headroom while keeping your signal well above the noise floor.
Professional meters often display both peak and RMS (average) levels. Peak meters show instantaneous maximum levels, while RMS gives you a better indication of perceived loudness.
Setting Proper Recording Levels to Avoid Clipping
Clipping occurs when an audio signal exceeds the maximum level that can be accurately represented, resulting in distortion. To avoid this, proper input level adjustment is crucial at every stage.
Start at the source with appropriate microphone placement and preamp settings. When recording vocals or instruments, aim for peak levels between -12 dB and -6 dB. This gives you enough signal strength while maintaining headroom for unexpected loud passages.
Gain staging in recording begins with your microphone preamp. Set your preamp gain so that your signal is strong but never approaches 0 dBFS on your loudest parts.
Digital audio workstations (DAWs) have virtually unlimited internal headroom, but plugins and virtual instruments still benefit from proper gain management. Many vintage-modeled plugins expect specific input levels to sound their best, typically around -18 dBFS.
The Importance of Headroom in Recording
Headroom is the available space between your average signal level and the point at which distortion occurs. Sufficient headroom is critical for dynamic recordings and later processing.
When tracking loud sources with high SPL (Sound Pressure Level), like drums or amplified guitars, set your levels conservatively. A sudden peak during an energetic performance can easily cause clipping if you haven't allowed enough margin.
Professional engineers typically maintain at least 6 dB of headroom throughout the recording chain. This practice ensures clean recordings and provides space for subsequent EQ boosts, compression, and other processing that might increase levels.
Digital systems can operate at optimal levels around -14 dBFS per track, leaving adequate headroom on the master bus to prevent intersample peaks during conversion.
Using Metering Tools Effectively
Modern metering tools provide valuable insights beyond simple level indicators. VU meters, peak meters, and spectral analyzers all serve different purposes in monitoring your signal.
VU meters display average levels and are excellent for setting consistent gain structure. They closely represent how we perceive loudness and help maintain consistent levels between tracks.
Peak meters show the highest instantaneous level and are crucial for detecting potential clipping. Many DAWs feature both peak and RMS metering to give you complete information.
Mastering engineers rely on proper gain staging to make informed decisions. Set up meter plugins at strategic points in your signal chain—after recording, after processing groups, and on your master fader—to ensure consistent levels throughout your project.

6
Post-Recording Techniques for Better Sound
Once you've captured your audio, the real magic happens in post-production. Proper editing techniques can transform acceptable recordings into professional-sounding audio with clarity, warmth, and presence.
Basic Editing Workflows for Beginners
Creating an efficient post-processing workflow starts with organization. Begin by trimming unnecessary silence and removing obvious mistakes or unwanted sounds from your recordings. Most digital audio workstations (DAWs) offer simple cut, copy, and paste functions that make basic editing straightforward.
Develop a consistent process that clearly labels tracks and uses color coding to identify different audio elements. This organization becomes crucial as projects grow in complexity.
Consider working in stages: first, clean up the audio; then apply effects; and finally make volume adjustments. This methodical approach prevents confusion and maintains audio quality throughout the process.
Save multiple versions of your project as you work. Creating backups at different stages provides insurance against mistakes and allows for easy comparison between processing choices.
Essential Audio Effects for Clarity
Several key effects can dramatically improve audio clarity when applied correctly. Reverb adds natural space to recordings, making them sound less sterile. A subtle application works best—aim for 10-15% wet signal for spoken word content.
De-essing helps tame harsh sibilant sounds (the "s" and "sh" sounds) that can become distracting in close-miked recordings. Apply this effect before compression to avoid emphasizing these frequencies.
Limiting prevents audio from exceeding a preset volume threshold, protecting against distortion. Set your limiter to catch only the highest peaks without squashing the overall dynamic range.
Gates can effectively remove background noise during pauses by automatically silencing the track when audio falls below a threshold. This proves especially valuable for cleaning up recordings with consistent low-level noise.
Introduction to EQ and Compression
Equalization (EQ) shapes the tonal balance of your recording by adjusting specific frequency ranges. For voice recordings, consider these common adjustments:
- High-pass filter at 80-100Hz to remove rumble
- Slight cut around 200-300Hz to reduce muddiness
- Boost at 2-3kHz to enhance clarity
- Gentle lift around 10kHz for air and brightness
Compression evens out volume inconsistencies by reducing the dynamic range. Start with a ratio of 2:1 or 3:1, setting the threshold to catch louder passages. Use a medium attack (10-20ms) to preserve initial transients and a medium release (100-200ms) to maintain a natural sound.
The proximity effect causes bass frequencies to increase when a microphone is positioned close to the sound source. EQ can help compensate for this by reducing low frequencies when necessary.
Noise Reduction and Clean-up Strategies
Specialized noise reduction tools can dramatically improve recordings affected by background noise. Most DAWs offer noise reduction plugins that analyze a "noise print" from a silent section, then intelligently remove similar sounds throughout the recording.
For persistent issues, consider these targeted approaches:
- Use spectral editing to remove discrete sounds like clicks or pops surgically
- Apply multiband compression to control problematic frequency ranges
- Create a slate (clean reference tone) at the beginning of recordings to help with noise profiling
Avoid excessive processing that can create artifacts or an unnatural sound. Small, incremental improvements yield better results than aggressive processing. Test noise reduction settings on short sections before applying them to entire recordings.
Echo cancellation tools help correct recordings made in reverberant spaces, though recording in a treated environment initially is always preferable to fixing acoustic problems later.

7
Key Takeaways for Basic Audio Recording Techniques
Selecting the right equipment forms the foundation of quality audio recording. A high-quality microphone is essential as it directly impacts the clarity of your recordings. The microphone type should match your specific recording needs.
Proper microphone placement significantly affects sound quality. Position microphones strategically to capture the desired sound while minimizing unwanted noise. For vocals, place the mic 6-8 inches away to achieve a balanced tone.
Room acoustics play a crucial role in recording quality. Treat your recording space with acoustic panels, bass traps, or even simple solutions like hanging blankets to reduce reflections and echoes.
Consider these essential recording principles:
- Record at appropriate levels (avoid clipping)
- Use pop filters for vocal recordings
- Monitor with closed-back headphones
- Create a quiet recording environment
- Maintain consistent microphone distance
Equipment preparation before sessions saves time and prevents technical issues. Test all connections, check levels, and ensure software is properly configured before beginning.
Remember the audio production golden rule: "If it sounds good, it IS good!" Trust your ears over technical specifications when making recording decisions.
Digital audio workstations (DAWs) offer powerful tools for recording and editing. Familiarize yourself with your software's capabilities to maximize recording efficiency and quality.
Happy recording!

Frequently Asked Questions
1
How can I improve the sound quality of my audio recordings?
Improving sound quality begins with your recording environment. Room shape matters significantly - avoid square or rectangular spaces that create standing waves and flutter echoes.
Consider adding acoustic treatments, such as diffusers and absorbers, to reduce reflections. This doesn't require expensive solutions; even strategic placement of furniture, bookshelves, and fabric can help.
Always record room tone (the ambient sound of your space) for 30 seconds before or after your main recording. This provides valuable background noise for editing and maintaining consistency.
2
What equipment is necessary for professional-level audio recording?
A quality microphone appropriate for your recording purpose forms the foundation of professional recording. Condenser microphones provide wider frequency response and greater sensitivity, while dynamic microphones offer durability and focused pickup patterns.
An audio interface with clean preamps connects your microphone to your computer with minimal noise. Look for interfaces with appropriate input and output specifications for your setup.
Isolation headphones are essential for monitoring during recording. They should provide accurate sound reproduction and sufficient isolation from external sounds.
3
What are the best practices for recording vocals in a studio setting?
Position vocalists at an appropriate distance from the microphone - typically 6-8 inches for most condenser microphones. This distance may vary based on the vocalist's volume and the microphone's sensitivity.
Use a pop filter to reduce plosives (harsh "p" and "b" sounds). Position it about 2-3 inches from the microphone to effectively diffuse air bursts.
Maintain consistent positioning throughout the recording session. Have vocalists mark their standing position and microphone height to ensure uniform sound across multiple takes.
4
What techniques are used to capture balanced stereo sound?
The X-Y technique uses two cardioid microphones, positioned at 90-120 degrees, with their capsules aligned at the same point. This provides excellent mono compatibility and natural stereo imaging.
ORTF placement mimics human hearing by positioning two cardioid microphones about 17cm apart at a 110-degree angle. This creates more spatial width than X-Y while maintaining good center focus.
Spaced pair (A-B) recording uses two microphones separated by several feet. This creates dramatic stereo width but can introduce phase issues if not carefully positioned.
5
What are the foundational steps for beginners in audio recording?
Start with understanding signal flow - how sound travels from the source through the equipment to the final recording. This fundamental concept helps troubleshoot issues and optimize recording quality.
Learn basic audio recording techniques, including gain staging, monitoring levels, and preventing clipping. Proper levels ensure clean recordings with sufficient dynamic range.
Practice critical listening by comparing your recordings to professional work. Pay attention to clarity, balance, and spatial characteristics to develop your ear for quality audio.
6
How does microphone placement affect the outcome of an audio recording?
The distance between the source and the microphone significantly impacts the tone. Closer placement captures more detail and bass (proximity effect) while reducing room ambiance. A greater distance includes more natural room sound.
Angle and orientation matter - pointing a directional microphone directly at a sound source captures the most direct sound. Off-axis placement reduces certain frequencies, which can be beneficial for harsh sources.
For instruments with multiple sound sources, such as acoustic guitars, experiment with placement to balance the elements. For example, positioning near the 12th fret often provides balanced tone between body resonance and string detail.
Related Articles

You Might Also Be Interested In