


Mastering engineers often face the challenge of making tracks loud and competitive without sacrificing quality. Limiting in mastering offers a practical answer, helping artists create impactful music that stands out in today's streaming landscape.
Limiting is a mastering process that controls peak levels, prevents clipping, and increases overall loudness while maintaining audio clarity. It works as a safeguard, keeping the audio signal from exceeding a specified threshold. Mastering limiters play a vital role in shaping a track's final sound, helping engineers achieve professional-level loudness without introducing distortion or compromising dynamic range.
Audio professionals can sharpen their mastering skills by understanding the finer points of limiting. The right limiter settings can separate a polished, radio-ready track from a muddy, over-compressed mix. Explore advanced techniques and balance loudness with dynamics to create productions that sound good across a range of playback systems.
Key Takeaways / TL;DR
- Limiting controls peak levels and increases perceived loudness in mastered tracks
- Proper limiter settings are crucial for achieving professional-sounding results
- Balancing loudness and dynamics is essential for creating impactful music

1
Understanding Limiting In Audio Mastering
Limiting plays a crucial role in the mastering process, helping engineers control dynamic range and reach the desired loudness. It also protects against digital clipping while letting engineers maximize perceived volume.
What Is A Limiter?
An audio limiter is an audio processor that keeps a signal from exceeding a specified threshold. It works like a specialized compressor with a very high ratio, typically 10:1 or higher. When the input signal reaches the threshold, the limiter quickly reduces the gain and keeps the output below that level.
Limiters come in several forms, including peak limiters and lookahead limiters. Peak limiters react instantly to transients, while lookahead limiters analyze the audio slightly ahead of time, which often produces more transparent processing.
A limiter's main controls include the threshold, which sets the maximum output level, and the release time, which determines how quickly the limiter stops attenuating the signal once it falls below the threshold.
The Role Of Limiting In The Mastering Chain
Limiting usually appears near the end of the mastering process. Placing a master limiter as the final dynamic stage primarily increases perceived loudness and prevents digital clipping. With an appropriate threshold, mastering engineers can raise a track's overall level without causing distortion.
Careful limiting helps modern productions sound competitive while preserving dynamic range and clarity. It also helps maintain consistent volume across different playback systems and streaming platforms.
Limiters also provide a safety net, stopping stray peaks or transients from exceeding the digital maximum and causing unwanted distortion or clipping in the final output.
Types Of Limiters: Digital Vs. Analog
Digital limiters process audio in the digital domain and give engineers precise control over the signal. They can offer extremely fast attack times and often include features such as true peak limiting and oversampling for greater accuracy.
Modern mastering workflows rely heavily on digital limiter plugins because they're flexible and can handle high sample rates. Engineers can automate and recall them easily, making them a natural fit for in-the-box work.
Analog limiters, by contrast, process the signal through physical electronic components. They can add subtle coloration or "warmth" to the audio, something many engineers still appreciate. Analog limiters may also use a softer knee and a more gradual transition into limiting, which can create a more musical result.
Both types have a place in professional mastering. Many engineers combine digital and analog tools to get the right result for each project.

2
The Basics Of Setting Up A Mastering Limiter
Setting up a mastering limiter means adjusting several key parameters to shape the desired sound. The threshold, attack and release times, and output ceiling all influence the final audio output.
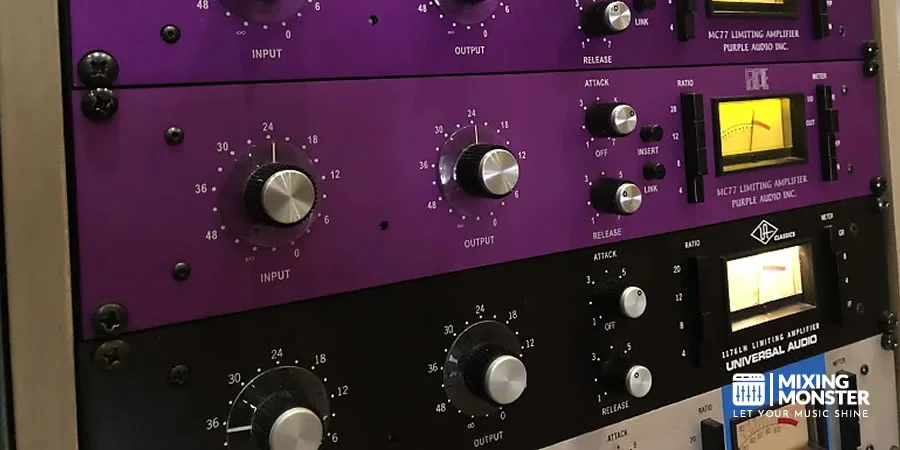
Limiting Threshold: Finding The Sweet Spot
The limiting threshold determines when gain reduction begins. Engineers need to set it carefully to balance loudness and dynamic range. A lower threshold raises loudness, but it can also reduce the mix's natural movement.
Engineers often begin by setting the threshold just below the mix's highest peaks. That gives the limiter room to apply subtle gain reduction without compressing the audio too heavily.
Fine-tuning the threshold usually means listening for distortion or lost transients. If the mix sounds squashed or loses impact, the threshold probably sits too low. If the limiter barely engages, engineers may need to lower it.
Limiting Attack And Release Times: Shaping Your Sound
Attack and release times strongly influence the limiter's response to incoming audio. The attack time determines how quickly it reacts to signals that exceed the threshold.
A fast attack can catch quick transients, though it may introduce distortion. Slower attack times preserve more of those transients but can let some peaks slip through.
Release time controls how quickly the limiter stops reducing gain after the signal falls below the threshold. Faster release times can raise perceived loudness, but they may also create pumping effects.
Many modern limiters include intelligent release control (IRC) modes that adapt to the input signal. These IRC settings help maintain consistent loudness across varying sections while preventing unwanted distortion.
Discover Best Audio Gear & Equipment


Limiting Output Ceiling: Preventing Digital Clipping
The output ceiling sets the highest level the limiter allows through. Engineers use this parameter to prevent digital clipping and keep the final output below 0 dBFS.
Most engineers set the ceiling slightly below 0 dBFS, usually between -0.3 and -0.1 dB. This leaves a safety margin for potential inter-sample peaks.
Some limiters include oversampling options that detect and prevent inter-sample peaks more accurately. They can prove especially helpful when engineers push for extreme loudness.
Engineers should monitor how much gain reduction the limiter applies. Too much can cause distortion and reduce dynamics, so aim for steady, moderate gain reduction instead of constant heavy limiting.
3
Advanced Limiting Techniques
Advanced limiting techniques give mastering engineers more precise control and open up some less conventional approaches. They allow for tailored processing and improved sonic quality.
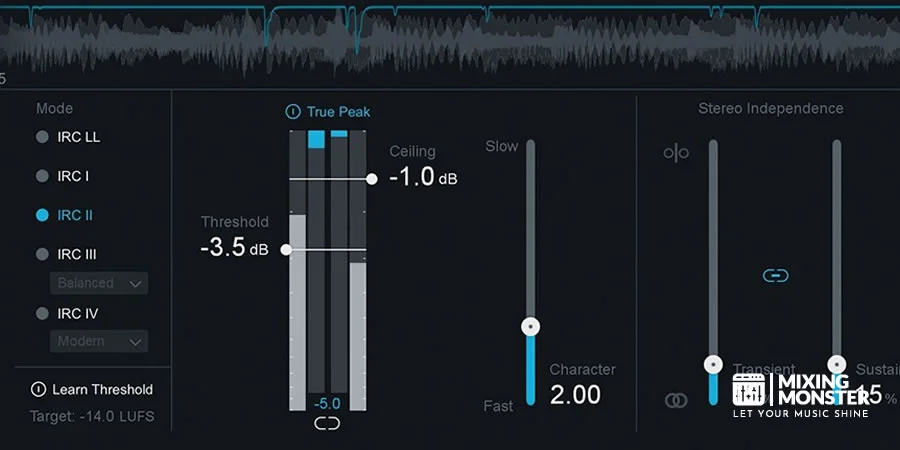
Multiband Limiting: Precision Control
Multiband limiting divides the audio spectrum into separate frequency bands so engineers can process each one independently. This lets them apply different limiting settings to specific frequency ranges.
By targeting problem areas, multiband limiting can tame harsh highs or control boomy lows without changing the entire mix. It works particularly well with complex material whose dynamics vary across the frequency spectrum.
Advanced limiting techniques often require careful adjustment of crossover points and individual band settings. Engineers still need to balance the push for loudness against spectral balance and a natural sound.
Adaptive Limiting: AI-Assisted Mastering
Adaptive limiting uses artificial intelligence to analyze and process audio in real time. The technology adjusts limiting parameters according to the incoming signal's characteristics.
AI-assisted limiters can make split-second decisions about threshold, release times, and even multiband processing. They often include true peak limiting and inter-sample peak detection to prevent digital clipping.
These tools can speed up mastering considerably while producing consistent results. Experienced engineers still need to oversee the AI's choices and make the final adjustments, though.
Your Song Mixed & Mastered By Mixing Monster


Parallel Limiting: Blending For Natural Results
Parallel limiting blends the limited signal with the original, unprocessed audio. This lets engineers increase perceived loudness while preserving transients and dynamic range.
Engineers typically create a master chain with both limited and unprocessed paths. By balancing the two signals carefully, they can achieve a more natural sound than aggressive limiting alone.
Limiting in mastering often benefits from parallel processing when engineers work with dynamic material. The approach works especially well for keeping punch in genres such as rock or EDM while still competing at modern loudness levels.
Key considerations include setting suitable ratios, adjusting the wet/dry mix, and adding complementary processing such as compression or saturation to the parallel chain.

4
Balancing Loudness And Dynamics In Modern Mastering
Mastering engineers face the challenge of maximizing perceived loudness while preserving dynamic range and musical integrity. Finding that balance takes careful attention to loudness standards, transient preservation, and the effective use of metering tools.
Understanding Loudness Standards
Loudness standards have evolved to address the loudness wars and ensure consistent playback across various platforms. Modern mastering must follow these standards without losing the music's artistic intent.
Streaming services and broadcast platforms use specific loudness targets measured in LUFS (Loudness Units Full Scale). These standards aim to create a consistent listening experience, guiding engineers who balance commercial loudness with dynamic fidelity.
Common loudness standards for mastering:
| Platform | Target LUFS | Max True Peak |
| Spotify | -14 LUFS | -1 dB TP |
| YouTube | -14 LUFS | -1 dB TP |
| Apple Music | -16 LUFS | -1 dB TP |
| AES Streaming | -16 to -20 LUFS | -1 dB TP |
Engineers still need to balance these standards against genre expectations and the artistic vision of the music they're mastering.
Preserving Transients While Maximizing Volume
Balancing loudness and dynamic range is crucial for preserving a track's impact and emotion. Transients, the short-duration peaks in audio, play a major role in retaining a song's punch and clarity.
Careful use of limiting and compression can increase perceived loudness without crushing transients. Multiband compression and parallel processing give engineers more control over specific frequency ranges.
Adaptive limiter release times can preserve transient detail while still reaching competitive loudness levels. Engineers should listen closely to the attack and release settings on their dynamic processors.
Related Articles

Using Loudness Meters To Inform Limiting Decisions
Loudness metering tools help engineers make informed mastering decisions. These meters provide real-time feedback on integrated loudness, short-term LUFS, and true peak levels.
Engineers should check their loudness meters regularly as they adjust limiters and other processors. That makes it easier to meet platform standards while keeping the desired dynamic range.
True peak metering helps prevent inter-sample peaks that can distort playback or conversion. Mastering engineers should keep true peak levels below -1 dBTP for most digital platforms.
Monitoring short-term LUFS fluctuations can reveal sections that might benefit from more dynamic treatment, helping the overall master retain musical interest and impact.

5
Common Limiting Mistakes And How To Avoid Them
Limiting plays a crucial role in mastering, but mistakes can quickly degrade audio quality. Understanding these pitfalls makes it easier to achieve professional-sounding results.
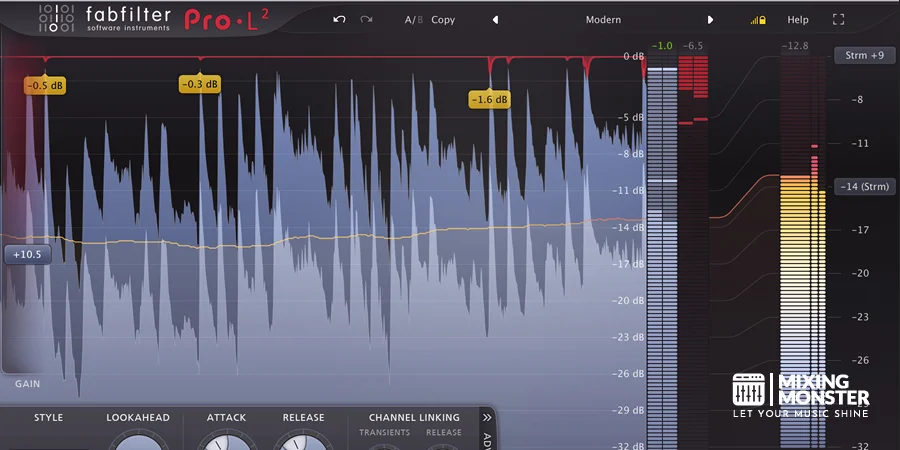
Over-Limiting: When Less Is More
Over-compressing or limiting can squash the life out of a track. Pushing the limiter hard may seem like an easy path to loudness, but it often creates audible distortion artifacts and removes dynamics.
Signs of over-limiting include:
- Lack of punch in kick drums
- Flattened transients
- Audible pumping effects
To avoid these problems, start with a conservative threshold and increase it gradually. Listen for small changes in the mix's character, especially around dynamic elements such as drums.
Using a soft clipper before the limiter can smoothly shave off aggressive transient peaks. This soft clipping approach preserves a natural sound while delivering competitive loudness without overworking the limiter.
Ignoring Genre-Specific Limiting Needs
Different genres call for different limiting approaches. EDM tracks might benefit from more aggressive limiting, while jazz recordings usually need a lighter touch.
Consider these genre-specific guidelines:
- Electronic: Higher limiting threshold, faster release times
- Rock: Moderate limiting, focus on preserving guitar dynamics
- Classical: Minimal limiting, maintain wide dynamic range
Always reference professionally mastered tracks in the same genre to gauge appropriate limiting levels.
Neglecting To Compare With Reference Tracks
Failing to use reference tracks can produce masters that don't translate well across different playback systems. Reference tracks offer a benchmark for loudness, dynamics, and overall tonal balance.
When comparing:
- Match the levels of your master and the reference
- Listen for differences in transient response, especially on kick drums
- Pay attention to how the limiter affects the stereo image
Use short-term listening tests and take breaks to avoid ear fatigue. That helps you stay objective when assessing your limiting choices against professional standards.

6
Integrating Limiting With Other Mastering Processes
Limiting plays a crucial role in the mastering chain, but it works best alongside other processes. EQ, compression, stereo enhancement, and dithering all interact with limiting to shape the final sound.
EQ And Compression Before Limiting
Limiting in mastering works most effectively after proper EQ and compression. Engineers typically apply EQ first to balance frequencies and address problematic resonances.
Compression comes next, taming the dynamic range and adding cohesion to the mix. It prepares the audio for limiting by reducing overall dynamic variance.
The compressor's attack and release times influence how transients reach the limiter. Faster attack times can soften transients, while slower times preserve more punch.
Engineers must adjust the threshold and ratio on both the compressor and limiter carefully to find the right balance of dynamics and loudness.
Stereo Enhancement And Its Impact On Limiting
Stereo enhancement can widen the perceived soundstage, but it may also introduce phase issues that affect limiting. Engineers must consider how stereo processing interacts with mono compatibility and overall loudness.
Widening the stereo image can increase peak levels, which may force the limiter to work harder. The result can include unwanted distortion or reduced impact.
To limit these problems, mastering engineers often apply stereo enhancement before limiting. They also monitor the correlation meter to maintain solid mono compatibility.
Some limiters include stereo linking controls, allowing independent processing of the mid and side channels. This can preserve stereo width while keeping loudness consistent across the frequency spectrum.
Dithering After Limiting: Why It Matters
Dithering is a crucial mastering step, and engineers typically apply it after limiting. It reduces quantization noise when reducing bit depth for distribution formats.
Engineers must choose the right dither algorithm for the target bit depth and desired noise-shaping characteristics. Common options include triangular, shaped, and noise-shaped dither.
Proper dithering supports smoother Digital-to-Analog Conversion (DAC) in playback systems, reducing artifacts and improving the reproduction of low-level detail.
The amount of dithering required depends on the final output format. For example, engineers commonly dither from 24-bit to 16-bit for CD mastering.
Engineers should avoid applying dithering multiple times, since doing so can introduce unnecessary noise. Dithering should remain the final step in the mastering chain, applied only once before exporting the final master.

7
Key Takeaways For Mastering The Art Of Limiting
Mastering the art of limiting is crucial for achieving a polished final master. Proper limiting techniques help maintain sonic integrity while increasing perceived loudness.
Engineers should apply limiting judiciously to preserve the music's dynamics. Setting the threshold just below peak levels can increase loudness without compromising sound quality.
Careful adjustment of attack and release times remains essential. These parameters balance dynamics and prevent distortion, contributing to a cleaner final product.
Key takeaways for mastering the art of limiting:
- Listen critically and trust your ears
- Understand genre-specific requirements
- Use appropriate tools for the task
- Balance loudness with dynamic range
- Set limiter threshold carefully
- Adjust attack and release times thoughtfully
- Utilize a brickwall limiter to prevent digital clipping
- Aim for desired integrated loudness (e.g., -9 LUFS for hip-hop)
- Preserve bass impact in bass-heavy genres
Modern limiters offer advanced features like band separation controls. Familiarize yourself with these tools to get the most from them in your mastering chain.
Remember that limiting is just one part of the mastering process. It should complement techniques like EQ and compression to achieve a well-balanced final master.
Happy limiting!

Frequently Asked Questions
1
What is the recommended amount of gain reduction when using a limiter in mastering?
The recommended gain reduction when using a limiter in mastering typically ranges from 1 to 3 dB. This conservative approach helps maintain dynamics while providing a subtle increase in perceived loudness.
Excessive gain reduction can create distortion and reduce transient detail. Engineers should balance loudness with preserving the mix's original character.
2
Can you explain the purpose of attack and release settings in mastering limiters?
Attack settings in mastering limiters determine how quickly the limiter responds to incoming peaks. Faster attack times catch transients more effectively, but they can also introduce distortion.
Release settings control how quickly the limiter stops attenuating the signal after a peak. The right release time helps prevent pumping and keeps the sound natural. Adjusting these parameters is crucial for transparent limiting.
3
How do you set the limiter threshold appropriately during mastering?
Setting the limiter threshold means finding a workable balance between louder levels and preserved dynamics. Start by lowering the threshold until the limiter reduces gain on the track's loudest sections.
Aim for consistent gain reduction throughout the song. Many engineers recommend setting the limiter's ceiling to -0.3 dB to help prevent digital clipping while leaving headroom for different playback systems.
4
What are the implications of using too much limiting on a master track?
Too much limiting can create a squashed, lifeless sound with little dynamics or punch. It can also cause distortion, strip away transient detail, and reduce the mix's sense of spatial depth.
Heavy limiting may leave listeners fatigued and weaken the music's emotional impact. Engineers need to balance achieving competitive loudness with preserving the track's original character.
5
What role does serial limiting play in the mastering process?
Serial limiting uses multiple limiters in succession, with each one applying a small amount of gain reduction. Compared with asking one limiter to handle a heavy reduction, this approach can sound more transparent.
Spreading the workload across several limiters gives engineers finer control over the final sound. It also allows subtler audio shaping without introducing noticeable artifacts.
6
When mastering, is it always necessary to use a limiter on the master bus?
Using a limiter on the master bus isn't always necessary, although modern mastering commonly includes one. Some genres and artistic choices may call for a more dynamic approach, without heavy limiting.
Limiters increase perceived loudness and prevent digital clipping. Still, skilled engineers can reach competitive levels through careful mix balancing and selective compression, rather than relying on limiting alone.