


If you've ever wondered why professional audio sounds cleaner than amateur productions, the answer often lies in a subtle but powerful technique called dithering. This intentionally added noise might seem counterintuitive, but it's the secret weapon that separates polished recordings from distorted ones.
Dithering is an intentionally applied form of noise used to randomize quantization error when reducing the bit depth of digital audio files. When audio undergoes bit-depth reduction—such as converting from 24-bit to 16-bit for a CD release—the process of quantization creates distortion that manifests as harsh, unpleasant artifacts. Dithering introduces low-level noise that masks these quantization errors, replacing deterministic distortion with random noise that the human ear finds far less objectionable.
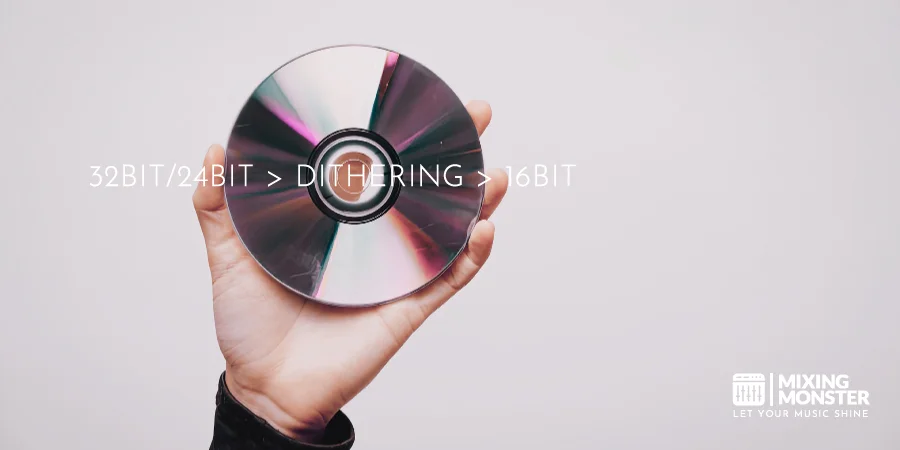
The final audio for a compact disc contains only 16 bits per sample, making dithering a crucial final step in the mastering process.
Understanding when and how to apply dithering can dramatically improve audio quality in music production workflows. This guide explores the technical mechanics behind different dithering algorithms, reveals common mistakes that compromise sound quality, and provides step-by-step instructions for implementing dithering correctly in various digital audio workstations.
Whether mixing a debut single or mastering an album, knowing these principles ensures recordings maintain their sonic integrity through every stage of production.
Key Takeaways / TL;DR
- Dithering adds intentional noise to eliminate harsh quantization distortion when reducing audio bit depth.
- Apply dithering only once during the final export or mastering stage to avoid cumulative noise buildup.
- Different dithering algorithms, such as triangular and noise-shaped dithering, serve specific purposes in the production workflow.

1
What Is Dithering In Audio?
Dithering introduces intentional low-level noise to digital audio signals during bit depth reduction, transforming harsh quantization distortion into a less perceptible noise floor. This process preserves audio quality when converting from higher to lower bit depths by randomizing truncation errors that would otherwise create audible artifacts.
The Scientific Definition Of Audio Dithering
Audio dithering is the intentional addition of random noise to a digital signal before quantization. The technique operates on the principle that uncorrelated noise can mask the mathematical errors inherent in bit depth reduction.
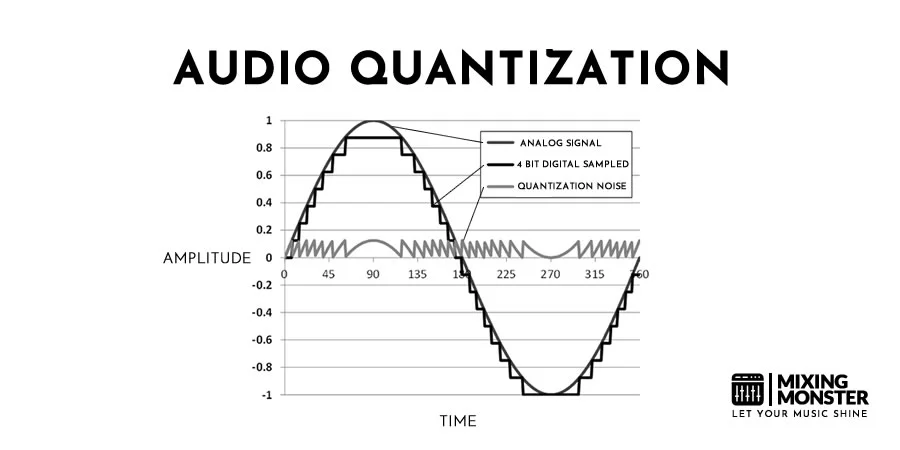
When engineers reduce bit depth, they face a fundamental problem: the destination format has fewer available values to represent amplitude levels. Quantization error is the difference between the original sample value and the nearest available value in the reduced bit-depth format.
Dither addresses this by adding noise that randomizes these errors. The noise itself typically ranges from -96 dBFS to -120 dBFS, placing it below the threshold of most listening environments. This random element prevents quantization errors from correlating with the original signal, thereby preventing harmonic distortion patterns.
The mathematics behind dithering relies on probability distribution functions. Most professional implementations use triangular probability density function (TPDF) dither, which produces optimal results for audio applications. TPDF dither adds noise values distributed in a triangular pattern, effectively decorrelating two successive quantization processes.
How Dithering Works At The Bit Level
Digital audio represents amplitude values as binary numbers, with bit depth determining the available resolution. A 24-bit system offers 16,777,216 possible amplitude values, while a 16-bit system provides only 65,536 values.
During bit depth reduction, the system must discard the least significant bits. Converting from 24-bit to 16-bit means removing the bottom 8 bits of data. Without dithering, the system truncates or rounds these values, creating signal-dependent distortion.
The dithering process adds random variations before truncation. These variations influence how the rounding process behaves for each sample. Instead of always rounding in predictable patterns, the noise causes some samples to round up and others to round down in a randomized fashion.
This randomization spreads the quantization error across the frequency spectrum as white noise rather than concentrating it in harmonically related frequencies. The human auditory system perceives this random noise as less objectionable than the harmonic distortion patterns created by truncation alone.
Different bit depth conversions require different dither amplitudes:
| Conversion | Dither Level | Noise Floor |
|---|---|---|
| 32-bit to 24-bit | -144 dBFS | Imperceptible |
| 24-bit to 16-bit | -96 dBFS | Very quiet |
| 24-bit to 8-bit | -48 dBFS | Audible |
The History And Evolution Of Dithering Technology
Dithering originated outside audio engineering, first appearing in World War II analog computing systems for military applications. Engineers discovered that adding small mechanical vibrations to analog computers improved calculation accuracy by preventing components from sticking at transition points.
The technique migrated to digital audio during the early days of compact disc development in the late 1970s. Sony and Philips engineers recognized that the 16-bit CD format would introduce quantization errors when mastering from higher-resolution studio recordings.
Early dither implementations used rectangular probability density function (RPDF) noise, which added a single source of random noise. Stanley Lipshitz, John Vanderkooy, and Robert Wannamaker published groundbreaking research in the 1980s demonstrating that TPDF dither provided superior results.
Modern dithering evolved to include noise shaping, a complementary technique developed in the 1990s. Noise shaping pushes dither noise into frequency ranges where human hearing exhibits less sensitivity, typically above 10 kHz. This advancement allows engineers to maintain the benefits of dithering while reducing the perceived noise floor by 10-20 dB in critical listening ranges.
Contemporary digital audio workstations offer multiple dithering algorithms, each optimized for specific applications and target formats.
Dithering Versus Truncation In Digital Audio
Truncation removes the least significant bits without any additional processing. This approach introduces deterministic errors that directly correlate with the audio signal, resulting in harmonic and intermodulation distortion.
The distortion from truncation becomes most audible during quiet passages and fadeouts. As signal levels decrease, quantization errors account for a larger share of the total signal, resulting in a grainy or harsh quality that listeners describe as "digital-sounding."
Dithering replaces this signal-correlated distortion with uncorrelated noise. While both approaches introduce artifacts, the character differs significantly:
Truncation artifacts:
- Harmonic distortion at integer multiples of signal frequencies
- Intermodulation distortion occurs when multiple frequencies interact
- Audible "stepping" in fades and quiet passages
- Dynamic range limited by distortion threshold
Dithering artifacts:
- Constant low-level noise floor
- No harmonic relationship to the original signal
- Smooth fades and low-level detail preservation
- Full theoretical dynamic range maintained
The choice between truncation and dithering affects the perceived bit depth of the final audio. A properly dithered 16-bit file can reproduce signal information below the 16-bit noise floor, effectively extending dynamic range into the dither noise itself. Truncated audio loses all information below the least significant bit, creating a hard limit at approximately -96 dBFS for 16-bit audio.
Professional mastering engineers universally prefer dithering for final deliverables, reserving truncation only for intermediate processing steps where subsequent operations will render the truncation artifacts irrelevant.

2
Why Audio Dithering Matters In Music Production
Dithering transforms harsh quantization errors into benign noise, preserving audio fidelity when converting high-resolution files to lower bit depths. The technique directly impacts signal-to-noise ratio and prevents artifacts that compromise professional productions.
Preventing Quantization Distortion And Artifacts
When reducing bit depth without dithering, the process creates quantization distortion that manifests as harsh, inharmonic artifacts. These distortions appear most prominently in reverb tails, fadeouts, and quiet passages where the audio signal approaches the noise floor.
The truncation process forces amplitude values to round up or down to the nearest available quantization level, generating unwanted harmonic content.
A 24-bit-to-16-bit conversion without dither produces audible distortion products that sound metallic and unnatural. The artifacts become particularly noticeable during sustained notes or ambient sections where listeners can easily detect the tonal anomalies.
Quantization errors also cause signals below the lowest bit threshold to cut abruptly to complete silence, creating a jarring listening experience.
Applying dither replaces these harsh distortions with a consistent low-level noise floor. This substitution removes the correlation between the original signal and the quantization error, eliminating the tonal artifacts that would otherwise degrade audio quality.
Maintaining Dynamic Range During Bit Depth Reduction
Dithering extends the effective dynamic range beyond what the reduced bit depth would normally allow. Without dithering, a 16-bit file theoretically provides 96 dB of dynamic range, but signals below this threshold quantize to pure digital silence. Noise-shaped dither can retain signal information down to nearly -120 dBFS, providing a 24 dB improvement in perceived dynamic range.
The added noise randomizes amplitude levels slightly, allowing very quiet signals to remain audible above the noise floor rather than disappearing entirely. This preservation proves critical for maintaining the subtle details that contribute to professional sound quality. Musical elements like room ambiance, reverb decay, and instrumental sustain benefit directly from this extended range.
The signal-to-noise ratio improves because dither converts correlated distortion into uncorrelated noise. While this introduces a noise floor, the trade-off favors audio quality since the human ear perceives random noise as less objectionable than tonal distortion.
Discover Best Audio Gear & Equipment


The Audible Impact Of Proper Dithering Techniques
Proper dithering techniques replace quantization distortion with smooth, analog-like hiss that blends naturally into the mix. Listeners typically cannot detect well-implemented dither at normal playback levels, especially when noise-shaping algorithms push the dither noise into frequency ranges where human hearing is less sensitive.
The difference becomes immediately apparent in A/B comparisons. Undithered audio exhibits granular, digital-sounding artifacts during quiet passages, while dithered audio maintains a clean, professional character throughout the entire dynamic range. Test signals demonstrate that dithered conversions preserve low-level detail that would otherwise be lost or corrupted.
Different dither types offer varying characteristics. TPDF (Triangular Probability Density Function) dither provides excellent results for most applications, while noise-shaped dither optimizes the frequency distribution of the dither noise to minimize audibility at 16-bit depths.
Common Audio Problems Caused By Missing Dithering
Omitting dither during bit-depth reduction creates multiple audible problems that compromise audio quality. The most obvious issue is the emergence of harsh, digital-sounding distortion in quiet sections. This distortion carries harmonic content unrelated to the original signal, making it particularly noticeable and unpleasant.
Another problem involves the premature truncation of reverb tails and fadeouts. Without dither, these elements either distort severely or cut to silence before completing their natural decay. The abrupt endings destroy the sense of space and continuity that producers work carefully to establish.
Low-level musical details disappear entirely when quantization forces quiet signals to zero. Subtle room ambiance, string resonances, and breath sounds that contribute to realism vanish from the mix. The resulting audio sounds flat and lifeless compared to properly dithered versions that maintain these nuances throughout the dynamic range.
3
When To Apply Dithering In Your Workflow
Dithering belongs at specific points in audio production where bit depth reduction occurs. The final mastering stage and format conversions require careful application, while certain scenarios call for avoiding them entirely.
Dithering During Mastering And Final Bounce
Dithering should be applied as the final step of mastering when exporting audio to a lower bit depth. Most digital audio workstations operate internally at 32-bit floating point, which means any export to 24-bit or 16-bit requires dithering to prevent quantization distortion.
The process must be the absolute last operation performed on the audio file. Any adjustment made after dithering, even a small gain change, undermines its effectiveness and reintroduces distortion.
Engineers should turn off all other dithering features in their DAW to ensure the audio receives dithering only once. Multiple applications of dither add unnecessary noise and degrade audio quality. When preparing audio for CD or streaming formats, the master should first be converted to the target sample rate at 32-bit, then dithered during the final bit depth reduction.
Bit Depth Conversion Scenarios Requiring Dithering
Any reduction from a higher bit depth to a lower fixed-point format requires dithering. Converting from 32-bit floating-point to 24-bit fixed-point requires dithering, as does any reduction from 24-bit to 16-bit, 12-bit, or 8-bit.
The audio contains 16,777,216 possible amplitude values at 24-bit depth. Reducing to 16-bit drops this to only 65,536 values, forcing the system to round or truncate amplitude measurements. Without dithering, this quantization creates harsh, inharmonic distortion, particularly noticeable in reverb tails, fadeouts, and quiet passages.
Internal DAW processes like bouncing, flattening, or freezing tracks may also require attention. If these operations force a conversion to 24-bit fixed-point, engineers should check whether their DAW offers dithering options for these internal processes.
Your Song Mixed & Mastered By Mixing Monster


When NOT To Use Dithering In Audio Processing
Dithering should remain off throughout mixing and production. Engineers working with 32-bit or 64-bit floating-point formats never need dithering because these formats have sufficient resolution to avoid audible quantization distortion.
The process should never be applied multiple times to the same audio. Each application adds noise to the signal, and repeated dithering degrades audio quality without providing additional benefits.
Applying dithering before additional processing creates problems. If an engineer dithers audio and then applies EQ, compression, or any other effect, the dithering becomes pointless because the subsequent processing alters the carefully shaped noise floor. Projects staying at their original bit depth throughout the entire workflow do not require dithering at any stage.
Dithering For Different Distribution Formats
Different distribution platforms require specific bit-depth and sample-rate combinations. CD audio requires 16-bit depth at 44.1 kHz, making dithering essential when converting from higher resolution masters.
Streaming services often accept 16-bit or 24-bit files. For 16-bit delivery to platforms like Spotify or Apple Music, engineers must apply dithering when bouncing from their 32-bit float sessions. Some platforms accept 24-bit files, and while the dither noise at this depth is extremely quiet, dithering still removes quantization distortion that could be audible.
High-resolution audio platforms accepting 24-bit files at 96 kHz or 192 kHz still benefit from dithering when converting from 32-bit float. The following table shows common format requirements:
| Format | Bit Depth | Sample Rate | Dithering Required |
|---|---|---|---|
| CD | 16-bit | 44.1 kHz | Yes |
| Streaming (Standard) | 16-bit | 44.1 kHz | Yes |
| Streaming (High Quality) | 24-bit | 48 kHz | Yes |
| Hi-Res Download | 24-bit | 96 kHz | Yes |
Engineers should verify the exact specifications required by their target platform before applying dithering to ensure the dithered audio matches distribution requirements.

4
Types Of Dithering Algorithms Explained
Different dithering algorithms use distinct mathematical approaches to add noise and reduce quantization errors when converting audio to lower bit depths. The choice between triangular probability functions, noise-shaped variants, and industry-standard implementations affects both the technical performance and audible characteristics of the final audio.
TPDF Dithering (Triangular Probability Density Function)
TPDF dithering applies random noise with a triangular probability density function to minimize quantization distortion during bit-depth reduction. This algorithm distributes noise equally across the entire frequency spectrum, making it particularly effective for preserving low-frequency detail.
The triangular distribution eliminates harmonic distortion caused by quantization errors. Unlike simpler rectangular probability density functions, TPDF requires two independent random number generators that are combined to produce the characteristic triangular shape.
This method works without requiring additional processing overhead for noise shaping. Audio engineers often choose TPDF for its transparent sound and predictable behavior across different types of material. The algorithm adds approximately 4.8 dB to the noise floor, which remains consistent regardless of the input signal characteristics.
Noise-Shaped Dithering And Psychoacoustic Optimization
Noise-shaped dithering redistributes the added noise away from the most sensitive frequency ranges of human hearing, typically between 2 and 5 kHz. This psychoacoustic approach moves quantization error energy into frequency bands where the ear is less sensitive.
The technique applies filtering to the dither signal after quantization. Engineers can design various noise-shaping curves based on equal-loudness contours that represent how humans perceive different frequencies at different amplitude levels.
Common implementations push noise above 10 kHz or below 100 Hz, where masking effects from the program material naturally hide the added noise. The perceived signal-to-noise ratio can improve by 10-20 dB compared to flat TPDF dithering. However, noise shaping adds computational complexity and may introduce artifacts if the shaped noise accumulates through multiple processing stages.
Related Articles
POW-r Dithering And Industry Standards
POW-r stands for Psychoacoustically Optimized Wordlength Reduction and represents the most widely adopted professional dithering standard. The algorithm combines noise shaping with sophisticated modulation techniques that adapt to the audio signal characteristics.
Multiple POW-r variants exist for different applications. POW-r Type 1 suits loud mixes with compressed dynamic range and uses minimal noise shaping, while Type 2 optimizes for speech and material with greater dynamic range. Type 3 applies the most aggressive noise shaping for classical music and other quiet recordings.
The algorithm analyzes spectral content to mask dither noise more effectively than static noise shaping curves. Major digital audio workstations include POW-r as their default or recommended dithering option for final masters. Its widespread adoption ensures consistent results across different playback systems and distribution formats.
Comparing Different Dithering Algorithms For Quality
The selection of dithering algorithms depends on the source material characteristics and the final delivery format requirements. TPDF provides the most neutral option with predictable performance across all content types. Noise-shaped variants offer improved perceived quality but require careful implementation to avoid accumulation issues.
Key Algorithm Differences:
- TPDF: Flat frequency response, no artifacts, universally compatible
- Noise-Shaped: Reduced perceived noise, potential for artifact accumulation
- POW-r: Adaptive optimization, industry-standard acceptance, multiple variants for specific content
Critical listening tests reveal that differences between algorithms become most apparent in quiet passages and fadeouts. Material with dense instrumentation and limited dynamic range shows minimal audible distinction between methods. Classical recordings and acoustic performances benefit most from sophisticated noise shaping that preserves low-level detail while maintaining a low perceived noise floor.
Engineers should apply dithering only once at the final bit depth reduction stage. Multiple dithering passes compound noise floor elevation without providing additional benefits. The bit depth of the destination format determines whether dithering is necessary—conversion from 24-bit to 16-bit requires dithering, while maintaining or increasing bit depth does not.

5
How To Dither Audio Properly Step-By-Step
Applying dither requires specific settings in your DAW and careful attention to bit depth reduction. The process involves selecting the appropriate dithering type, configuring export parameters, and ensuring dither is applied only once as the final step in your audio chain.
Setting Up Dithering In Your Digital Audio Workstation
Most professional DAWs include built-in dithering options in their export or bounce settings. Users should locate the dithering controls in the export window, typically found under bit depth or sample rate conversion options.
The dithering function should remain disabled during mixing and editing. It only activates when preparing to export a final mix to a lower bit-depth format.
In applications like Pro Tools, Logic Pro, or Ableton Live, the dither settings appear as a checkbox or dropdown menu in the export dialog. Users must ensure no other plugins or processes occur after the dither in the signal chain. When dithering for CD mastering, set the bit depth to 16 bits with dither enabled.
The sample rate conversion should be handled separately from bit depth reduction when possible. Converting to 44.1 kHz at 32-bit first, then applying dither while reducing to 16-bit, produces cleaner results than doing both conversions simultaneously.
Choosing The Right Dithering Algorithm For Your Project
Different dithering algorithms serve specific purposes based on the destination format and content type. The three main types are TPDF (Triangular Probability Density Function), POW-r, and noise-shaped dither.
TPDF dither works well for general-purpose applications and 24-bit exports. It adds a flat noise floor across all frequencies without any spectral shaping. This algorithm provides the most transparent results for high-resolution audio, where the dither noise remains inaudible.
POW-r dithering offers multiple levels (POW-r 1, 2, and 3) with increasing amounts of noise shaping. POW-r 1 suits vocal-heavy material, while POW-r 2 and 3 work better for full mixes with complex frequency content. These algorithms push the dither noise into less audible frequency ranges.
For 16-bit CD masters, noise-shaped dither algorithms like POW-r 2 or Type 2 perform better than flat dither. The noise shaping moves the dither signal above 10 kHz, where human hearing is less sensitive. Material with extended quiet passages or fadeouts benefits most from noise-shaped dithering.
Dithering Settings For Streaming Platforms
Streaming platforms like Spotify, Apple Music, and YouTube accept various formats, but they typically require specific bit depths and sample rates. Most platforms accept 16-bit or 24-bit files at 44.1 kHz or 48 kHz.
For standard streaming delivery, a 16-bit, 44.1 kHz file with dithering applied works universally. When the master file is 24-bit or 32-bit float, dithering must be applied during conversion to 16-bit.
Some platforms like Apple Music and Tidal support high-resolution audio up to 24-bit. Files delivered at 24 bits still benefit from dithering when reduced from 32-bit floating-point processing. However, the dither noise at 24-bit resolution remains completely inaudible at normal listening levels.
Recommended streaming platform settings:
- Spotify: 16-bit, 44.1 kHz with POW-r 2 or TPDF dither
- Apple Music: 24-bit, 48 kHz with TPDF dither (or 16-bit with noise-shaped dither)
- YouTube: 16-bit, 48 kHz with POW-r 2 dither
- Tidal/Qobuz: 24-bit, 44.1 or 48 kHz with TPDF dither
Export Settings And Dithering Best Practices
Dithering must be applied only once during the final export to avoid accumulating noise. Any processing after dithering undermines its effectiveness and introduces quantization distortion.
The export workflow should follow this order: ensure all processing is complete, turn off normalization or limiting after dithering, enable dithering in the export settings, select the target bit depth, and export the file. No gain adjustments, fade-ins, or metadata changes should occur after this dithered export.
Critical export settings checklist:
- Dithering enabled: Yes (only for final export)
- Target bit depth: 16-bit or 24-bit (never dither to 32-bit float)
- Dithering type: TPDF for 24-bit, noise-shaped for 16-bit
- Post-dither processing: None
- Sample rate: Match destination format requirement
Users working with mastering plugins should place dither at the absolute end of the chain. Many mastering suites include integrated dithering modules that automatically position themselves correctly in the signal flow. Files destined for additional mastering should be exported at 24-bit or 32-bit float without dithering, as the mastering engineer will apply dither during their final export.

6
Dithering In Popular DAWs And Audio Software
Most professional digital audio workstations include built-in dithering tools that activate during export, while third-party plugins offer additional control and specialized algorithms for specific workflow needs.
Applying Dithering In Pro Tools
Pro Tools incorporates dithering through its Bounce to Disk function. When bouncing a session to a lower bit depth, users can access dithering options in the bounce dialog. The software provides POW-r dithering algorithms at different noise-shaping levels.
POW-r 1 applies minimal noise shaping and works well for most general purposes. POW-r 2 offers moderate noise shaping, pushing quantization noise into less audible frequency ranges. POW-r 3 provides the most aggressive noise shaping, ideal for final masters destined for 16-bit CD distribution.
Engineers select their preferred dithering type based on the destination format and content type. The dithering process only applies when the bounce bit depth is lower than the session bit depth. A 32-bit float session bouncing to 24-bit or 16-bit will automatically apply the selected dither algorithm.
Dithering Options In Logic Pro And Ableton Live
Logic Pro includes dithering in its bounce settings under the PCM section. Users choose between POW-r #1, POW-r #2, and POW-r #3 algorithms when exporting to bit depths below the session resolution. The software automatically turns off dithering when bouncing to formats that don't require it, such as 32-bit files or compressed formats like MP3.
Ableton Live handles dithering through its export audio function. The software applies triangular dithering by default when reducing bit depth during export. Live doesn't offer multiple dithering algorithms in its native export window, keeping the process straightforward for users who want a reliable default option without extensive customization.
Both DAWs apply dithering only as the final step in the export chain, ensuring it occurs after all other processing.
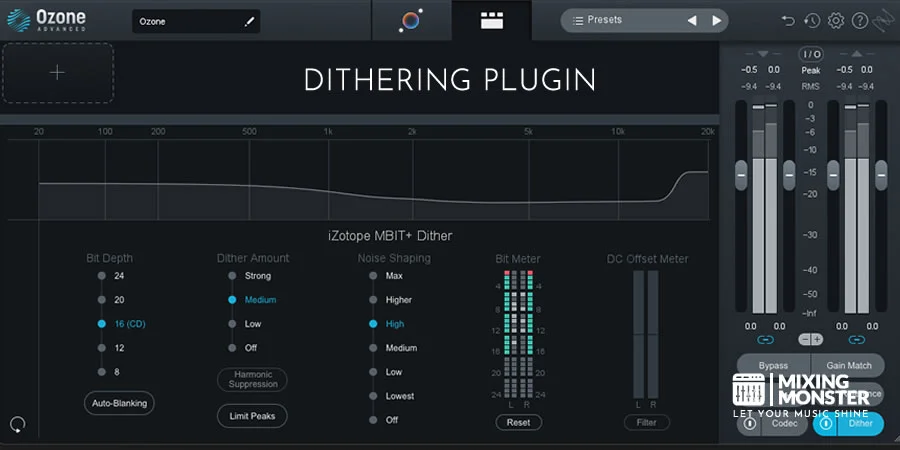
Using External Dithering Plugins And Processors
Specialized dithering plugins provide advanced control beyond native DAW options. iZotope MBIT+ offers multiple dithering algorithms with detailed noise shaping curves. The plugin displays real-time metering and allows A/B comparison between different dither types.
Waves IDR provides dithering with bit-depth reduction and noise-shaping profiles optimized for different material types. Users can select from Type 1 (light), Type 2 (moderate), and Type 3 (ultra) noise shaping curves. The plugin includes a dither amount control and double-precision processing.
External processors typically insert on the master bus as the last plugin in the chain. They offer more transparency into the dithering process through visual feedback and parameter adjustment. Many engineers prefer this approach when preparing final masters because it provides explicit control over when and how dithering occurs rather than relying on automatic export functions.
Comparing Built-In DAW Dithering Versus Third-Party Options
Built-in DAW dithering delivers professional results for most production scenarios. Native algorithms use established mathematical principles and produce clean bit depth reduction without artifacts. The main advantage lies in workflow integration: dithering occurs automatically during export, without requiring additional plugins or routing.
Third-party options excel in specialized situations requiring fine-tuned control. They offer multiple algorithm choices, adjustable noise-shaping curves, and detailed metering to help engineers make informed decisions. Professional mastering engineers often prefer dedicated dithering tools because they can audition different algorithms and select the optimal one for specific material.
| Feature | Built-In DAW Dithering | Third-Party Plugins |
|---|---|---|
| Algorithm variety | Limited (2-3 options) | Extensive (5-10+ options) |
| Visual feedback | Minimal | Detailed metering |
| Workflow | Automatic during export | Manual plugin insertion |
| Cost | Included | Additional purchase |
The choice between built-in and external dithering depends on the project requirements and desired level of control. Critical final masters often benefit from third-party tools, while routine exports work well with native DAW options.

7
Advanced Dithering Techniques For Mastering Engineers
Professional mastering engineers employ specific dithering strategies that go beyond basic plugin presets. Understanding noise-shaping curves and their frequency response characteristics allows engineers to tailor dithering to different program material and delivery formats.
Noise-Shaping Curves And Frequency Response
Noise shaping redistributes dither noise away from frequencies where human hearing is most sensitive. The technique pushes quantization noise into frequency ranges above 10 kHz, where it becomes less perceptible to listeners.
Common noise-shaping algorithms include:
- POW-r 1: Applies minimal noise shaping suitable for acoustic recordings and classical music
- POW-r 2: Provides moderate shaping for balanced frequency content across genres
- POW-r 3: Uses aggressive shaping ideal for loud, compressed material like EDM and rock
Engineers select curves based on the spectral content of their material. A sparse acoustic guitar recording benefits from POW-r 1's gentle approach, while heavily limited electronic music tolerates POW-r 3's more aggressive redistribution. The trade-off involves a slight increase in total noise energy in exchange for reduced audibility in critical frequency bands.
Dithering For High-Resolution Audio Formats
High-resolution formats require different dithering strategies than standard 16-bit releases. When mastering for 24-bit distribution platforms, engineers typically skip dithering entirely during the bounce process.
The additional 8 bits of depth in 24-bit audio provide sufficient resolution that quantization distortion remains below the noise floor of most playback systems. Dithering a 32-bit float session to 24 bits introduces unnecessary noise without perceptible benefit.
However, when creating both high- and standard-resolution masters from the same session, engineers must carefully plan their workflow. They first bounce a 24-bit master without dither, then use that file as the source for subsequent 16-bit conversions with appropriate dithering applied.
Multiple Bounce Workflows And Dithering Strategy
Dithering should be applied only once throughout the entire production chain. Applying dither multiple times compounds the added noise and unnecessarily degrades audio quality.
Engineers working with stems or multiple mastering passes must track which files already contain dither. When bouncing stems from a 32-bit session for analog summing, the stems should export at 24-bit without dither. After re-importing and finalizing the master, dither gets applied only during the final 16-bit bounce.
Series limiting chains require particular attention since some limiters apply dithering by default. Plugins like Waves L3 include built-in dither that must be disabled when multiple limiters work in series. Engineers verify each plugin's dither settings before the final export to prevent accidental double-dithering.
A/B Testing Dithering Results For Quality Control
Professional engineers compare different dithering algorithms against their source material to identify artifacts or tonal shifts. This process involves bouncing multiple versions with different dither types and noise-shaping curves for direct comparison.
Testing focuses on the quietest sections of a track where dither noise becomes most audible. Engineers listen specifically for:
- Unnatural noise artifacts during fadeouts
- Coloration changes in reverb tails
- Graininess in soft instrumental passages
The testing environment matters significantly. Studio monitors in treated rooms reveal subtle differences that consumer playback systems might mask. Engineers also verify their dithered masters on various playback devices, including laptop speakers, earbuds, and car audio systems, to ensure translation across platforms.
8
Common Dithering Mistakes To Avoid
Dithering errors can compromise audio quality and introduce unwanted artifacts into final mixes. Understanding these pitfalls helps producers maintain clean, professional-sounding masters while avoiding technical issues that degrade sonic performance.
Double Dithering And Cascading Noise Issues
Double dithering occurs when audio undergoes bit-depth reduction multiple times, with dither applied at each stage. This creates a cumulative noise floor that becomes increasingly audible, degrading signal quality.
The problem typically emerges when producers export tracks with dithering enabled, then import those files into another session where dithering gets applied again during final mastering. Each dithering pass adds its own noise signature, resulting in a noticeable hiss or graininess.
To prevent this issue, producers should track which files have already been dithered and avoid applying dithering during intermediate export stages. Dithering should only happen once during the final bounce to the target bit depth. Working at higher bit depths throughout the production process (24-bit or 32-bit floating-point) and saving dithering for the absolute last step ensures clean results without cascading noise.
Over-Dithering And Excessive Noise Floor Problems
Over-dithering happens when producers apply too much dithering noise or use inappropriate dithering algorithms for their material. This raises the noise floor to audible levels, particularly noticeable during quiet passages or fadeouts.
Some dithering plugins offer intensity controls or different noise-shaping curves. Applying maximum settings or aggressive noise shaping when unnecessary can make the background hiss more prominent than the quantization distortion it aims to mask. This becomes especially problematic with minimalist music, classical recordings, or ambient material, where silence plays an important role.
The solution involves choosing appropriate dithering algorithms based on content type and using default or moderate settings rather than maximum intensity. Different algorithms, such as TPDF (Triangular Probability Density Function) or POW-r, offer varying balances between noise and artifact reduction. Producers should compare results with ears trained to their specific material.
Forgetting To Dither During Critical Conversions
One of the most common errors involves skipping dithering when reducing bit depth, which introduces harsh quantization distortion into the final audio. This typically occurs when bouncing from 24-bit or 32-bit float sessions down to 16-bit for CD or streaming distribution.
Without dithering, the truncation or rounding of audio samples creates distortion artifacts that sound particularly unpleasant on sustained notes, reverb tails, and quiet dynamic passages. The distortion manifests as a grainy, digital harshness that marks amateur productions.
Critical conversion points include final master exports, sample-rate conversions that also involve bit-depth changes, and any workflow step where higher-resolution audio is reduced to a lower-resolution format. Producers should verify their DAW export settings include dithering when the output bit depth differs from the session bit depth. Many DAWs turn off dithering by default, requiring manual activation.
Using Incorrect Dithering Settings For Target Format
Different delivery formats require specific dithering approaches, and mismatched settings compromise audio quality. A 16-bit CD master needs different treatment than a 24-bit high-resolution download or streaming upload.
Common format mistakes include applying dithering when exporting to formats that don't require it (such as 24-bit or 32-bit float masters), using the wrong noise-shaping curve for the playback medium, or failing to account for codec behavior in lossy formats. For instance, dithering a file destined for MP3 compression adds noise that the encoder must then work harder to represent, potentially reducing the effectiveness of the lossy compression.
Recommended dithering settings by format:
| Target Format | Bit Depth | Dithering Required | Notes |
|---|---|---|---|
| CD Audio | 16-bit | Yes | Use TPDF or POW-r |
| High-res download | 24-bit | No | Keep native bit depth |
| Streaming services | 16-bit | Yes | Apply before upload |
| Intermediate masters | 32-bit float | No | Maintain headroom |
Producers should research their target platform's specifications and apply dithering only as the final step in the signal chain when bit depth reduction is necessary.
9
Key Takeaways For Audio Dithering Mastery
Dithering masks quantization errors by adding low-level noise to digital audio signals. This technique prevents harsh distortion when reducing bit depth during mastering.
Apply dither only once as the absolute final step before exporting to a lower bit depth. Any processing after dithering, including gain adjustments or sample rate conversion, undermines its effectiveness.
Engineers should enable dithering when bouncing down from 24-bit to 16-bit for CD distribution or streaming services. Dithering remains unnecessary for 32-bit floating-point exports since this resolution produces no audible quantization distortion.
When to dither:
- Converting from 32-bit to 24-bit
- Preparing 16-bit masters for CD
- Any bit depth reduction to 24-bit or lower
- Final export during the mastering stage
When to skip dithering:
- Working with 32-bit floating-point files or higher
- During mixing or intermediate bounces
- Before applying additional processing
The process improves dynamic range by replacing quantization distortion with smooth white noise. This preserves quiet details in reverb tails and fadeouts that would otherwise be lost or distorted.
For 16-bit audio, noise-shaped dither algorithms reduce the audibility of added noise. At 24-bit depths, flat TPDF-type dither works effectively since the noise floor sits well below typical listening levels.
Happy dithering!

Frequently Asked Questions
1
What is dithering in audio?
Dithering is the process of adding random noise to an audio signal to reduce quantization distortion that occurs when converting to lower bit depths. This technique replaces harsh quantization errors with a more pleasant, low-level noise floor.
The process works by introducing small amounts of randomness that help smooth the transition between digital amplitude values. When an audio file is reduced from 24-bit to 16-bit, many amplitude values no longer have exact matches in the lower resolution format.
Without dithering, these values get truncated or rounded, creating audible distortion, especially in quiet passages and reverb tails. The added noise effectively masks these errors while preserving detail that would otherwise be lost.
2
In what way does dithering impact the quality of digital audio?
Dithering improves audio quality by introducing subtle randomness that reduces distortion while preserving low-level detail. The technique transforms quantization distortion into a smooth, consistent noise floor that sounds more natural than the harsh artifacts of truncation.
When properly applied, dithering can extend the perceived dynamic range of lower bit-depth audio by up to 24 dB. This means quiet sounds remain audible above the noise floor rather than being cut off or distorted.
The randomized noise is far less objectionable to human hearing than the tonal distortion products resulting from quantization errors. Most listeners find the slight hiss from dithered audio preferable to the harsh artifacts of undithered bit-depth reduction.
3
Do I need dithering for mastering?
Dithering should be applied during mastering only as the final step, when bouncing audio to lower bit depths. The technique is crucial for maintaining audio quality when preparing files for CD or streaming formats that require 16-bit resolution.
Most modern digital audio workstations operate internally at 32-bit floating-point, which means dithering is necessary when exporting to 24-bit or 16-bit formats. The process should occur as the absolute last operation before final export.
Engineers should only dither once during the mastering stage. Any processing applied after dithering, including gain adjustments or format conversions, can negate its benefits and introduce new quantization errors.
4
What's the difference between dithering and noise shaping?
Dithering adds random noise to reduce quantization distortion, while noise shaping applies frequency-dependent filtering to make that noise less audible. Noise shaping essentially equalizes the dither noise, pushing it into frequency ranges where human hearing is less sensitive.
At 16-bit resolution, noise shaping can make a noticeable difference in perceived audio quality by reducing the audibility of the dither noise. At 24-bit depths, the dither noise sits so far below normal listening levels that simple flat dither works effectively without additional shaping.
Both techniques work together in many mastering applications, with noise shaping serving as an optional enhancement to basic dithering. The choice between flat and shaped dither depends on the target bit depth and intended playback environment.
5
What is the significance of dithering in the context of music production?
Dithering helps maintain quality during digital conversion and processing by preserving detail that would otherwise be lost when reducing bit depth. The technique is especially important for preserving subtle elements such as reverb tails, ambient textures, and fadeouts.
In music production workflows, dithering bridges the gap between high-resolution studio formats and lower-resolution distribution formats. Without it, the quality compromise during bit depth reduction becomes immediately apparent in critical listening environments.
Producers working in 32-bit or 64-bit floating point need dithering when bouncing to 24-bit fixed-point or any lower resolution. This ensures professional quality throughout the production chain from recording through final delivery.
6
Should I dither when exporting audio?
Dithering should be enabled when exporting audio only if the bit depth is reduced below the session format. Files exported at 32-bit floating point or higher do not require dithering because the resolution remains high enough to avoid audible quantization distortion.
When exporting 16-bit files for CD or streaming, dithering becomes essential as the final processing step. The same applies when bouncing from 32-bit floating-point sessions to 24-bit fixed-point files.
Users should turn off dithering when exporting at the same bit depth as their working format or when exporting to high-resolution formats. Multiple applications of dithering can accumulate noise without providing additional benefit.