


Achieving proper stereo width in mastering can transform a flat, lifeless track into a professional, immersive listening experience. Many a professional audio engineer struggles with expanding the stereo image without sacrificing mono compatibility or losing clarity in the center of a mix. When focusing on mastering stereo width, the goal is to enhance the listening experience without introducing technical flaws.
Stereo width in mastering refers to the perceived spatial distribution of audio elements across the left and right channels, creating depth and dimension in the final mix. Getting stereo width in mastering involves carefully applying stereo imaging plugins, EQ techniques, and spatial processing to enhance the existing soundstage without introducing phase issues.
The mastering stage allows engineers to refine the stereo field that was established during mixing, though substantial changes should be avoided. Learning how to achieve stereo width in mastering involves balancing the side signals with the center channel while avoiding frequency masking. Proper stereo expansion requires understanding mid-side processing and maintaining balance between centered and side elements.
This guide explores practical techniques for enhancing stereo width during mastering, from plugin-based approaches to hardware solutions. Engineers will learn how to evaluate existing mixes, apply widening without compromising the low end, and use metering tools to ensure mono compatibility.
The techniques covered bridge both mixing and mastering disciplines. They provide practical methods for creating a broader mix while preserving the integrity and balance of the original production.
Key Takeaways / TL;DR
- Stereo width in mastering enhances spatial perception through controlled mid-side processing and frequency-specific expansion techniques.
- Always verify mono compatibility when applying stereo widening to prevent phase cancellation and maintain low-frequency integrity.
- Use metering tools and reference tracks to make precise adjustments that result in a wider mix without altering its fundamental balance.

1
How To Get Stereo Width In Mastering
Achieving proper stereo width in mastering requires understanding when and how to apply stereo widening techniques while maintaining mono compatibility and avoiding phase issues. An audio engineer must balance the desire for a wide stereo image against the technical requirements of playback systems. This process often begins with evaluating the original panning and balance.
Understanding Stereo Width Versus Loudness And Clarity
Stereo width and loudness operate independently in mastering, though many engineers mistakenly conflate the two. A track can be loud without being wide, and a wide stereo field doesn't automatically create perceived loudness.
When an audio engineer applies mid/side processing, they can isolate the center and edges of the soundstage for better control. The stereo image represents the spatial distribution of audio content across the left and right channels, while loudness refers to overall amplitude and compression.
Key Distinctions:
- Stereo Width: Horizontal placement and spread of audio elements
- Loudness: Perceived volume and dynamic range compression
- Clarity: Frequency separation and element definition
Excessive stereo widening can actually reduce clarity by smearing transients and creating phase cancellation. When engineers push the side signal too aggressively, centered elements lose definition and punch. Mid-frequency content is particularly prone to over-widening, as many critical elements compete in this range.
The relationship between width and clarity becomes evident when checking mono compatibility. Elements that sound wide in stereo may completely disappear or change character when summed to mono, indicating phase problems that compromise clarity.
When To Add Stereo Width During The Mastering Stage
The decision to enhance stereo width during mastering depends on the source material's existing spatial characteristics. Returning to mixing is the preferred solution when width issues are significant, but mastering adjustments work for subtle enhancements.
Engineers should add width during mastering only after analyzing the mix in full stereo, mono, and mid-side mode. This evaluation reveals whether the stereo spread needs adjustment or if the existing balance serves the musical intent.
Situations Warranting Width Adjustments:
- High frequencies lack air and dimension
- Reverb and ambiance sit too centered
- Genre expectations require more spatial depth
- Individual elements need subtle positioning refinement
Stereo width mastering works best when applied to specific frequency ranges rather than the full spectrum. High-frequency enhancement typically causes fewer problems than low or mid-range widening. The mastering engineer must determine whether changes in width will enhance the musical idea or create unwanted artifacts.
Setting Realistic Width Goals Based On Genre
Different musical genres have established conventions for stereo spread that listeners expect. Electronic dance music typically features wider stereo fields than acoustic jazz, where natural room ambiance provides spatial information.
Genre-Specific Width Characteristics:
| Genre | Typical Width Approach | Focus Areas |
| EDM/Electronic | Wide, expansive | Synths, effects in sides |
| Rock/Metal | Moderate, punchy | Guitars panned, drums centered |
| Hip-Hop | Narrow to moderate | Strong center, controlled sides |
| Classical | Natural, subtle | Authentic room ambience |
| Pop | Moderate to wide | Balanced, radio-friendly |
Acoustic and live recordings benefit from subtle width enhancement that maintains natural spatial relationships. Heavy stereo widening on these genres creates an artificial presentation that contradicts the organic performance aesthetic.
Bass-heavy genres require particular caution with low-frequency stereo content. Processing stereo width on low-end systems creates energy imbalances between left and right channels, reducing impact on club systems and causing problems on single-speaker devices.
Avoiding Over-Widening And Phase Problems
Phase coherence must remain intact when increasing stereo width during mastering. Over-widening creates out-of-phase relationships that cause frequency cancellation when played in mono, affecting playback on phones, laptops, and public address systems.
Monitoring mono compatibility is essential throughout the stereo widening process. Engineers should frequently toggle between stereo and mono to identify elements that disappear or change character, indicating phase issues.
Signs Of Excessive Width:
- Hollow or thin sound in mono playback
- Loss of bass weight and power
- Vocal or lead instruments are losing presence
- Unnatural spatial presentation
- Left-right channel imbalance
Low-frequency content below 150-200 Hz should generally remain mono or near-mono. Maintaining low-end mono ensures that the track retains its impact on club systems and portable devices. While some side information may be present in a good mix, aggressive widening in this range compromises the foundation and causes playback inconsistencies.
Mid-range widening requires careful application, as many important elements occupy this frequency range. Small adjustments in stereo width prove more effective than dramatic changes, preserving the mix's original balance while adding subtle dimension.

2
Preparing Your Mix For Stereo Widening In Mastering
Before applying any stereo enhancement during mastering, engineers must analyze the existing mix to identify its strengths and weaknesses in the stereo field. Proper preparation prevents common problems like phase cancellation and ensures the final master translates well across all playback systems.
Evaluating Mix Balance Before Applying Width
The engineer should listen to the mix in a controlled monitoring environment to assess the current stereo balance. This process requires critical listening to identify how elements are distributed across the left and right channels. The engineer examines the spatial relationships through calibrated studio monitors.
Critical elements like kick drums, snare drums, bass guitars, and lead vocals typically occupy the center of the stereo field. Strategic planning of instruments such as rhythm guitars, synth pads, and background vocals creates the initial width and depth. The audio engineer needs to identify which elements already contribute to the stereo image. The engineer needs to identify which elements already contribute to the stereo image and which remain centered.
Stereo widening can alter the balance between centered and panned elements. When specific audio processing techniques enhance the stereo width, the side signal often becomes more prominent, which may unintentionally boost reverb tails or panned instruments. The engineer must evaluate whether these balance shifts will support or detract from the original musical intent.
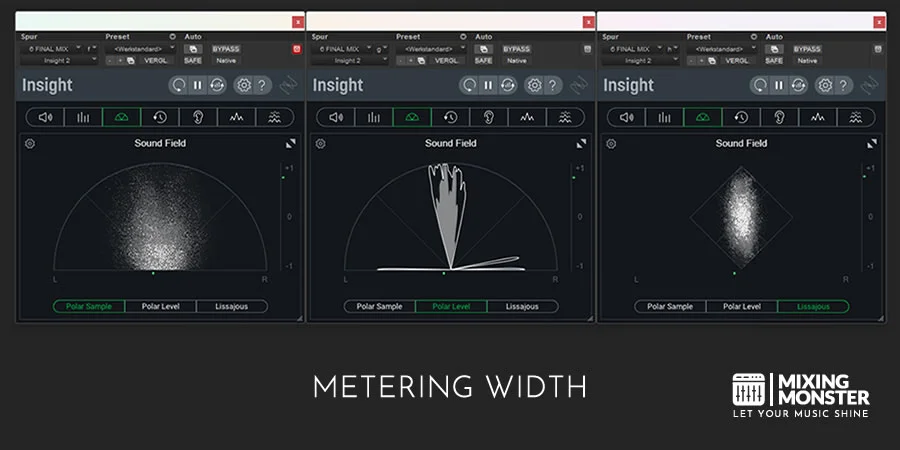
Using a mid-side analyzer plugin reveals the exact distribution of energy between the center and the sides. A well-balanced mix typically shows appropriate separation without extreme clustering in either the mid or side channels.
Checking Mono Compatibility And Phase Correlation
Mono compatibility testing is essential before applying any stereo widening processes. The engineer should sum the stereo mix to mono using either a plugin or a hardware monitor controller to identify potential phase issues.
When a mix is collapsed to mono, elements that experience phase cancellation will decrease in volume or disappear entirely. This indicates poor phase coherence between the left and right channels. Common problem areas include stereo-widened synthesizers, timing errors in delays, and microphone recordings with polarity inversions.
A phase correlation meter displays the relationship between left and right channels on a scale from -1 to +1. A reading of +1 indicates perfect correlation (mono), while 0 shows completely uncorrelated signals, and -1 represents perfectly out-of-phase signals. Most professional mixes maintain phase correlation between +0.5 and +1 for the majority of the track.
The engineer must identify any sections where the phase correlation drops below +0.3, as these areas are prone to problems when played on mono systems like smartphones, club PA systems, and certain streaming platforms. Elements with severe phase issues should be addressed in the mix before mastering begins, though minor adjustments can sometimes be made during mastering.
Discover Best Audio Gear & Equipment


Identifying Frequency Ranges That Support Width
Different frequency ranges respond differently to stereo widening techniques. Low frequencies below 120-150 Hz typically need to remain centered to maintain energy distribution and prevent phase issues on bass-heavy playback systems.
The mid-frequency range from 250 Hz to 2 kHz contains many competing elements, such as vocals, guitars, and keyboards. Changes to stereo width in this region are immediately noticeable and require careful consideration. High frequencies above 4 kHz are generally more forgiving when creating the perception of width through processing.
The engineer should use a spectrum analyzer in mid-side mode to examine which frequency ranges already contain substantial side information. If the sides already have significant high-frequency content from cymbals, reverb, and panned instruments, additional widening may be unnecessary or excessive.
Frequency ranges and typical stereo treatment:
- 20-120 Hz: Keep mono to maintain bass energy and prevent uneven channel distribution
- 120-250 Hz: Minimal width, check for low-end instruments that may need centering
- 250-2 kHz: Apply width cautiously due to vocal and instrument density
- 2-8 kHz: Moderate width enhancement possible with fewer trade-offs
- 8-20 kHz: Most forgiving range for stereo enhancement
Using Reference Tracks To Define Stereo Targets
Reference tracks in the same genre provide concrete examples of appropriate stereo width for the target market. The engineer should select two to three professionally mastered tracks with instrumentation and energy similar to the project being mastered.
Loading reference tracks into the digital audio workstation allows for direct A/B comparison using the same monitoring chain. The engineer should analyze the reference tracks with the same tools used to evaluate the original mix, including spectrum analyzers, phase correlation meters, and mid-side processors.
Specific aspects to compare include the ratio of mid-to-side energy, the frequency distribution in the side channels, and how the stereo image changes across different song sections. A reference track with excessive width for the current project can mislead the engineer into excessive processing.
The engineer should note the phase correlation readings during dense sections of the reference tracks. If professional releases maintain correlation above +0.6 during choruses while the current mix drops to +0.3, this indicates the mix may already have width that could become problematic with additional enhancement.
Matching the perceived width of reference tracks provides a realistic target rather than relying on subjective preferences that may not translate well across different playback systems.
3
Using Stereo Imaging Plugins For Mastering Width
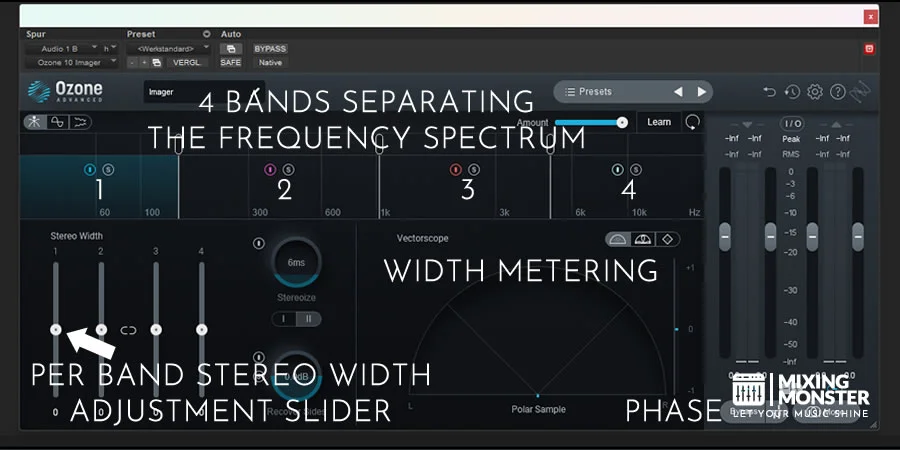
A high-quality stereo imager and professional stereo-imaging plugins enable mastering engineers to manipulate a mix's spatial characteristics through mid/side processing and frequency-specific adjustments. This specialized stereo imager requires precise settings and careful application to enhance width without compromising mono compatibility or introducing phase issues.
Mid Side Processing For Controlled Stereo Expansion
Advanced mid/side processing separates audio into mid and side channels. This gives the audio engineer independent control over centered and stereo information, creating a more immersive sound. The mid channel contains everything panned to the center, while the side channel holds the stereo-panned elements.
This approach enables targeted adjustments to specific parts of the stereo field. Effective mid/side processing enhances the sides while keeping the center punchy.
Engineers can boost the side channel to increase perceived width or reduce it to narrow the stereo image. The mid channel can be adjusted separately to maintain vocal clarity and bass focus.
Most stereo imaging plugins include dedicated mid and side controls with visual feedback. Engineers typically work in small increments, adjusting the balance between mid and side signals by 1-2 dB at a time. This prevents overcorrection and maintains the mix's natural character.
M/S processing also allows for corrective work when mixes have excessive stereo information in certain frequency ranges. Engineers can narrow problematic frequencies while leaving others untouched.
Frequency-Dependent Stereo Widening Techniques
Frequency-dependent stereo widening applies different amounts of stereo enhancement across the frequency spectrum. Low frequencies typically remain narrow or mono, while higher frequencies can accommodate more width.
Bass frequencies below 150 Hz should generally stay centered to maintain power and prevent phase cancellation. Mid-frequency range changes should be handled with care, as important elements compete in this area and changes become immediately noticeable.
High frequencies above 5 kHz respond well to stereo widening without significant trade-offs. These frequencies create air and spaciousness when widened moderately. Engineers often apply subtle width increases to highs while leaving mids and lows relatively untouched.
Typical Frequency Bands for Stereo Width:
| Frequency Range | Width Treatment |
| Below 150 Hz | Mono or narrow |
| 150 Hz - 500 Hz | Minimal widening |
| 500 Hz - 2 kHz | Careful, subtle adjustments |
| 2 kHz - 5 kHz | Moderate widening possible |
| Above 5 kHz | More freedom for width |
Multiband stereo imaging tools enable precise frequency-specific adjustments.
Your Song Mixed & Mastered By Mixing Monster


Best Practices For Stereo Imager Plugin Settings
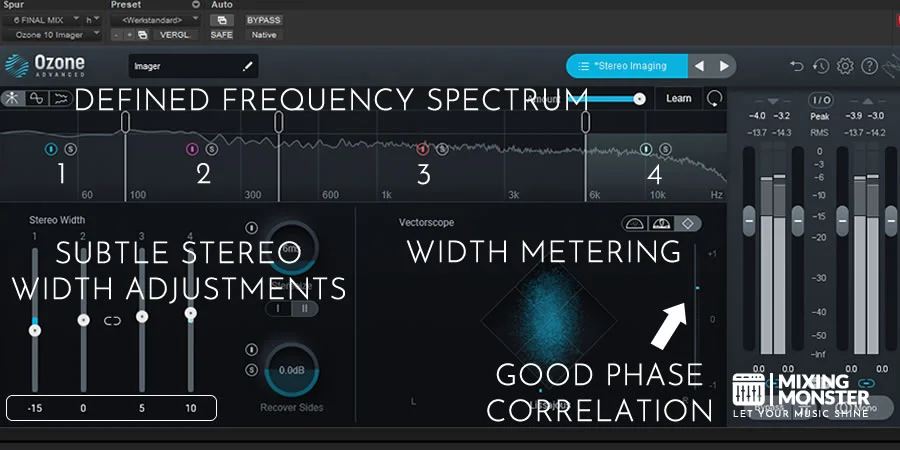
Adjusting width in small increments prevents over-processing and maintains mix integrity. Start with width values between 100% and 110%, rather than pushing settings to extremes.
Refer to the mono mix frequently when making stereo width adjustments. Elements that disappear or become quieter in mono indicate phase problems that will translate poorly to mono playback systems. Some stereo wideners introduce phase shifts that cause cancellation.
Monitor balance changes as stereo enhancement often makes panned elements more prominent. Reverb tails and stereo effects become louder when the side signal increases, potentially shifting the overall mix balance away from the original intent.
Key Plugin Parameters:
- Width control: Keep between 100-120% for subtle enhancement
- Frequency range: Apply different amounts per band
- Phase correlation: Monitor to stay above -1 for mono compatibility
- Output level: Compensate for perceived loudness increases
Use visual meters to track correlation and width. Most mastering plugins display phase correlation, which should remain positive to ensure mono compatibility.
Common Mistakes With Stereo Imaging Tools
Over-widening creates an unnatural sound and often results in a hollow center with weak vocals and instruments. Engineers sometimes push stereo enhancers too far, causing the mix to lose cohesion and power.
Widening low-end content is a common error that causes phase issues and an uneven energy distribution between the left and right channels. Bass that lacks mono focus sounds weak on mono playback systems and club sound systems.
Failing to check mono compatibility represents a critical oversight. Mono compatibility should always be kept in mind throughout the stereo imaging process, as many playback scenarios sum stereo to mono.
Processing already-wide mixes with additional stereo wideners compounds existing problems. Some mixes arrive at mastering with excessive width, requiring narrowing rather than expansion. Listen carefully to determine whether the stereo image needs any changes before reaching for stereo imaging tools.
Applying identical stereo widening across all frequencies creates imbalance and phase problems. Each frequency range requires individual consideration based on its role in the mix and susceptibility to phase issues.

4
EQ-Based Techniques To Increase Stereo Width
Equalization provides precise control over the stereo field by targeting specific frequency ranges in the mid and side channels. Engineers can reshape the spatial balance of a mix through strategic mid-side EQ techniques and mid/side EQ adjustments. Using m/s eq allows for surgical precision when addressing the sides while maintaining mono compatibility.
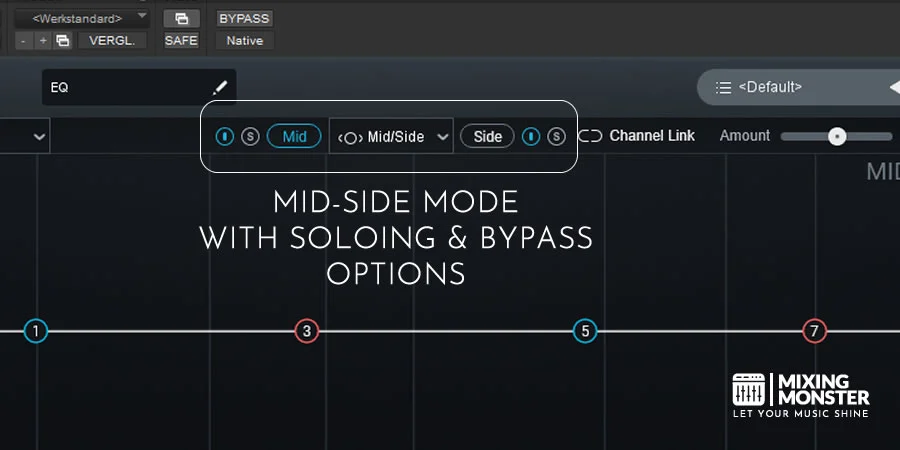
Mid Side EQ For Enhancing Side Information
A mid-side equalizer splits the audio signal into center (mid) and stereo (side) components for independent processing. This allows engineers to boost specific frequencies in the side channel without affecting the centered elements.
Applying gentle boosts between 8 kHz and 12 kHz on the side channel enhances air and presence in the stereo field. The mid channel remains untouched, keeping vocals and bass elements stable in the center. Care must be taken when boosting mid-range frequencies on the sides, as this area contains competing elements that can create imbalance.
Side channel processing requires conservative gain adjustments. Boosts of 1 to 3 dB often provide noticeable width enhancement without introducing phase issues. Engineers should check mono compatibility after each adjustment to ensure the mix translates well across playback systems.
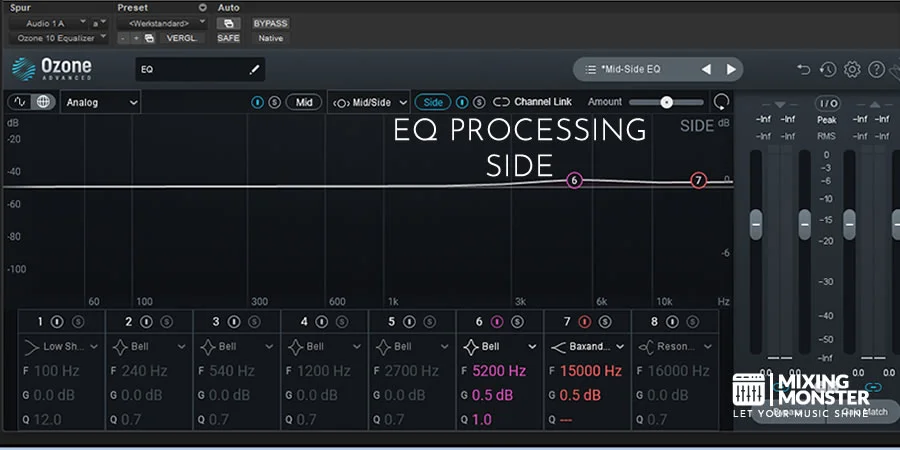
High-Frequency Width Without Harshness
High-frequency enhancement offers a more forgiving approach to stereo widening compared to mid-range adjustments. Boosting frequencies above 10 kHz in the side channel creates a sense of space and dimension without drastically altering the mix balance.
Using shelving filters on the side channel provides smooth, musical results. A gentle shelf starting at 8 kHz can add sparkle to cymbals, hi-hats, and reverb tails that naturally occupy the stereo field. The key is avoiding excessive gain that introduces sibilance or listener fatigue.
Recommended High-Frequency Widening Settings:
- Frequency range: 8 kHz to 15 kHz
- Filter type: High shelf or bell
- Gain amount: +1 to +2.5 dB
- Q factor: 0.7 to 1.5 for bells
Bell filters offer more surgical control for targeting specific problem areas or enhancing particular instruments in the side image.
Related Articles

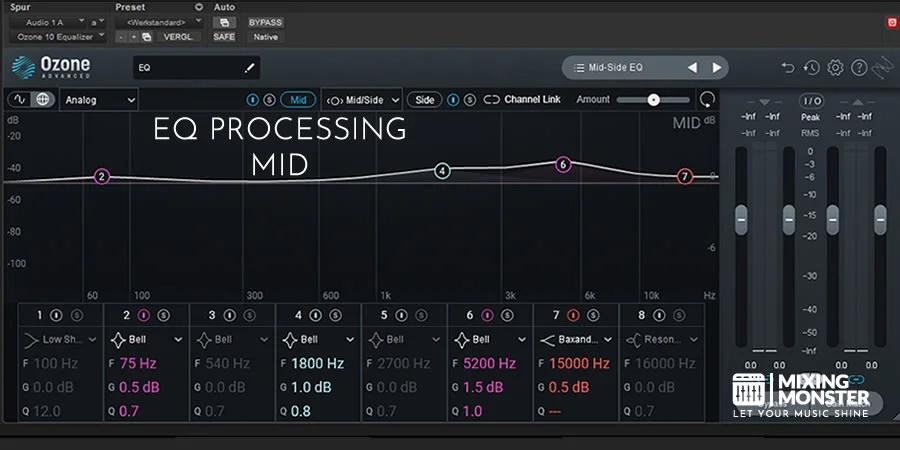
Cleaning The Mid Channel To Create Space
Reducing certain mid-channel frequencies creates space for side information to become more prominent. This subtractive approach often yields more natural results than aggressive side channel boosting.
Attenuating mid-channel content between 200 Hz and 400 Hz can reduce muddiness and frequency masking that hides stereo width. A subtle cut of 1 to 2 dB in this range allows panned instruments and reverb to shine through. This technique proves particularly effective when the mix feels congested despite having adequate side information.
Low-frequency content requires careful consideration during stereo width processing. Making bass frequencies more mono prevents phase cancellation and maintains energy distribution across both channels. A high-pass filter on the side channel below 150 Hz tightens the low end while preserving width in higher frequencies.
Dynamic EQ For Responsive Stereo Control
Dynamic EQ applies frequency-specific processing only when certain threshold levels are met. This approach prevents static boosts from creating problems during loud passages or busy sections.
A dynamic mid-side EQ can widen high frequencies during sparse arrangements while pulling them back during dense sections. Setting a dynamic band to boost side channel highs only when they fall below a certain level maintains consistent perceived width throughout the track. The ratio and threshold settings determine how aggressively the processing responds.
Dynamic processing also helps control harsh resonances that arise from side-channel boosting. A dynamic cut targeting 3-5 kHz in the side channel tames brittle frequencies without dulling the overall brightness. Attack and release times should be set according to the program material, with faster settings for transient-rich content and slower settings for sustained sounds.

5
Adding Stereo Width With Harmonics And Saturation
Saturation adds harmonic content that can enhance perceived stereo width when applied strategically to the side channel. Engineers can use harmonic exciters and saturation plugins to create thickness and character in the stereo field without relying solely on traditional stereo enhancer techniques.
Stereo Saturation Versus Mono Saturation
Applying saturation to the entire stereo signal differs significantly from processing only the mid or side channels. Mid-side compression allows engineers to apply saturation independently to centered and stereo content.
When using stereo saturation, the plugin processes both channels equally, adding harmonics across the full mix. This approach works well for cohesive warmth but provides limited control over stereo width enhancement.
Side channel saturation targets only the stereo information. Applying subtle saturation on the sides makes high-end elements stand out in the stereo field and creates a thicker, fuller stereo image. This technique preserves the clarity of centered elements, such as vocals and kick drums, while enhancing the clarity of peripheral instruments.
Engineers should use gentler saturation settings on the side channel than they would on mono content. Excessive side saturation can create phase issues and reduce mono compatibility.
Harmonic Exciters To Enhance Side Content
Harmonic exciters generate new frequency content that wasn't present in the original signal. When applied to the side channel through m/s compression, these tools add perceived width without increasing actual panning.
Tape saturation emulations work particularly well for adding warmth to the sides. They introduce even-order harmonics that sound musical and smooth. Tube-style saturation produces odd-order harmonics, creating a brighter, more aggressive sound.
Engineers typically apply exciters to specific frequency ranges rather than the full spectrum. Processing above 4kHz on the side channel adds air and sparkle. Mid-range excitation between 1kHz and 4kHz requires careful attention, as excessive processing in this range can make mixes sound harsh or fatiguing.
The key is maintaining the original tonal balance while adding subtle harmonic richness. A/B comparison in mono reveals whether the added harmonics translate well or create problematic artifacts.
Parallel Processing For Subtle Width
Parallel saturation allows engineers to blend processed and unprocessed signals for more natural results. This method provides greater control over the intensity of harmonic enhancement.
The engineer sends the side channel to a parallel processing chain with heavy saturation or harmonic excitation. They then blend this heavily processed signal back with the original at a lower level, typically between 10% and 30%.
This approach offers several advantages:
- Preserves the original dynamics and transients
- Allows aggressive saturation settings without overtly distorting the mix
- Provides precise control through blend amount adjustment
- Maintains clarity while adding depth and character
The parallel chain can include multiple saturation types stacked together. Combining tape saturation with tube emulation creates complex harmonic structures that sound richer than single-plugin processing.
Avoiding Distortion And Phase Smear
Excessive saturation on the side channel causes audible distortion and phase issues, reducing mix quality. Engineers must recognize when harmonic enhancement crosses into detrimental territory.
Phase smear occurs when saturation plugins introduce different delays across the frequency spectrum. This issue becomes particularly problematic with analog-modeled saturators that include transformer emulation. Testing the mix in mono immediately reveals phase cancellation issues.
Visual metering helps identify problematic processing. Correlation meters should remain positive, ideally above 0.7, when adding side-channel saturation. Values approaching zero or going negative indicate phase issues that will cause elements to disappear in mono playback.
Distortion becomes audible when saturation settings are pushed too far. Listen specifically for harshness in cymbals and hi-hats, and in vocal sibilance. These elements live in the side channel and show distortion artifacts most clearly.
The engineer should apply high-pass filtering before saturation to prevent low-frequency content from triggering the saturation circuit unnecessarily. Filtering below 200-300Hz on the side channel keeps bass elements centered while allowing clean harmonic enhancement of higher frequencies.

6
Using Reverb And Spatial Effects In Mastering
Reverb and spatial effects can enhance stereo width during mastering, though they require careful application to avoid disrupting the existing mix balance. These tools add width, depth, and height to a track. They work best when used subtly to add dimension rather than create entirely new spatial characteristics.
Stereo Reverb For Depth And Width Enhancement
Stereo reverb adds perceived space and dimension to a master without drastically altering the original mix intent. Creating depth and width in mastering involves using reverb sparingly to add texture or improve specific frequency ranges.
The mastering engineer should apply reverb with extremely short decay times and minimal wet signal levels. A reverb setting with 0.3 to 0.8 seconds of decay time typically works well for subtle enhancement. The wet/dry mix rarely exceeds 5-10% to maintain the integrity of the original mix.
Key reverb parameters for mastering:
- Pre-delay: 10-30ms to separate the direct signal from the reverb tail
- Decay time: 0.3-0.8 seconds for subtle enhancement
- Wet/dry mix: 3-8% to preserve mix balance
- High-pass filter: 200-400Hz to keep the low end clean
The reverb should enhance existing spatial information rather than create new room characteristics. Engineers focus on supporting elements that already have stereo width rather than forcing mono elements into the stereo field.
Micro Ambiance Versus Audible Reverb
Micro ambiance refers to extremely subtle reverb that adds dimension without being consciously perceived as reverb. This technique differs from audible reverb, which listeners can clearly identify as an added effect.
Micro ambiance uses decay times under 0.5 seconds with extremely low wet signal levels between 2-5%. The effect creates a sense of space without drawing attention to itself. Audible reverb, conversely, uses longer decay times and higher mix levels that become a noticeable part of the sonic signature.
Most mastering applications favor micro ambiance because it enhances width while maintaining the mixing engineer's original vision. The mixing stage already established the primary reverb characteristics, so mastering reverb should remain nearly imperceptible.
Engineers can layer multiple micro-ambiance effects across different frequency ranges to achieve cumulative width enhancement. One reverb might target frequencies above 8kHz while another addresses the 2-5kHz range, each contributing minimal but additive spatial enhancement.
Mid Side Reverb Processing Techniques
Mid-side reverb processing allows engineers to apply reverb exclusively to the side channel, leaving the center channel untouched. This approach widens the stereo image without muddying the center elements, such as vocals, kick drums, and bass.
Processing only the side signal maintains clarity in the mid channel where most critical mix elements reside. Engineers typically apply a high-pass filter to the reverb input at 400-800Hz to prevent low-mid frequency buildup in the sides.
The side-only reverb technique works particularly well for emphasizing existing stereo information from guitars, synth pads, and background vocals. Decay times between 0.4 and 1.2 seconds create noticeable width without overwhelming the mix.
The Haas effect can complement this technique by introducing subtle delays between the left and right channels to enhance spatial perception. However, the audio engineer must be careful not to create phase issues that compromise mono playback.
Mid-side reverb workflow:
- Insert reverb on the side channel only
- Apply a high-pass filter at 400-800Hz on the reverb input
- Set decay time to 0.4-1.2 seconds
- Adjust the wet mix to 8-15% for the side channel
- Monitor mono compatibility throughout
Keeping Low Frequencies Centered
Low-frequency content requires careful handling when applying spatial effects during mastering. Stereo-widening of low-frequency content creates an uneven distribution of energy between the left and right channels, reducing punch and causing phase issues.
Engineers should high-pass filter any reverb or spatial effects at a minimum of 150-200Hz, though 300-400Hz often proves safer. This filtering prevents bass and kick drum energy from spreading into the stereo field, where it loses impact and focus.
Some mastering chains include a dedicated low-end management tool that ensures frequencies below 120-150Hz remain perfectly mono regardless of other processing. This approach maintains bass power while allowing freedom with mid- and high-frequency spatial enhancement.
Low-frequency spatial guidelines:
|
Frequency Range |
Spatial Processing Approach |
|
Below 80Hz |
Always mono, no spatial effects |
|
80-150Hz |
Minimal width, centered processing |
|
150-400Hz |
Careful spatial enhancement with filtering |
|
Above 400Hz |
More freedom for width and reverb |
The bass frequencies anchor the mix and provide physical impact that listeners feel rather than hear. Maintaining their centered position ensures the master translates well across all playback systems, from earbuds to club sound systems.

7
Hardware Techniques For Stereo Width In Mastering
Analog hardware offers distinct sonic characteristics for stereo width processing that many mastering engineers value for their natural sound and subtle harmonic enhancement. Physical gear provides tactile control and often introduces pleasing phase relationships that differ from digital emulations.
Analog Stereo Imaging Hardware Overview
Mid-side processors represent the primary hardware tool for stereo width control in mastering studios. These units split the signal into mid and side components, allowing engineers to independently adjust the level relationship between the centered and stereo information.
Common hardware categories include:
- Dedicated M/S matrices and processors
- Stereo width modules in mastering consoles
- Standalone stereo field controllers
- Modified sum-and-difference networks
The Maselec MLA-2 and SPL Stereo Vitalizer serve as industry-standard examples that provide precise mid-side control without digital conversion artifacts. These processors maintain phase coherence while offering graduated width adjustments that remain mono-compatible.
Passive designs using transformers create width through subtle phase manipulation and harmonic content. The hardware approach requires careful gain staging since analog devices operate within specific voltage ranges that affect how the width processing interacts with the signal.
Using Analog EQ For Natural Width
Analog equalizers create stereo width through frequency-dependent mid-side processing rather than artificial widening effects. Engineers apply different equalization curves to the mid and side signals to naturally enhance spatial characteristics.
High-frequency shelving on the side signal using vintage EQ designs adds air and dimension without the harshness that can occur with digital stereo enhancement. A gentle 1-2 dB boost above 10 kHz on the sides creates perceived width while maintaining tonal balance.
Tube-based equalizers like the Manley Massive Passive or Pultec-style units impart harmonic saturation that differs between channels due to component tolerances. These small variations contribute to a wider perceived image through natural phase relationships.
Key frequency targets for width:
- 8-12 kHz: Air and sparkle enhancement
- 3-5 kHz: Presence and definition
- 200-400 Hz: Warmth reduction in sides only
Engineers often reduce low- to mid-range content in the side channel using parametric EQ to tighten the stereo image while preserving centered elements.
Hybrid Mastering Chains And Signal Flow
Hybrid setups combine analog width processing with digital precision tools for optimal results. The signal path typically involves converting to analog at strategic points where hardware characteristics provide the most benefit.
A common configuration routes digital audio through an analog M/S processor before returning to the digital domain for final limiting. This approach captures the natural phase relationships and harmonic content of hardware while maintaining digital control over dynamics.
Typical hybrid signal flow:
- Digital file playback from DAW
- Conversion through high-quality D/A
- Analog M/S processing or EQ
- A/D conversion back to digital
- Digital limiting and metering
Engineers position width-enhancing hardware before compression stages, since dynamic processing can affect stereo relationships. Some chains place analog EQ after M/S processing to shape the newly adjusted stereo field.
Monitoring remains critical in hybrid chains. Engineers compare the analog-processed signal against the digital source to ensure improvements justify the added conversion stages and potential phase shifts.
When Hardware Adds Value Over Plugins
Hardware provides advantages in specific mastering scenarios where sonic character matters more than recall ability or cost efficiency. The decision to use physical gear depends on the source material and desired outcome rather than automatic preference.
Dense, digitally-produced mixes benefit from analog processing's natural phase smearing and harmonic distortion. These characteristics smooth harsh transients while creating depth that purely digital widening cannot replicate convincingly.
Material that requires subtle width adjustments responds well to hardware, since analog controls offer continuous variation without the stepped parameters of some plugins. The tactile feedback helps engineers make minute adjustments by ear rather than by visual reference.
Hardware advantages:
- Harmonic enhancement: Natural overtones from transformers and tubes
- Phase coherence: Analog circuits maintain musical phase relationships
- Sonic character: Specific colorations from component interactions
- Workflow benefits: Immediate response without computer latency
Conversely, projects requiring precise recall across multiple revisions favor plugin-based approaches. Hardware makes most sense when the mastering engineer commits to decisions during the session and values the specific sonic signature of particular units.
8
Metering And Monitoring Stereo Width Accurately
Accurate measurement and monitoring tools reveal the true stereo characteristics of a master, preventing phase issues and ensuring compatibility across playback systems. A correlation meter serves as the primary reference point for tracking stereo width and phase relationships throughout the mastering process.
Using Stereo Imaging And Correlation Meters
A correlation meter displays the phase relationship between left and right channels on a scale from -1 to +1. Values at +1 indicate perfectly mono content, while readings near 0 show wide stereo information. Negative values indicate phase cancellation, causing audio to disappear when played in mono.
The vectorscope provides visual feedback on the distribution of stereo images. A narrow vertical pattern indicates mono content, while a wider horizontal spread shows stereo width. Engineers watch for lopsided patterns that reveal balance issues between channels.
Mid-side processing requires careful monitoring with vector scopes and correlation meters to maintain phase coherence and prevent cancellation. Most professional mastering chains include both tools running simultaneously. The correlation meter catches problems that might slip past visual inspection alone.
Goniometer readings help identify problematic frequencies before they cause translation issues. Engineers set these meters to display both peak and average readings for comprehensive analysis.
Monitoring In Mono And Multiple Speaker Systems
Switching to mono playback reveals phase cancellation and balance problems hidden in stereo. Elements that disappear or become significantly quieter in mono need adjustment before finalizing the master. Bass frequencies particularly require mono checking since many club systems and streaming platforms sum the low end to mono.
When mastering engineers monitor stereo width, they test on multiple speaker configurations to verify translation. Near-field monitors provide detailed imaging information, while far-field speakers reveal how the mix performs in larger spaces. Consumer-grade speakers expose balance issues that studio monitors might mask.
Checking at different listening positions confirms the stereo image remains consistent off-axis. Engineers move around the room to identify sweet spot dependencies. Width adjustments that only work in one position indicate problems requiring correction.
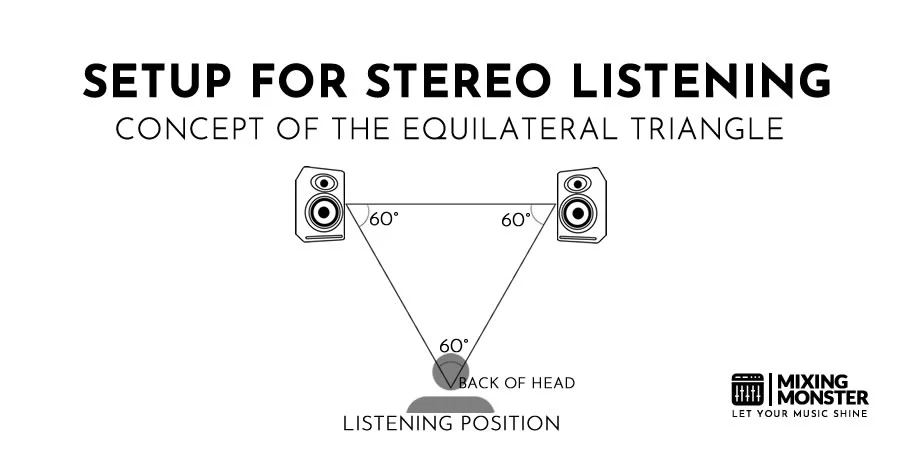
Headphones Versus Speakers For Width Decisions
Headphones exaggerate stereo width due to complete channel separation, making them unreliable for final width decisions. What sounds perfectly balanced on headphones often translates as too wide on speakers. Engineers use headphones primarily for detail checking and identifying subtle phase issues.
Speakers provide the cross-feed that occurs in real-world listening environments. The left ear receives some right-channel information, and vice versa, creating a more natural stereo image. This acoustic blending reveals how width adjustments actually perform for listeners.
Most mastering workflows involve checking on speakers first, then verifying details on headphones. Critical width decisions always happen on calibrated monitors in treated rooms. Headphones serve as a secondary reference rather than the primary decision-making tool.
Loudness Normalization And Streaming Considerations
Streaming platforms apply loudness normalization that can affect perceived stereo width. Services like Spotify and Apple Music turn down hot masters, which changes the balance between mid and side information. Engineers are masters at target levels matching platform specifications to predict post-normalization results.
LUFS metering combined with stereo analysis shows how width holds up after normalization. A master measuring -14 LUFS translates differently than one at -8 LUFS when both are normalized to the same playback level. The relationship between overall loudness and stereo information must be monitored throughout the entire mastering chain.
Advanced stereo width techniques must account for the codecs used by streaming services. MP3 and AAC encoding can affect stereo information differently than lossless formats, making it essential to check encoded versions before release.
9
Key Takeaways For Stereo Width In Mastering
A professional audio engineer approaches stereo width as a refinement tool rather than a corrective measure. The goal is always to create a wider mix that remains cohesive and powerful. The mix should already contain a solid stereo image before professional mastering begins.
Critical Points to Remember:
- Preserve mono compatibility - Any width adjustments must translate well when summed to mono
- Focus on high frequencies - Widening high-frequency content is more forgiving than mid-range changes
- Keep low end centered - Bass frequencies should remain mono to prevent energy imbalances between channels
- Use subtle adjustments - Small incremental changes prevent drastic alterations to the original mix balance
Every enhancement to stereo width comes with trade-offs. Increasing side information can diminish the presence of centered elements, such as vocals or kick drums.
The mastering engineer evaluates whether the stereo image needs any modification. Analyzing the mix in stereo, mono, and mid-side modes reveals the actual distribution of elements across the sound field.
Elements That Affect Width Perception:
|
Element Type |
Typical Position |
|
Kick, snare, bass, lead vocal |
Center |
|
Hi-hats, harmonies, effects |
Panned/sides |
|
Reverb, modulation effects |
Stereo/wide |
Mid-range frequency adjustments require extra care, as many important elements overlap in this range. Changes here are immediately noticeable and can disrupt the balance established during mixing.
The side signal provides the perception of width in a master. Understanding what exists on the sides versus the center guides all width-related decisions during mastering.

Frequently Asked Questions
1
What techniques can be used to enhance stereo width during mastering?
Techniques such as mid/side processing and the Haas effect are common for enhancing stereo width. Mid/side processing represents the most controlled approach for enhancing stereo width during mastering. Engineers can independently adjust the center and side signals to widen the stereo field without affecting mono elements like bass and vocals.
Delay-based stereo expansion, often utilizing the Haas effect, creates the perception of width by introducing subtle timing differences between channels. This technique works particularly well on high-frequency content where the ear is more sensitive to spatial cues. This technique works particularly well on high-frequency content where the ear is more sensitive to spatial cues.
High-frequency range changes are more forgiving than mid-range adjustments when processing stereo width. Engineers often apply gentle widening to frequencies above 8kHz to create space without disrupting the core elements of the mix.
Multiband stereo imaging allows frequency-specific width adjustments. This approach prevents low-end phase issues while opening up the higher frequencies for a more spacious sound.
2
Which stereo widening plugins are recommended for mastering?
Professional mastering engineers commonly use dedicated stereo imagers and stereo-imaging plugins that provide precise control over the width parameter. Using a stereo imaging plugin with small incremental adjustments helps achieve balance and clarity in final masters.
Mid-side equalizers and m/s eq tools offer surgical control over the stereo field. These mid/side EQ applications allow for independent processing of center and side signals. These tools enable engineers to brighten the sides or tighten the center without affecting the entire mix.
Correlation meters and phase scope analyzers serve as essential monitoring tools during stereo width processing. These visual aids help engineers maintain mono compatibility while expanding the stereo image.
3
How can one achieve a balanced stereo image in a master without compromising the mix?
The mastering stage involves refining the existing stereo placement rather than creating new spatial relationships. Mastering refines the stereo field with subtle adjustments to ensure the song feels full without losing balance.
Engineers should analyze the mix in stereo, mono, and mid-side modes before making any adjustments. This listening approach reveals how the track behaves across different playback systems and identifies potential phase issues.
Increasing stereo width often leads to a change in balance as panned signals become more prominent. Engineers must ensure that enhancing the side signal doesn't drastically alter the center-to-side balance or bury important mix elements.
Every stereo width adjustment comes with trade-offs that require careful consideration. For example, boosting high-frequency side content may reduce the warmth and presence of a centered vocal.
4
What are the common pitfalls when applying stereo widening effects in mastering?
Excessive stereo widening creates phase problems that cause the mix to disappear or sound hollow when played in mono. Radio, smartphones, and many streaming platforms sum audio to mono, making mono compatibility a critical consideration.
Processing the mid-frequency range requires particular care, as many important elements compete in this range. Mid-frequency range changes should be handled with care, as it is often the most noticeable part of the frequency spectrum.
Widening low-frequency content below 150Hz typically creates an uneven energy distribution between channels. Bass instruments usually sit in the center of the mix, and spreading them across the stereo field weakens their impact and causes phase cancellation.
Over-processing the stereo image can fundamentally change the artistic intent of the mix. The mastering engineer's role is to enhance the initial musical idea rather than create a completely new sense of depth and width.
5
How does using an Ozone Imager affect the perceived stereo width in a mastering context?
Ozone Imager provides visual feedback via vector scope and correlation meters, helping engineers make informed decisions about stereo width. The plugin allows frequency-specific width adjustments across multiple bands.
The stereo width control in Ozone Imager ranges from completely mono to artificially widened, with precise percentage values for each frequency band. Engineers can apply gentle widening to the upper frequencies while keeping the low end centered and focused.
The correlation meter displays phase relationships between channels, indicating when processing pushes the signal toward potential mono-compatibility issues. Maintaining correlation values above +0.7 generally ensures the mix translates well to mono playback systems.
6
What should be considered when deciding the stereo field's depth in a master track?
Genre conventions significantly influence appropriate stereo width decisions. Electronic music often features wider stereo fields than acoustic recordings, which typically maintain more natural spatial characteristics.
The playback environment affects how listeners perceive stereo width. Tracks intended for headphone listening can accommodate more aggressive widening than those designed for speaker playback or club systems.
Engineers must evaluate whether the stereo image actually needs changes before processing. A well-balanced mix already contains appropriate stereo placement and may not require additional width enhancement.
Monitoring in both stereo and mono reveals how width adjustments translate across different playback scenarios. This A/B comparison helps engineers identify the maximum amount of widening possible while maintaining mono compatibility.